If you have been struggling to remove your old soap dispenser-you have come to the right place. Replacing your sink-mounted soap dispenser would be a rather easy repair if it were not for over-built fixtures of the past that used large finely-threaded brass nuts that were torqued tightly. I had actually tried to remove this once to see how big the hole was but abandoned the idea when I couldn’t get the nut to budge. Now I have to remove it. This repair barely warranted a write-up if I had not ran across one trick that made the repair MUCH easier. If you don’t believe me, check out these reader comments:
Oh, thank you thank you thank you! I have been fighting with this thing for hours, and I even went to the hardware store to get another tool. That still didn’t work. Then I looked and looked on youtube for a useful video. Nothing. Then I saw your repair. BANG. Done in 10 seconds! –Sara
Here’s another Grandma that you’ve helped! … Your trick worked in 10 sec. flat! … I am doing the happy dance. Thanks a million! –Diana
Honestly, you saved me countless more hours wrestling with this thing underneath the sink. Thank you! –Rick
How to Replace a Sink-Mounted Soap Dispenser Without Putting a Wrench on the Nut
Tools Needed:
Parts Needed:
- chrome soap dispenser
- Scotch-Brite Scrub Sponge
(to clean the sink before installing the new soap dispenser)
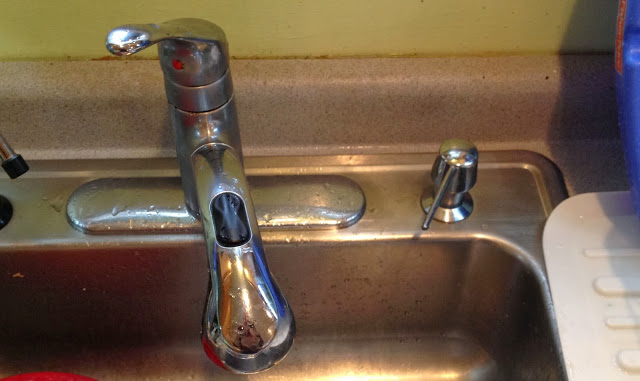
The only reason I’m replacing ours is because the tip has corroded to the point where it is very sharp:
 |
| The underneath side of the dispenser was corroded and very sharp |
Step 1: Pick a replacement sink-mounted soap dispenser.
You need to consider whether you want a nickel (brushed) look or chrome. Our sink (was) chrome but it looks a bit brushed with age but I went with a chrome soap dispenser from amazon.com (click for the product link) that had 171 reviews averaging 4.5/5 stars.
 |
| Delta RP1001 Sink Mounted Soap Dispenser |
Step 2: Remove your old soap dispenser.
The only thing that stands in your way is the nut on the back. Most modern soap dispensers have a nylon nut that is intended to be installed and uninstalled by hand but mine had a brass nut on it and was almost impossible to reach up there, see where I was working, and loosen the corroded thing:
 |
| The old soap dispenser with a tightly torqued brass nut (excuse the poor focus) |
Our cabinet has a shelf under the sink so it makes accessing this nut very difficult with the only tool I really have to loosen it, a channel-lock wrench:
 |
| The old soap dispenser under our sink (don’t ask what those two capped drains are sticking out of the wall–I didn’t plumb this house) |
I tried and tried but I couldn’t see the nut and reach my arms up in there to get the wrench on that nut and then it occurred to me that there was an easier way since I was replacing the current soap dispenser.
Step 3: The Trick—put a wrench on the top of the soap dispenser fixture.
Because we are throwing away the current fixture we can just put a wrench on the top of the fixture to break loose the nut. Turn it counter-clockwise to loosen:
 |
| The Trick–put your wrench on the top to break free the nut. |
Once I broke loose the nut by putting the wrench on the top I was able to unscrew the nut from below using my fingers. It was quite uncomfortable holding the top and unscrewing the nut from below at the same time but I have long arms–you might need to put a vice grip (or a friend) on the top to hold it still. There was a bunch of caked-on soap and corrosion on the threads so it made difficult turning.
Step 4: Clean the sink.
Before installing the new soap dispenser make sure to clean the sink around the hole:
 |
| Corrosion where the old soap dispenser was located. |
Carefully clean the area using a scotch-bright scratchy sponge (scrub in the direction of the grain on the stainless steel). Mine cleaned up nicely:
 |
| Nice and clean for the new soap dispenser. |
Step 5: Install the new soap dispenser.
Take off the bottle and then the nut. Make sure the rubber washer stays on top.
 |
| Nut removed from the new soap dispenser |
You only need to hand tighten the nut. make sure you put the flat side up (towards the sink bottom).
 |
| Underneath view of the newly installed sink mounted soap dispenser |
Step 6: Screw on the new bottle.
I tend to turn things like this backwards until I feel/hear the threads jump down (indicating you are ready to start) and then turn it tight. It helps you keep from cross-threading nuts. This bottle is pretty flimsy so you don’t want to tear it up.
 |
| The soap bottle installed |
Step 7: Fill with soap and finish the dishes.
The dispenser I purchased came with a funnel but I just shoot the soap straight into it without, no funnel necessary. You could take the bottle off and fill it but it’s a pain to get it back on and like I shared before, the bottle is not made of thick plastic so I would install it and leave it alone (and it should serve you just fine that way). Mission accomplished.
Amazon Associate Disclosure: As an Amazon Associate I earn from qualifying purchases. This means if you click on an affiliate link and purchase the item, I will receive an affiliate commission. The price of the item is the same whether it is an affiliate link or not. Regardless, I only recommend products or services I believe will add value to Share Your Repair readers. By using the affiliate links, you are helping support Share Your Repair, and I genuinely appreciate your support.
JOHN, YOU ARE AMAZING!!!! My soap dispenser stopped working at least 10 years ago and i went back to the ridiculous hand dispenser with its tipping over, constant refilling and its intolerable dripping! Someone said “in 10 seconds” and she was right…..after years of trying to get the old pump out, I would give up, then try again. 10 seconds, John, and everyone reading this. I now have my dispenser working properly and perfectly (but don’t use the small bottle the dispenser comes with, but get the kit that goes to a jug of soap in your cabinet. Thank you, thank you, thank you…..did I say THANKS? Amazing John!
What a wonderful note Helene! I’m so glad you were able to get that dispenser replaced and thank you for sharing about the “jug” adapter. That is a great idea and one I have not implemented at my house but I’m going to look into it!! Thanks for sharing your successful repair!!
John, thank you any yes Helene is correct it was less than 10 seconds after struggling to remove the brass nut for an hour. Again thanks for your tip.
So glad you wrote this and I found it tonight. My parents soap dispenser broke. My mom did her google research and told me I needed to lay under the sink and screw from the bottom. There was no way that metal thing was going to unscrew with barely any space to work with so she said it’s okay I’ll call a professional plumber to do it. I got up and went to my phone to do my own google reseach and that’s when I came across your article. After reading it I walked to the sink and was able to twist the top part off in seconds and the bottom part just fell down. Installing the new soap dispenser after that was super easy.
Good to hear. I almost didn’t write this article but when I thought of this trick–I thought I should and many people like you have stumbled onto it, which took something hard and made it easy–good job at finding a solution and getting the job done.
This was helpful! Fortunately I read this before I started. I tried first the normal way of trying to unscrew from the bottom, and when i realized it just wasn’t happening, I tried your suggested method. It too one simple twist with the wrench to loosen it up and then was able to fully take the nut off by hand. It didn’t even mess up by mounting unit had I wanted to keep it. I ended up throwing the old stuff away but keep in mind you might be able to use your method without messing up the old mounting unit. Thank you!
These are great suggestions, but I had two problems that could not be addressed by this repair. I thought I would share the eventual resolution here. The first problem is that while the impossibly tight brass nut wouldn’t turn, efforts to turn it did spin the entire dispenser assembly around. The second problem was that my old dispenser had a seam between the top decorative collar and the neck of the dispenser above it. So if one tried to ‘loosen’ the collar from above, it just spun freely and independently from the neck above and the threaded section below. After lots of intense and failed efforts to budge that brass nut from below and/or above, I abandoned that path. Instead, I was ultimately successful by CUTTING OFF the dispenser by running a wood/metal flush-cut blade between the neck and the collar, using a Dremel-like tool (actually a Rigid ‘JobMax’). This worked great, the dispenser was off in about a minute; I wish I’d gone this route days before. If you choose to/need to go this route, make sure to clear and block off the area and clean up very carefully, as there will be fine metal dust all around your sink – not good for a food prep area! I used cardboard ‘walls’ and then cleaned up with damp paper towels followed by sponges that would not be used for dishes. // Hope this is of some further help to anyone with the specific added challenges that I had. Thanks.
Thanks for sharing David.
Yep, this was useful. Even though I am not replacing the old one (just need to remove it to re-caulk the sink area), I was still able to make use of this advice. Gripping the top of the old stem above the counter with the vice-grips allowed me to turn it from above, which loosened the brass nut sufficiently for me to work it off the rest of the way. Since the top of the soap dispenser fits over the stem, there are no visible marks from the vice-grips.
Hi, so, I would like to know if anyone has ever mounted a soap dispenser from the bottom of a kitchen cabinet, so that it would be above the sink, hanging from the cabinet. Does a product exist for that? Or am I just barking up the wrong tree with that idea?
Wow, thanks so much. I really thought we would need someone to come in and do it. The soap dispenser had snapped off and left its remains inside the pipe.I loosened the top part with vise-grips, then my wife used regular old pliers to keep the top part immobile. I crawled under the sink, and that bad bad hex nut twisted off like it was Chubby Checker! Dude!
I had the exact issue and had no room for the wrench to turn when underneath the sink. The sink was in the way and the nut would not budge. Once I followed your advice, it literally took 10 seconds and the assembly and nut under the sink simply fell off. Thanks for saving my back and those “looks” from my wife. And my counters are granite and that was a non issue since I was using the channel lock on the metallic portion of the prior soap dispenser and not the granite.
Thanks for sharing David—good job at not giving up!
THANK YOU, John!!! <3
My issues was the bottle was behind the sink and between the sink and wall. Too tight to have any leverage or use a wrench. I removed the bottle from below, removed the dispenser from the top. I took one handle of a snub nosed, long handled wrench and stuck it into the opening on top. I was able to hold the dispenser in place while I unscrewed from the top. The nut underneath the sink finally fell off and I was able to replace the dispenser with one that has a long hose that goes directly into a large bottle of soap under the sink. No more having to refill from the top. Simply remove the large bottle when it is empty and replace it with another filled bottle. Soemone has to design this soap dispensers to be attached from top so they canbe easily removed when they fiannly break, which they will.
Unless you mean use the channel lock wrench on the top to break it off, this didn’t work for me. You see, the nut and the threaded part of the dispenser have melded together, so I can rotate the top part to my heart’s content without solving the problem. I’ve applied WD40 under and over to see if that does anything. This whole thing makes me wonder what kind of cruel person invented this mechanism? Metal on metal in a wet environment, gee I wonder why that would be a problem. Duh.
Did not work for me. The area underneath the sink is too tight a space to get any grip on the soap bottle. Next will be finding a sink the fits the shape of my sink so I can replace it. Good luck as the original manufacuturer no longer makes that shape any longer.
Worked like its stated and saved me tons of time and a trip to the chiro for an adjustment!
Hi John, thanks for the quick response. I would need a second person to do the replacement. Someone needs to come up with a better way to attached these under counter mounted soap dispensers, maybe a twist and click version. I know once I move I will not use these types of dispensers again.
What if the soap dispenser sits ontop of a granite counter stop? Will using this method damage my countertop? This procedure needs to have 2 people to be successful for me as I have a garbage disposal pipe blocking me from getting completely under the sink.
I wouldn’t have any reservations to using this method on a granite installation and you don’t need 2 people. Granite is pretty robust. You will be installing another soap dispenser over the old installation anyway.
I’ve wanted to change-out my mother’s dispenser for ages but it’s tucked way up behind a deep sink bowl; you can’t even see it. Long story short – I gave up. I knew I’d cause big damage trying to fix small damage. Your fix is massively appreciated.
Great to hear you were able to get it changed out. Thanks for sharing.
OK!!! I’ve been STRUGGLING to get the nut off of my soap dispenser for DAYS. Thought I’d have to pull out my Dremel and cut the dispenser at the top itself off!! Ready this article, took my all of 5 minutes to get the old dispenser off and install the new one. All I can say is, THANK GOD for this article. LOL.
Thanks for the note Marcus and thanks for hanging in there and overcoming!
Thank you! This really helped when nothing else would!
Oh good, thanks for leaving a note David.
My friend, tips like this are what make the Internet great. I had a nylon screw that would not budge because of 25 years of soap build up locking it on. A quick google search, found this tip, grabbed a pair of pliers, 2 seconds later the lock was broken and screwed off the rest by hand. Thanks for taking the time to share this tip for the home repair neophyte.
Thanks for the Feedback Martin. I originally hadn’t planned on writing about this repair but when I figured out that trick, I wanted to share.
Do you think I can remove the soap dispenser altogether and replace it with the hose and nozzle sprayer that comes with a new faucet?
Yes you can but your faucet needs to be designed to go with a sprayer. I would alternatively recommend you keep your soap dispenser and purchase a kitchen faucet that has a pull-out sprayer built in–they are so much nicer than the separate ones.
I decided to hook a hose up to a large bottle of soap below my sink. Long story short, after I realized my current soap dispenser wouldn’t work with the set up, I tried every tool in my house, I made multiple trips to the hardware store trying to get socket wrenches to fit the underside of the soap dispenser, and finally I decided to use ol’ google and sure enough, I found your suggestion and it worked like a charm! I had just enough time to cancel my basin wrench I ordered online and swapped the soap dispenser and hose system out, now it works like a charm! I was really about to give up!
Glad to hear Michelle. I was in the habit of writing up ALL my repairs when I put in that soap dispenser but it should be rather trivial until I ran into the extremely hard to reach nut and when I came up with that solution I decided it was share-worthy and from all the great feedback like yours I get I’m so glad I did. Good job on persisting and finding a solution!
How did you BREAK the nut?
I’ve got the bottle off..but I don’t understand how you actually BREAK the nut.
I think there is a misunderstanding… I say “break free” the nut, i.e. loosen enough so it can be easily turned. By putting the wrench on the top of the fixture you can turn the top, breaking free the nut on the bottom, and then it can be turned by hand and removed.
Will this work if dispenser is installed in s quartz countertop?
It should work just fine, the countertop material should not matter.
Your tip about using the channel lock pliers on the piece above the sink gave me the confidence to do what needed to be done. I had started trying that myself, after futile attempts at removing the rusted locknut underneath with a faucet wrench, but had been afraid I’d damage something. Just forcing it, wiggling it, clearing away the crud and then having another person hold the loosened upper unit firmly with the pliers while I scrunched underneath the sink and turned the lock nut by hand (the most versatile tool of all) got throb done. Thanks.
Thanks for the comment Mark. I’m glad you were able to get your soap dispenser changed out.
Great advice on removing soap dispenser. Thank you
Chuck
Thanks Chuck! You are welcome.
After 2 days of buying tools and trying everything I could find in the garage, I found this amazing article. God bless you!!!You’re amazing. Yomna
Great to hear, thanks for the feedback!
Yep. Worked great. Smart idea. Saved me time and effort!! Thanks you for posting.
OMG it worked. I tried to replace the soap dispenser several weeks ago and could not figure out how to get that thing off. I gave up then but was determined to get this job done. I read your instructions and they worked. The only issue I ran into was the pipe threads had some rust further down and got struck. I soaked it in WD40. I held the bottom nut still and my husband turned the top. It came off. The new one is on and works great. Actually looks better made. Thanks so much for the tip.
I’m glad you were able to get it replaced Patricia–good work on being persistent.
Thanks for posting your tip. It worked wonderfully after wrestling with it for quite a while.
Great to hear–good job on not giving up and finding a solution!
I seriously want to marry you right now.
Well, thank you for the compliment. My wife may have something to say about that though!?!?! I’m glad you were able to get your soap dispenser replaced!!
Worked like a charm – Thank you
Great to hear, thanks for the comment and good job on the repair.
John
Here’s another Grandma that you’ve helped! There was just no way to get a grip on that darn hex nut. I’ve had such good luck lately finding what I need to know on the internet, so I gave it a try. Your trick worked in 10 sec. flat! I just kept upward pressure on the old fixture while turning counter-clockwise and the hex nut dropped right off. I am doing the happy dance. Thanks a million!
Thank you for sharing Diana–I love hearing from people who were helped. Good job on fixing your soap dispenser!
Honestly, you saved me countless more hours wrestling with this thing underneath the sink. Thank you!
Thanks for taking the time to share Rick–I’m glad I was able to be of assistance.
Thank you!!!!! You are a genius and a wrench worked. Now to purchase a new one and I will be back for the install instructions.
You are very generous. Thanks for taking the time to leave a comment. I’m glad I was able to help.
Thank You Thank You Thank You!
I too spent hours trying to find the tool or method to get that nut off, had no success until I found your method. Thanks so much, it took 30 seconds !!!! Place a vice grip on the dispenser, turn left, broke the nut, blocked the vice grip wrench on top , went under and turned the lock nut with my finger counter clock wise. Again, thanks and have a great day.
Thanks for taking the time to share Ken–I’m glad to have helped.
John,
I did it!!! Thanks for your help! How many women have you helped complete this difficult job?! I’m so grateful. Perseverance and determination always pay off!
Have a great weekend and Happy Father’s Day if you are a Father.
Thank you.
That is so good to hear Katie, I’m glad to have helped. Will you please share with everyone what exactly it was that helped you remove your old soap dispenser?
I’ve only been able to get the metal cover off the top. Now it’s plastic that I’m twisting and it just doesn’t want to come loose.
Hi,
I followed your instructions but I just can’t get this loose. I twist and twist counter clockwise but it just spins. It’s locked so tight under the sink that it’s just not giving. I the nut is so tight and thin under the sink that I can’t get a tool around it.
I’m ready to pull my hair out.
Help….
Thank you for your question Katie. Have you unscrewed the bottle from bottom of the soap dispenser as I describe in Step 2? You could possibly use a screw driver to hold the nut in place on the bottom and then turn it as I suggest by gripping the top of the fixture. See if there is something you can do to hold the lower nut still while turning it from the top. Let me know if that works for you. Hang in there Katie.
Oh, thank you thank you thank you! I have been fighting with this thing for hours, and I even went to the hardware store to get another tool. That still didn’t work. Then I looked and looked on youtube for a useful video. Nothing. Then I saw your repair. BANG. Done in 10 seconds!
That’s awesome Sara, thanks for taking the time to leave a comment. I am glad I was able to help.
Thank you so much. .it worked to grip top part and turn that with channel grips and hold nut steady under sink.(took two of us) .after many tries in vane I finally found your help online to be my answer! Grateful grandma! !
Ginny, I’m glad to have helped a grandmother. Thank you for sharing!
Thank you so much. This really helped get the old dispenser out!
Patricia, thank you for the feedback. You know, I try not to post an article unless it adds something useful and I wasn't going to write about this repair until I had such a hard time getting that nut loose on the underneath side. When it dawned on me that I could just loosen it from the top side I figured it was good enough to share–I'm glad it was able to help you! –John