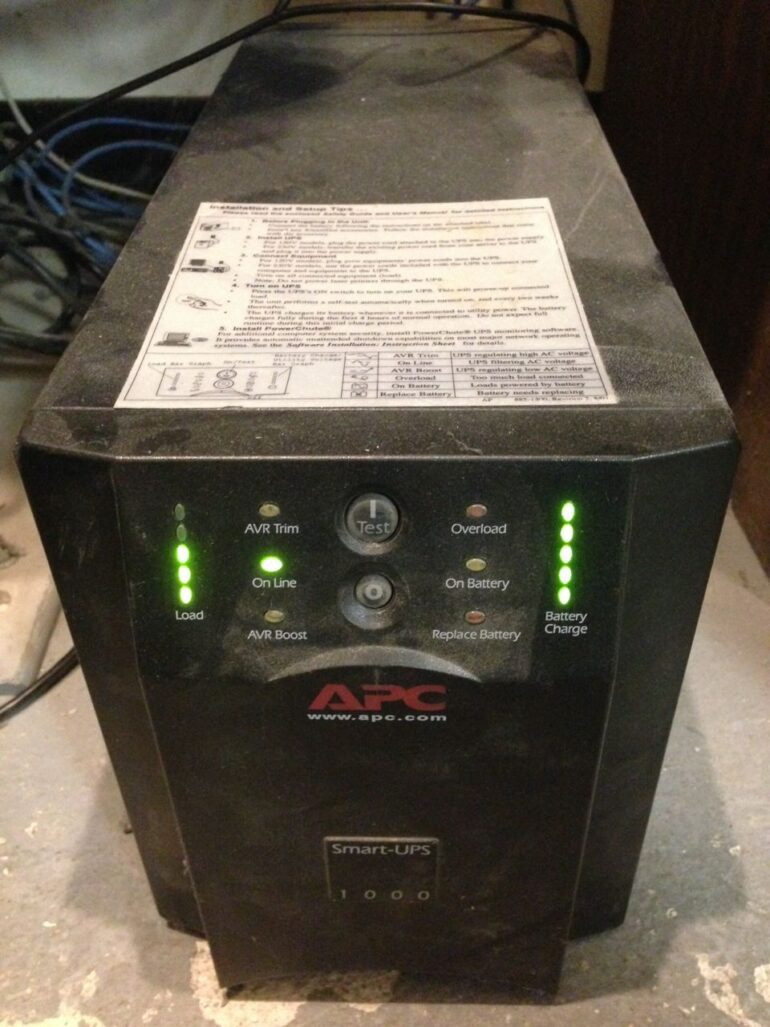
How to Replace Batteries in APC Smart-UPS 1000
Hardware:
- APC Smart-UPS 1000, Model: SUA1000 (the closest current model can be found here
)
Parts Needed:
Tools Needed:
- Phillips Screw driver (if you need a set of screwdrivers, get them here
)
Step 1: Unplug the Smart-UPS from the wall.
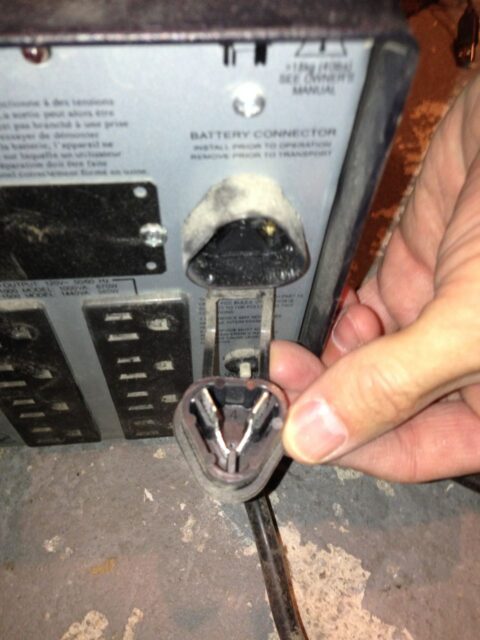
Step 2: Disconnect the batteries.
There is a disconnect plug on the back–it is a triangular piece of plastic with an exclamation point on it. Pull it out. Note: it is tethered by a piece of plastic.
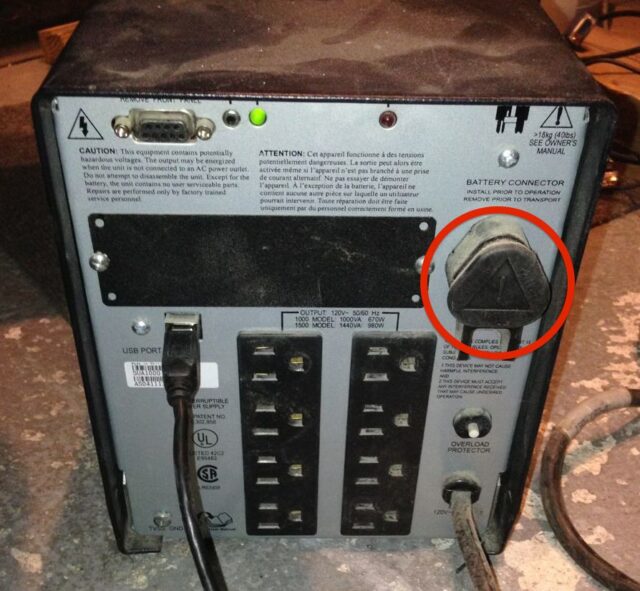 |
| Battery disconnect |
Step 3: Pop the front face off.
There is a place to grab on each side of the UPS on the sides towards the top for you to get a hold of the face to pop it off. This front panel pops on and off a lot like many car interior panels with a spring tab that fits into a slot–there are 4 of these that hold this front face on the APS. Note: there is a ribbon cable that connects the front face to the UPS so be aware of that when you are removing the face.
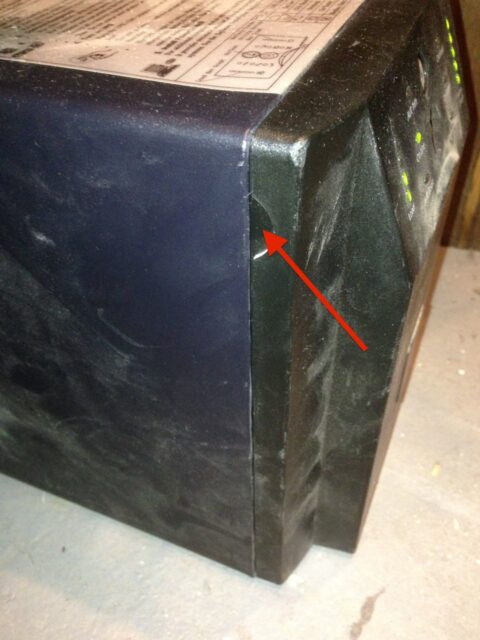 |
| There’s a place to grab a hold of the front panel on each side |
 |
| The red arrows point to the spring tabs that insert into 4 slots in the front of the APC |
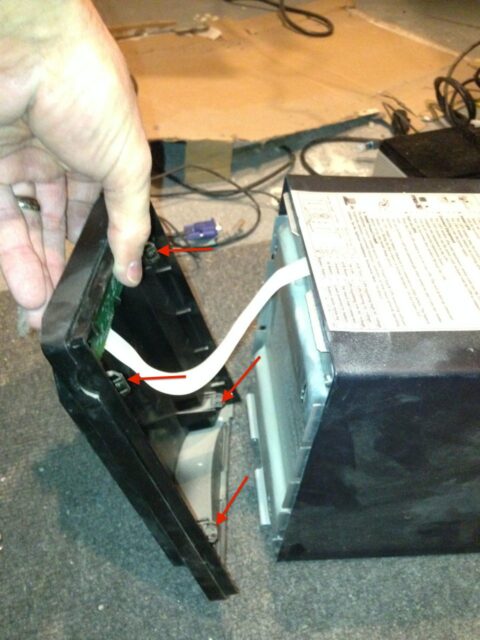
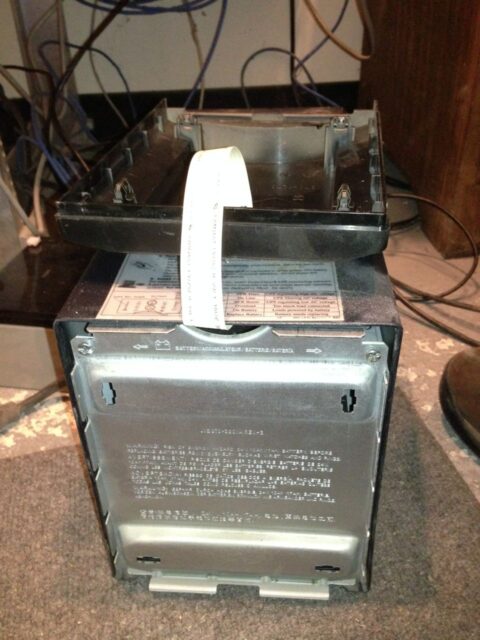
Step 4: Lay the front face up on top of the UPS.
There is plenty of ribbon cable to do this:
 |
| Lay the front panel on top of the UPS, watch for the ribbon cable |
Step 5: Remove the two phillips-head screws at the top corners of the battery compartment door on the front.
Set them aside for you will need to put them back in when you are re-assembling the unit.
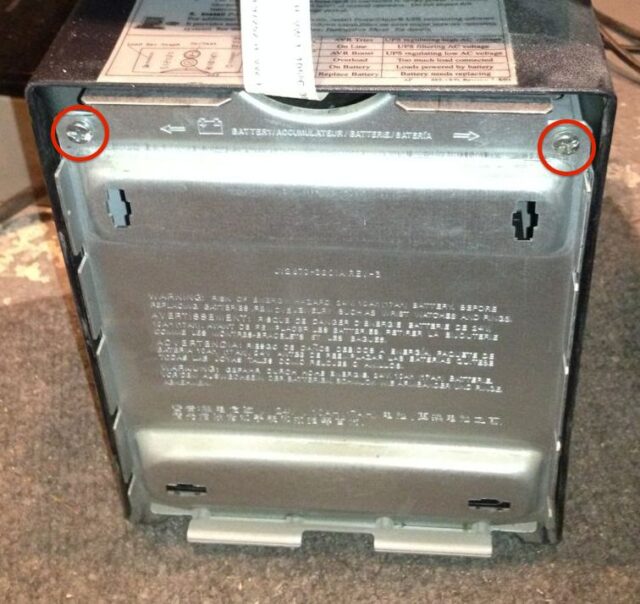 |
| Battery compartment screw locations |
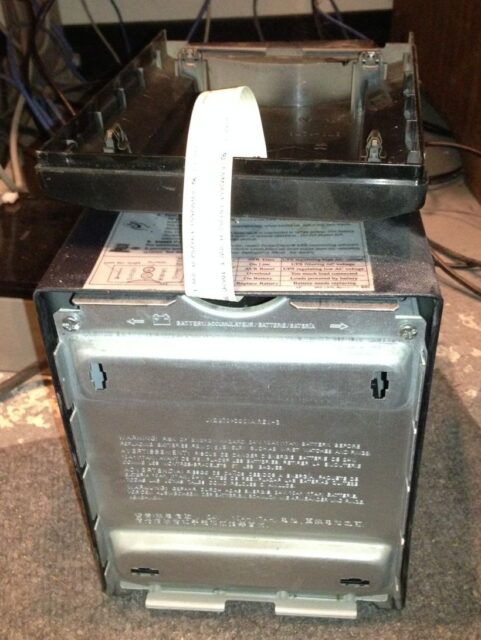
Step 6: Lay the battery compartment door down.
It is connected/hinged at the bottom edge and you do not need to remove it.
 |
| Battery compartment door open |
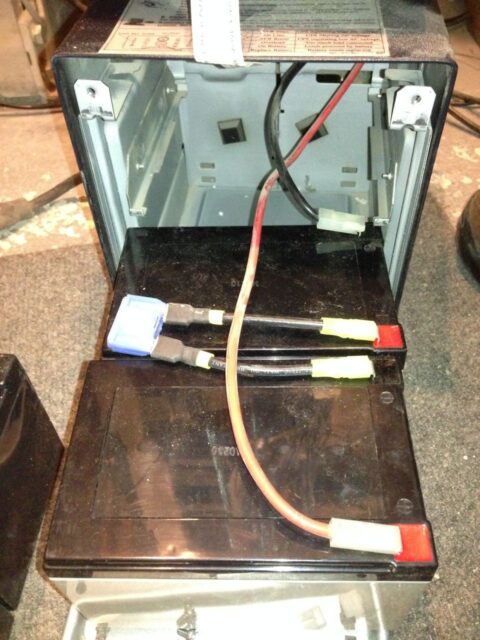
Step 7: Slide the batteries out.
Be aware of the battery cable length–I was able to slide them almost all the way out. To slide them out I reached in and put my fingertips in the seam between the two batteries and pulled them right out. The batteries that were in there were stuck together with some double-sided adhesive.
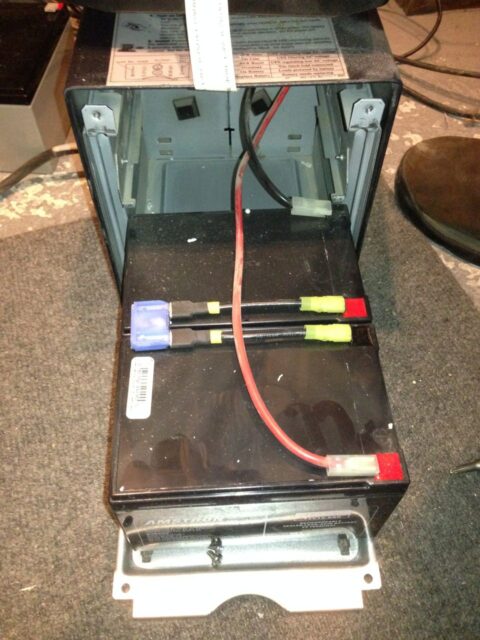 |
| The batteries have been slid straight out |
Step 8: Disconnect the positive, negative, and the jumper between the batteries.
For this APC the connections just slide on/off. Note that both batteries are oriented with their positive terminal toward the front. This is called a “series” connection–the two batteries’ voltage adds up. The jumper in the middle was stuck to the batteries but you can just pull it off:
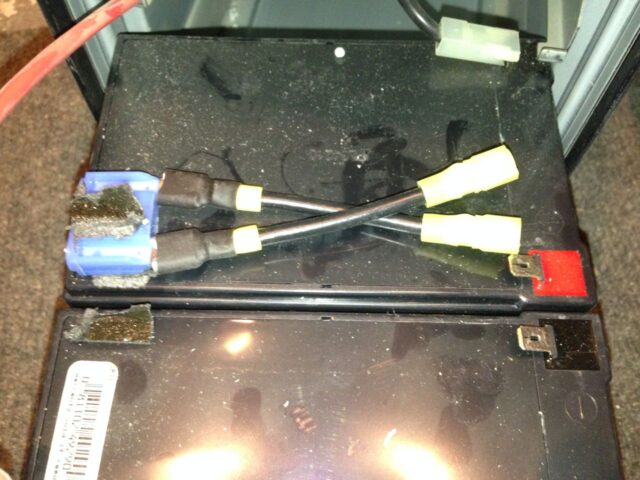 |
| Jumper was stuck to the battery case–simply pull it off |
 |
| Here the old battery, disconnected, with the new batteries ready to install |
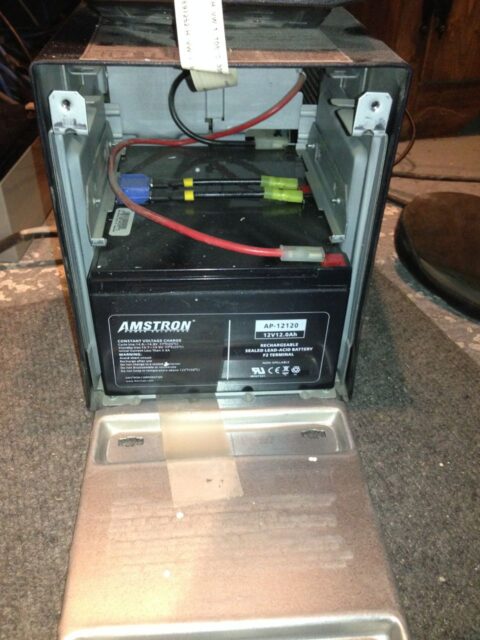
Step 9: Orient the new batteries on the metal door in the fashion seen in the picture above and connect the new batteries.
From top to bottom the terminals should go: black, red, black, red. The jumper that goes between the two batteries doesn’t matter which end goes on which battery but mine was adhered to the battery so I could see which end used to face down. Here my new batteries are re-connected:
 |
| New batteries re-connected |
Step 10: Slide the batteries back into the UPS.
 |
| Here the new batteries have been reinstalled |
Step 11: Close the battery compartment door and reinstall the two screws.
I had a difficult time lining up the front panel so I could reinstall those screws so you’ll need play around with the front panel to get it to work.
 |
| Here the screws are reinstalled |
Step 12: Place the front panel back in place and snap back on.
You should be careful to feed the ribbon cable back in the hole where it comes out. I got the front panel to snap back on by tapping it with the palm of my hand.
Step 13: Re-connect the batteries.
Reinsert the triangular plug you pulled out in Step
 |
| Reconnecting the battery disconnect jumper |
Step 14: Reconnect everything.
Plug in the devices you had connected to the UPS, your USB monitoring cable (if you had that connected to your computer), and you are ready for unexpected power outages again.
All my APC Battery Backup Posts:
- How to Replace the Battery in a APC Back-UPS ES 500 Battery Backup
- How to Replace the Batteries in a APC Smart-UPS 1000
- How to Replace the Battery in an APC Smart-UPS 1500
- How to Permanently Disable the Beeping Alarm on an APC Back-UPS ES 500 Battery Backup
Amazon Associate Disclosure: As an Amazon Associate I earn from qualifying purchases. This means if you click on an affiliate link and purchase the item, I will receive an affiliate commission. The price of the item is the same whether it is an affiliate link or not. Regardless, I only recommend products or services I believe will add value to Share Your Repair readers. By using the affiliate links, you are helping support Share Your Repair, and I genuinely appreciate your support.
Same basic procedure as replacing the 750 I did last year. Then it was recommended to allow the new batteries to charge for minimum 8hrs with 40% or less load and run a test before trusting them to the full load. Is this not an issue with the 1000 model?
Thanks for the question Holly. I am unaware of the break-in procedure. Did you do the same thing when it was brand new? The same principle would apply. Disclaimer- I didn’t read any of the instructions, I was just figuring out how to replace the batteries.
Good question, John! I don’t know what was done when the backups were first installed. I did give these new batteries 12+ hours to charge as they were only showing 2 out of the 5 battery charge lights when I hooked them up. Seem to be running fine and even at only 2/5 charge worked fine for the self test. All 5 lights lit and normal load hooked up. The instructional video I watched for the 750 earlier in the year recommended doing the charge as even “new” replacement batteries will never have a full charge on them. Seems logical to start with a fresh charge, so I have done it. Just takes some planning and time.
Very nice and helpfull step by step procedure.
Thanks a lot !
I had sowllen batteries too, but not enough to be completely stuck.
By the way my APC Smart UPS has a LCP display panel and 4 command buttons in front instead of your model.
But there’s not difference in the procedure.
Thanks for sharing the update.
You are exactly on it. No more indecision in my mind.
I learned right knowledge here.
APC (which is nothing else than French Schneider) is not providing the minimum manuals to use its products.
Thank you John.
Please correct my approximate English
@John Mueller
Your synthesis is instructive.
So, you seem top admit the onduleur (UPS) always indifferently works on 12 or 24V ; it’s the point which confuses me : I used to deem any device ready for one voltage, not for several without doing change in the hardware ??
Thank you for the precious link.
Please correct my approximate English
Roland Paingaud
I was not suggesting you could run a UPS designed for 24V on 12V. They are only designed for a single voltage, in this case 24V.
Clear !
Thank you.
But I’m surprised the batteries are in series connection, not parallel.
Then, if each battery has 12V tension, the onduleur is on 24V !!!
Which is not the rule, I guessed ?
Please correct my approximate English.
Roland Paingaud
Thanks for the question Roland. It is better to have higher DC voltage and I found a great discussion on this subject here. I’ll summarize as follows: Power = Current x Voltage (P=IV). If your voltage is half, your current must be double, just to get the same power (P=2I(V/2)). Batteries have internal resistance and doubling the current, to get the same amount of power, doubles the resistive losses and lowers the efficiency (shortens the life) of the system.
Yep! It’s that easy…unless the battery case has swollen. SInce the receptacle is quite tight the battery was stuck inside and I had to remove the case to PUSH it out of it. And, btw, you don’t need to connect/disconnect the triangular plug to change the battery, it is only there for regulatory concerns about the transportation of the unit.