The cassette player in my 2004 Toyota Sienna quit working some time ago. I don’t ever listen to cassettes anymore but I do use a Cassette Adapter to listen to my iPhone over the stereo so I was missing that quit a bit. I had already replaced the stereo with another used one and wrote up how you can do that here:
The cassette player on the old one still worked so I decided to just swap out the cassette player portion of the stereo with the old one and I have written how you too can do that here:
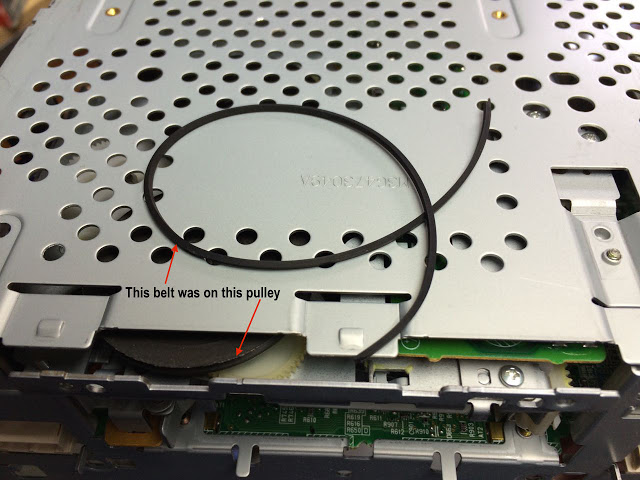
I got curious, as I often do, as to what went wrong with the cassette player so I took a closer look and quickly could tell that there was a broken belt. I later decided I wanted to find a replacement belt and fix it, just so I could share how you could do it and if the newer one broke on me too, I’d already have a working replacement. Check out my two other posts above to learn how to remove the Sienna’s stereo and to remove the cassette player from the stereo. Once you have done that you can begin to repair it. If you have the same issue as me, a broken belt, follow along and repair yours too.
How To Replace Cassette Drive Belt on Toyota Sienna 2004-2010
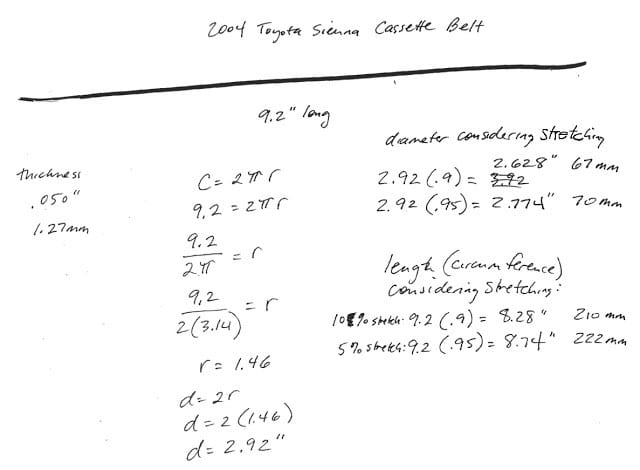
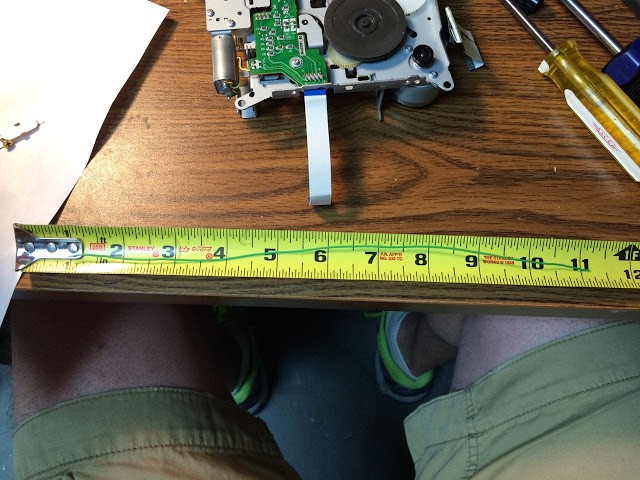
If you have the same model as I do you won’t need to do this because I have done it for you. I laid out the belt and measured its length. My belt measured approximately 9.2″ long. I read that you should take into consideration 5-10% stretching. 5% stretching would give me an original belt length of 9.2*.95=8.65″ On the long end, or 10% stretching would give me an original belt length of 9.2*.9=8.28″ long. The thickness of the belt measured around .050″.
Calculating the length of the replacement belt I’ll need
Step 2: Shop for a replacement belt.
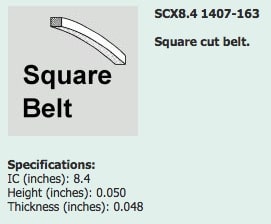
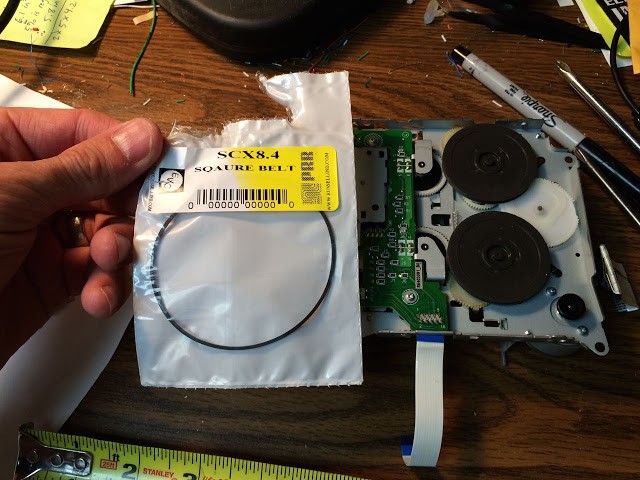
I had a difficult time finding a .050 square belt the correct length. Finally I found a belt at V-M Audio Enthusiasts. I decided upon a .050″ square belt 8.4″ long, which is half way between the 10% stretching and the 5% stretching lengths I came up with above (and was an available size at .050″ square). You can find the belt here.
Cassette Drive belt 8.4″ in Circumference and .050″ square
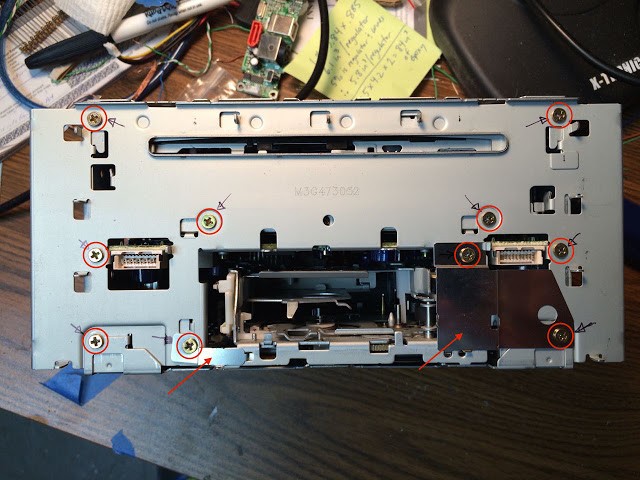
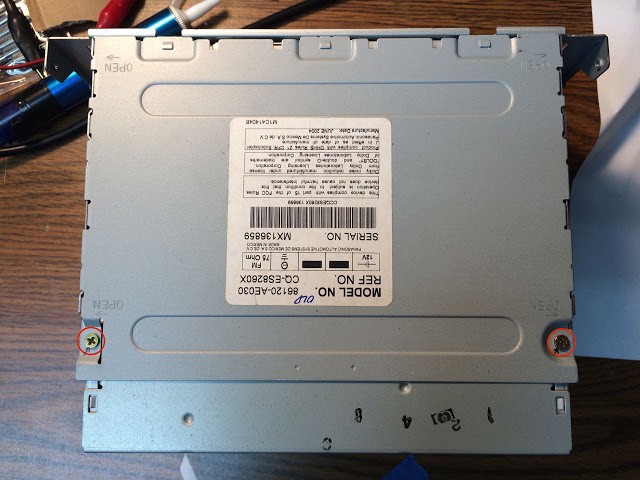
Step 4: Remove all 10 screws from the front of the stereo.
I’ve circled all the screws in the picture below. There are also two thin metal pieces that will come free was well (see the arrows):
Remove all the screws from the front of the stereo, keep track of the two metal covers that come free as well
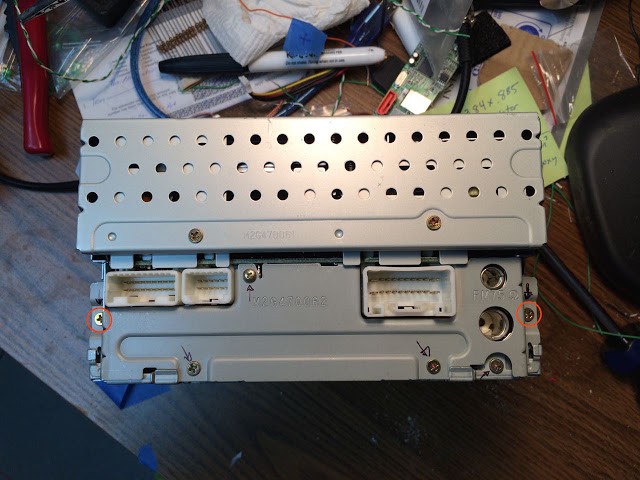
Step 5: Remove the 6 circled screws from the back of the stereo.
You may want to take note of which ones are flat faced and which ones are round. The top middle one is round:
Remove the 6 circled screws from the back
Step 6: Remove the two screws on the back of the top metal plate of the stereo.
There are only 2 screws on the top plate, circled below:
Remove the two screws from the top metal cover
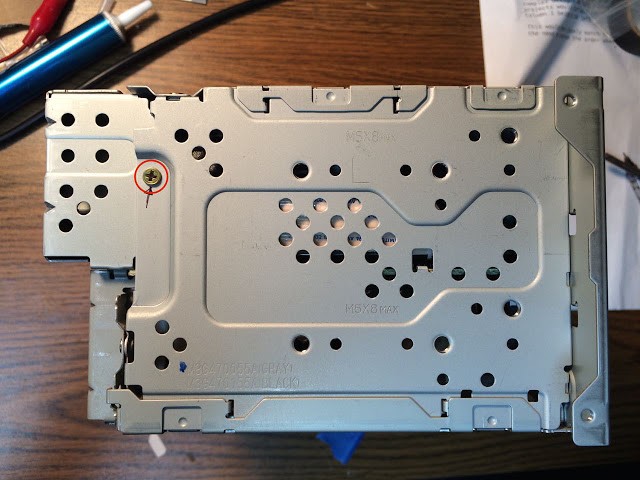
Step 7: Remove the single screw from the left side:
There’s only one on the left side:
Left side of the stereo only has one screw, remove it
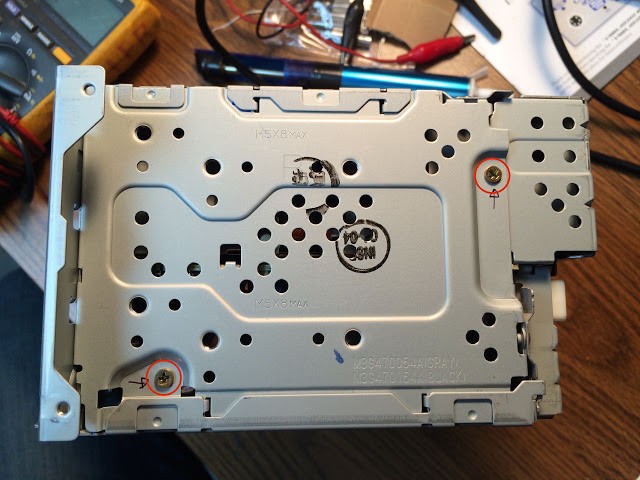
Step 8: Remove the two screws from the right side
They are circled in the picture below:
Right side has 2 screws, remove them both
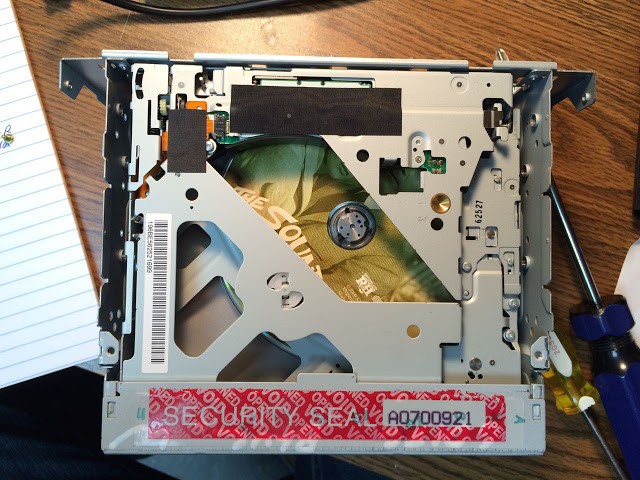
Step 9: Remove the metal cover off the top of the stereo.
To remove it just lift it straight up. This is what you’ll have once you remove it (note that the Sound of Music soundtrack CD is still in the changer):
Top cover removed
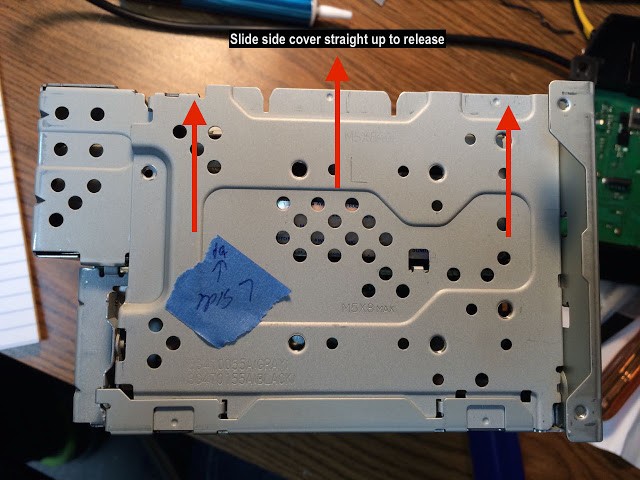
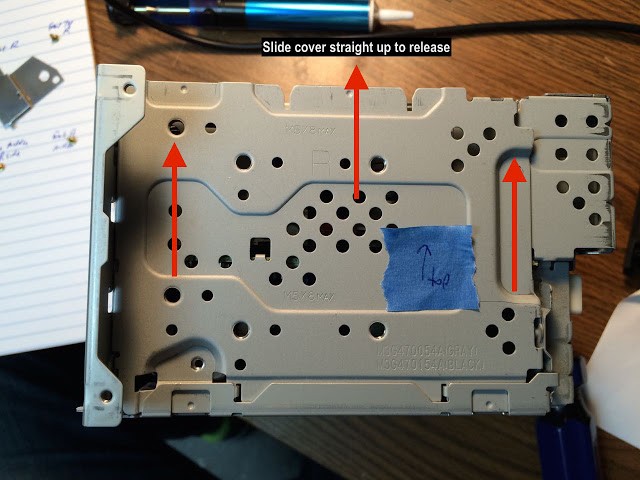
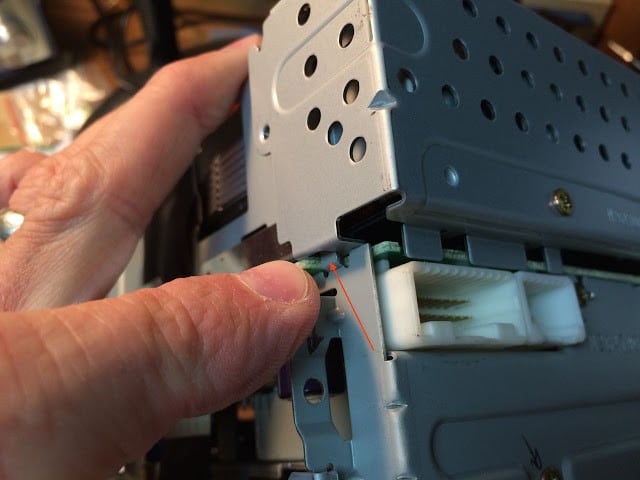
Step 10: Remove the left and right sides of the assembly.
The sides slide straight up and out of the unit. They “lock” the two parts of the stereo together when they are in place. Carefully lift them both up and out:
Slide the left side straight up to unlatch it, and then remove it
Slide the right side straight up to unlatch it, and then remove it
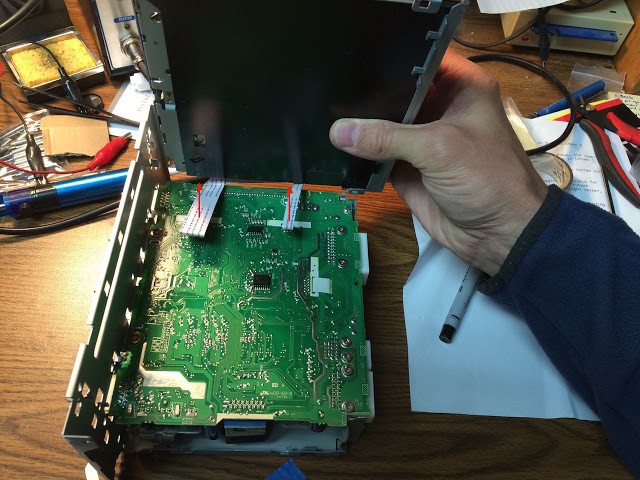
Once you have the sides removed be careful because the CD changer will be loose, except for two cables.
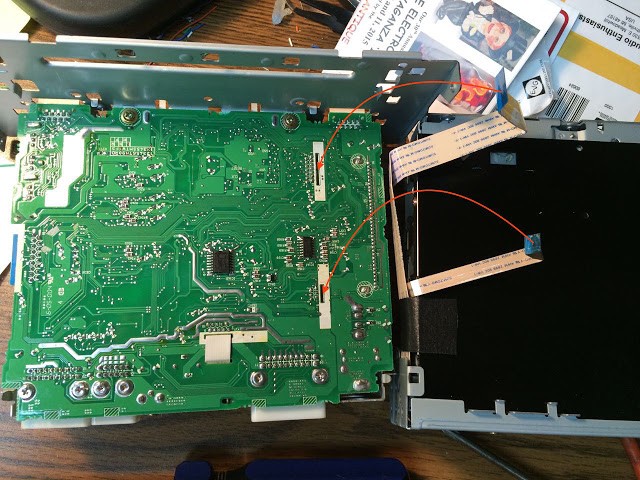
Step 11: Lift the CD changer up and off the assembly and disconnect the ribbon cables.
The ribbon cables are just pushed into a connector and come out easily if you gently pull them straight up as illustrated below:
Pull the two ribbon cables straight up to release them
Set the CD changer aside.
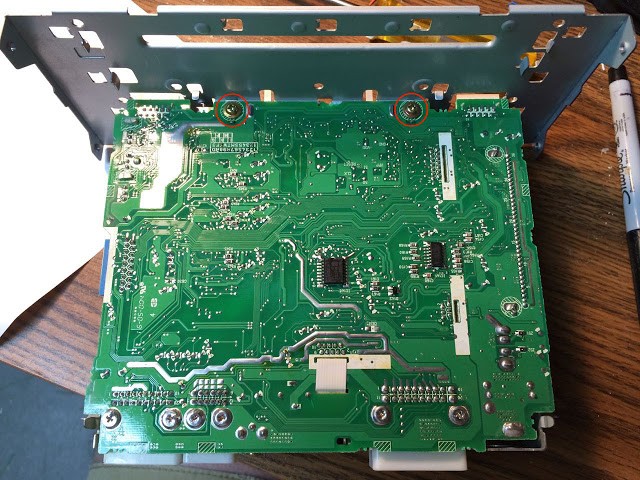
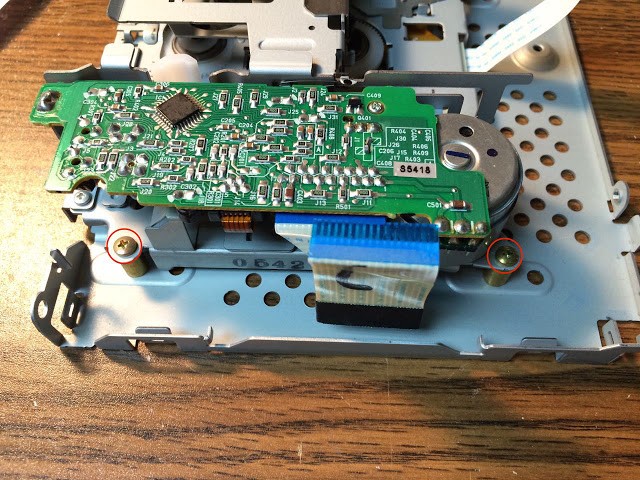
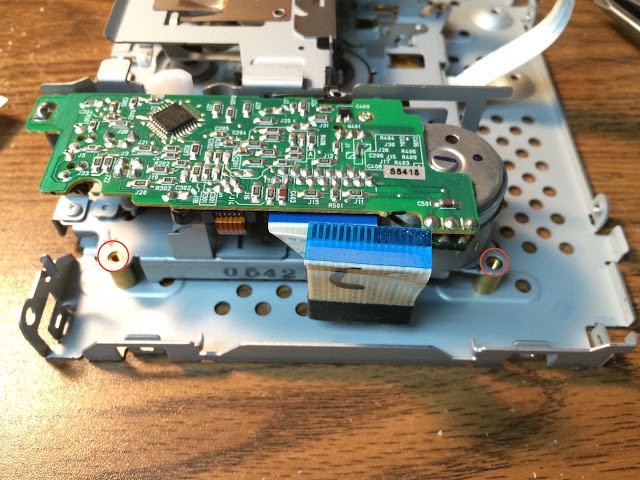
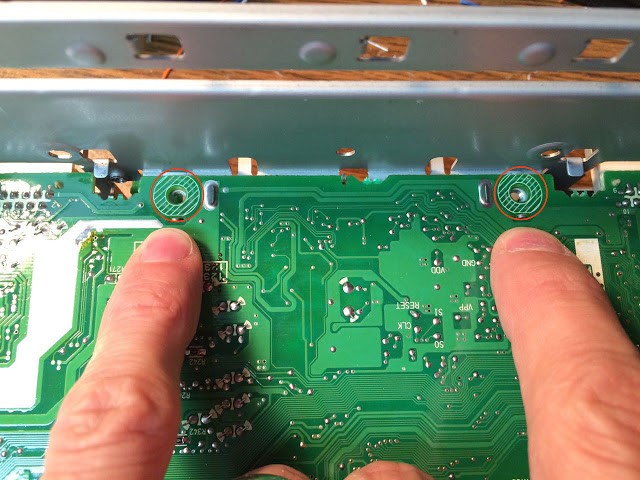
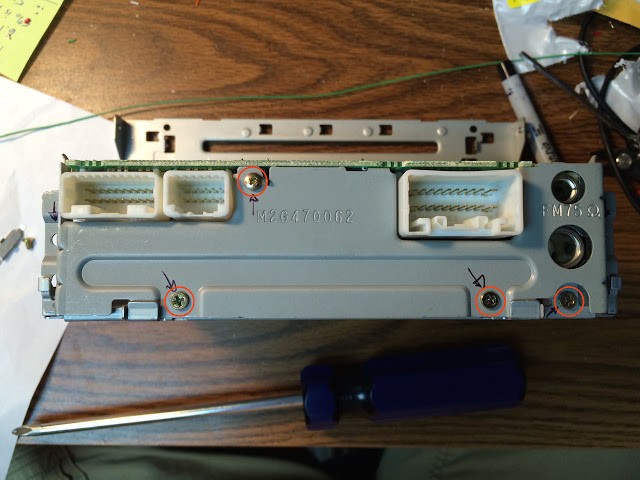
Step 12: Remove the two screws towards the front of the circuit board on the cassette player module:
Remove the front two screws from the cassette player circuit board
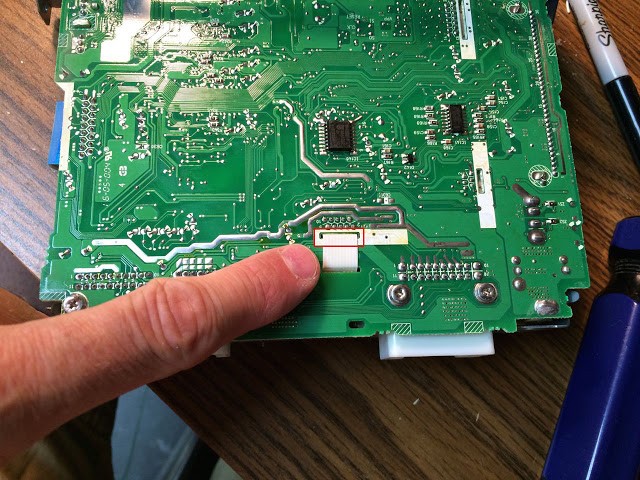
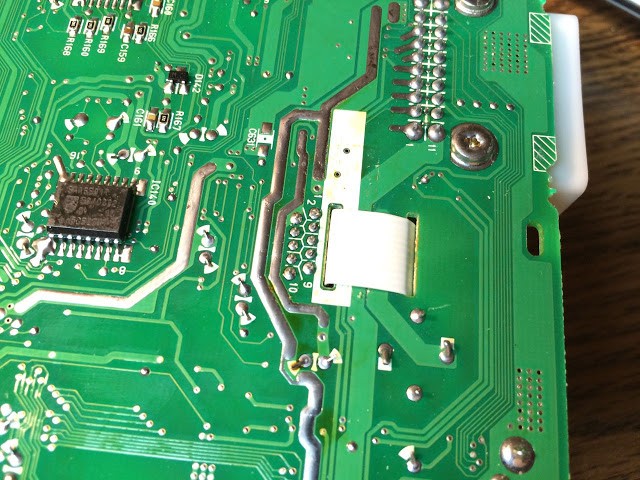
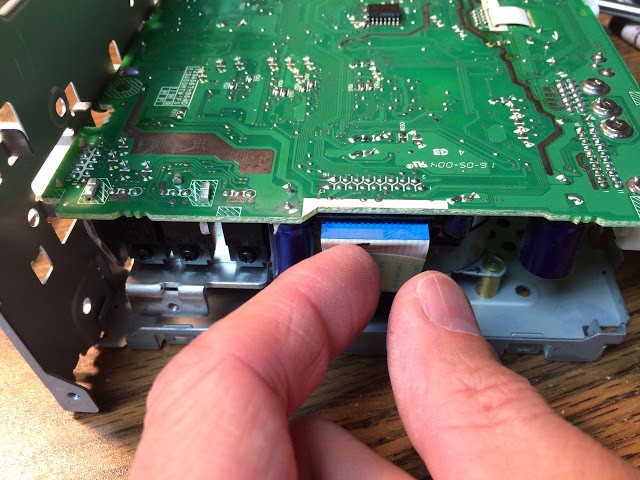
Step 13: Disconnect the two ribbon connectors from the cassette player circuit board.
They both pull straight out without much effort and are held in by friction. One is on the side:
Side ribbon
Pull it straight out (toward you in the picture):
Side ribbon disconnected
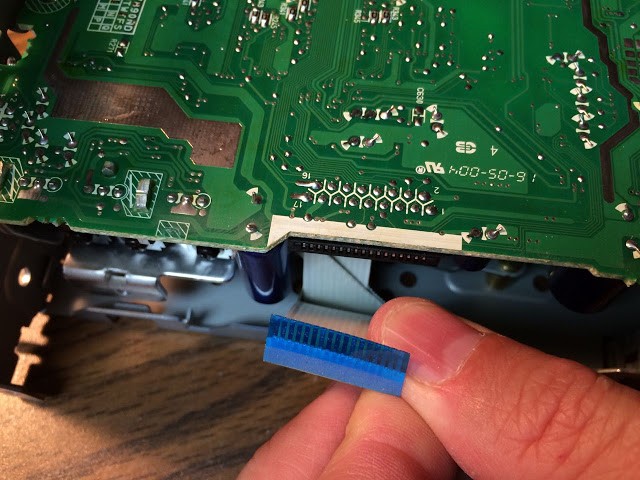
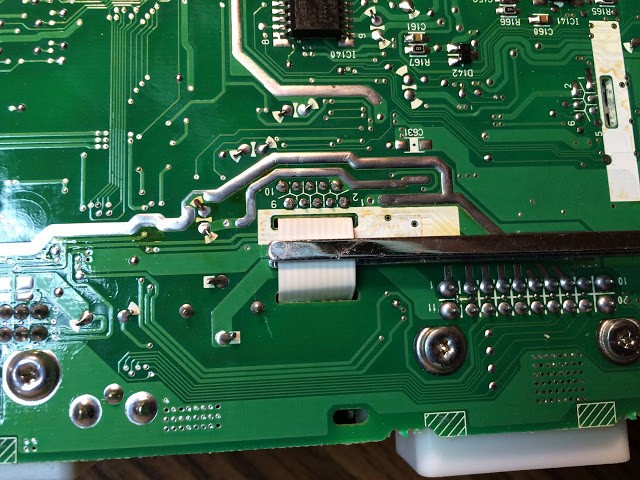
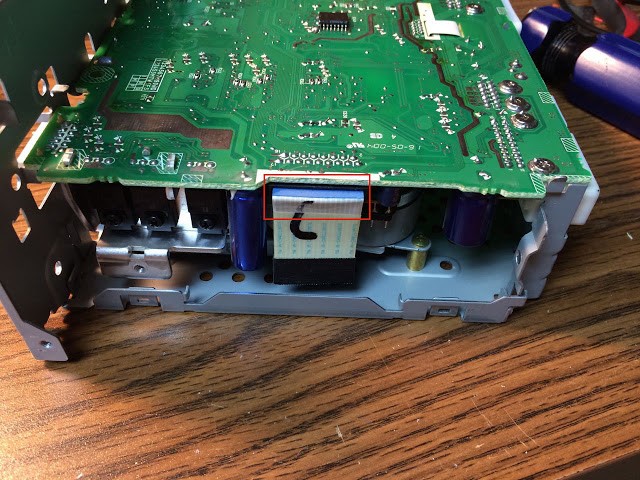
The back one comes through a hole in the PCB and then inserts down into the board:
Back ribbon connector
I slipped in a flat grabbing tool to pull it up:
Gripping the ribbon to disconnect it
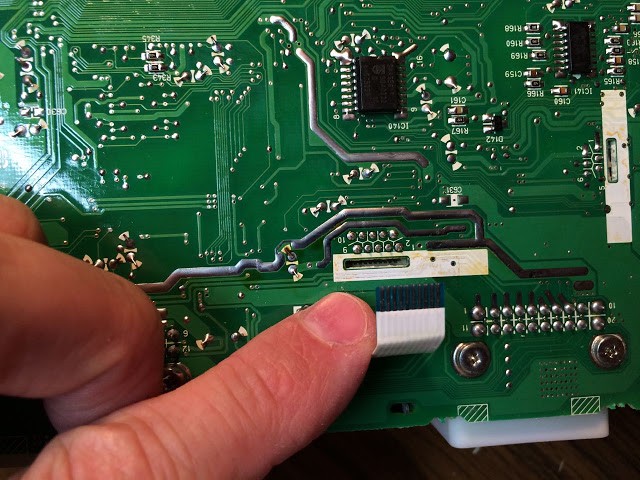
Here it is disconnected:
Back ribbon cable disconnected
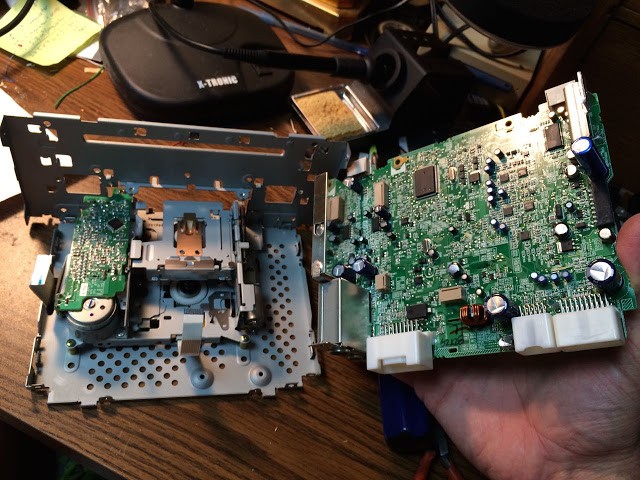
Step 14: Remove the cassette player circuit board.
You will need to feed the ribbon cable through the board to remove it:
Cassette Circuit board removed
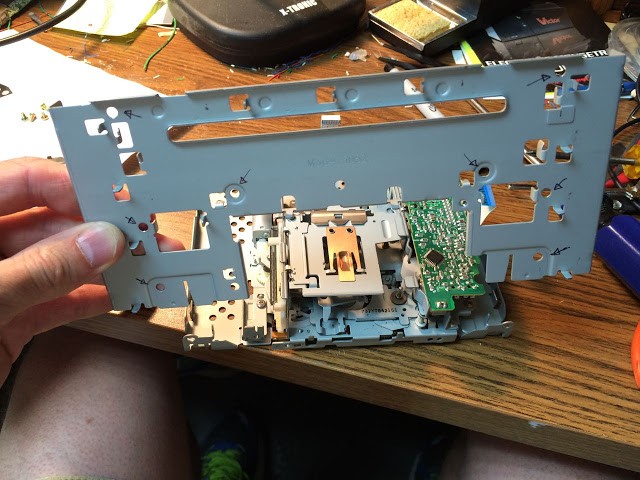
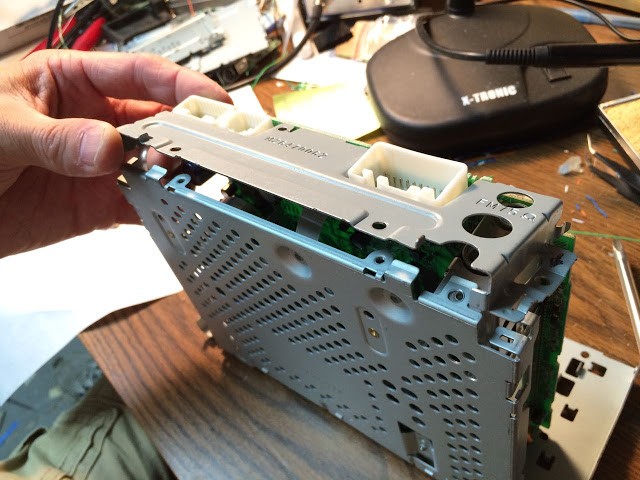
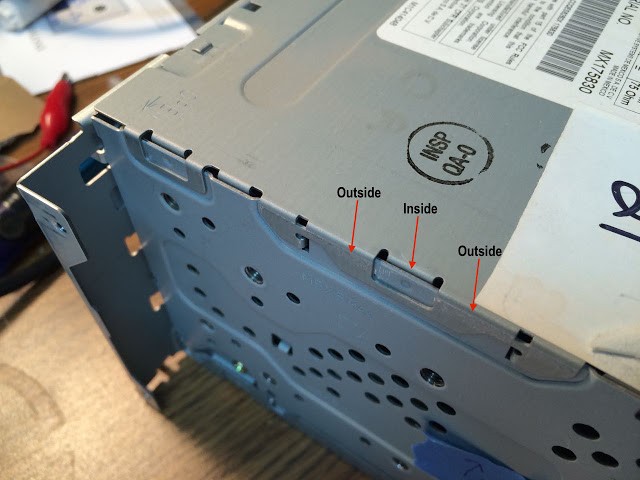
Step 15: Remove the front metal panel from the cassette player.
It should slide straight up and out.
Lift the front metal panel straight up and off the cassette player
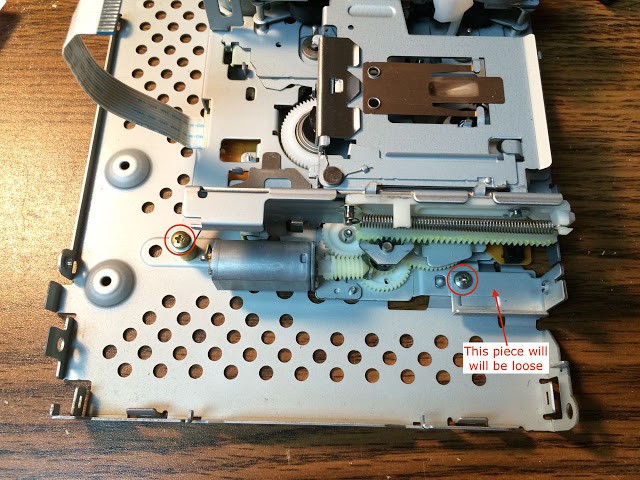
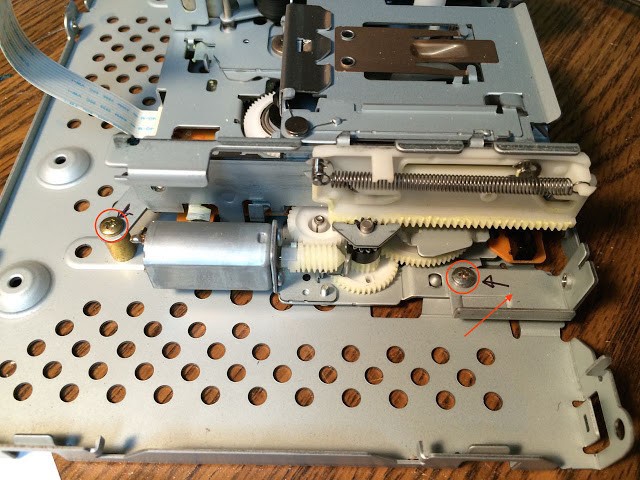
Step 16: Remove the 2 screws from each side of the remaining cassette player mechanism.
These 4 screws will free the player caddy from the lower body. Here are the left screws:
Remove the left 2 screws from the cassette player assembly
The little metal bracket under the front screw will come loose when you remove the screw so keep that piece with these screws. Here is the location of the right screws:
Remove these two screws from the right side
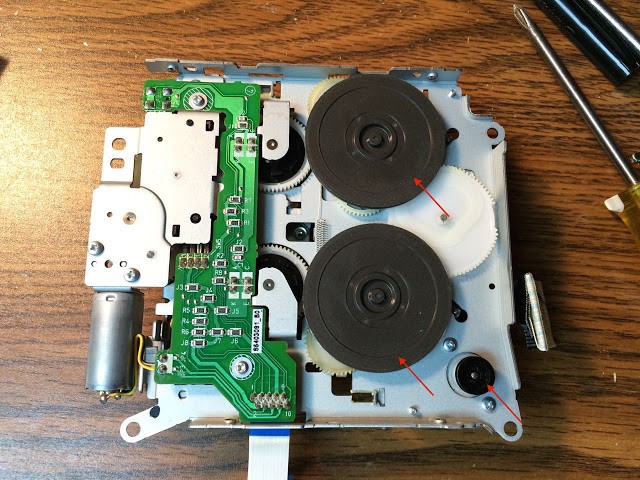
Step 17: Lift off the cassette player mechanism.
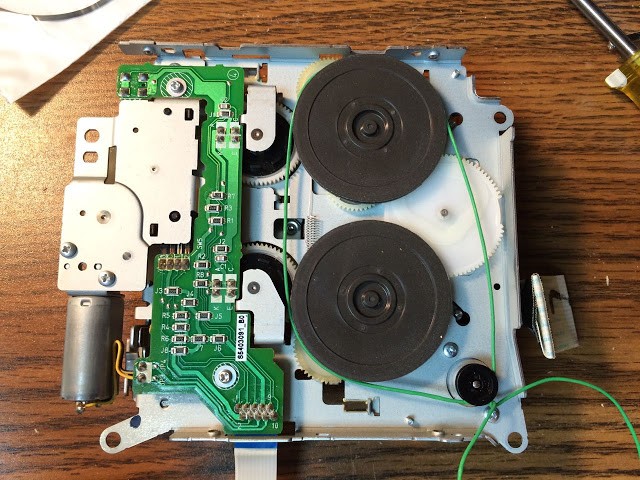
Flip it over and locate the 3 pulley wheels on the underneath side:
The three black wheels the belt will go around
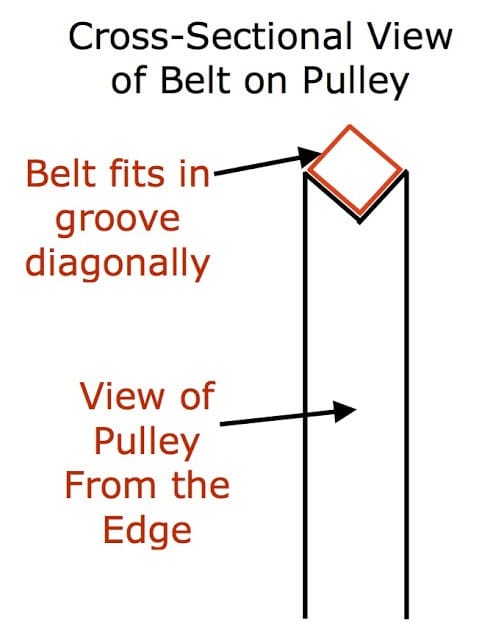
Step 18: Put the belt on the wheels.
The square belt fits on the edge of the wheels diagonally as shown in the diagram I made below:
The belt is really diamond shaped as it sits on edge as seen above
I ran a piece of wire around the path of the belt so I could measure the straight length of the (almost) belt path, just for curiosity:
I put a piece of wire around the path of the belt so I could measure it
The wire measured by laying it on a tape measure (and I’m burning an inch here), around 10.125″ long.
Measuring the wire, burning an inch: approximately 10.125″
I’m about to put the pulley on:
I’m about to put the new belt on
Originally I had the belt path incorrectly shown in the picture below. Because the belt was broken when I tore into the cassette player, I didn’t know. I haven’t actually got to test it out so I didn’t know it was wrong until reader Brian Daniels was nice enough to point out my mistake. Place the belt on the pulleys in the path indicated by the RED line (ignore how the belt is actually installed):
Belt Path Shown in Red (Corrected)
Step 19: Reinstall the 4 screws that mount the cassette assembly to the base.Caution: Before you move on make sure your belt is not twisted in-between any of the pulleys.
Right ones:
Reinstall the two right mounting screws
On the left side make sure to place the bracket before installing the screw:
Reinstall the left bracket and 2 screws
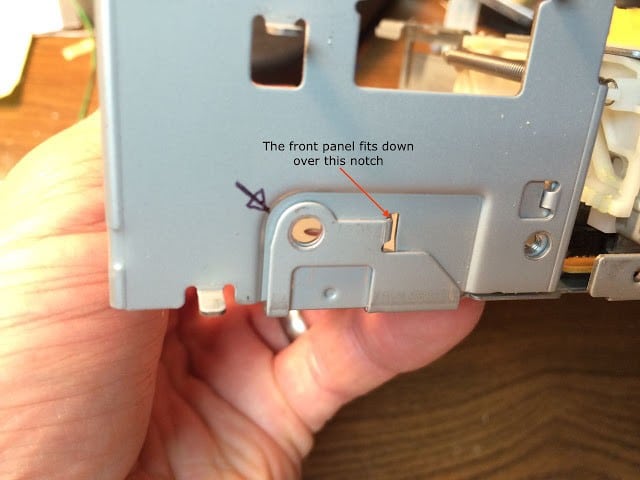
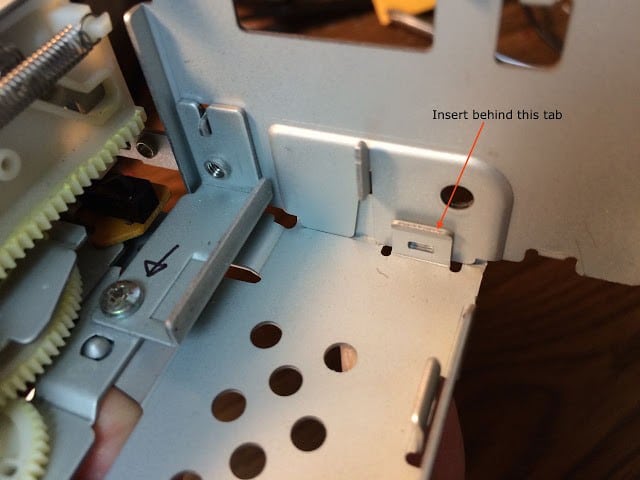
Step 20: Reinstall the front metal panel:
Reinstall the front metal panel
The panel fits down into notches:
View from the front: the panel fits over this notch
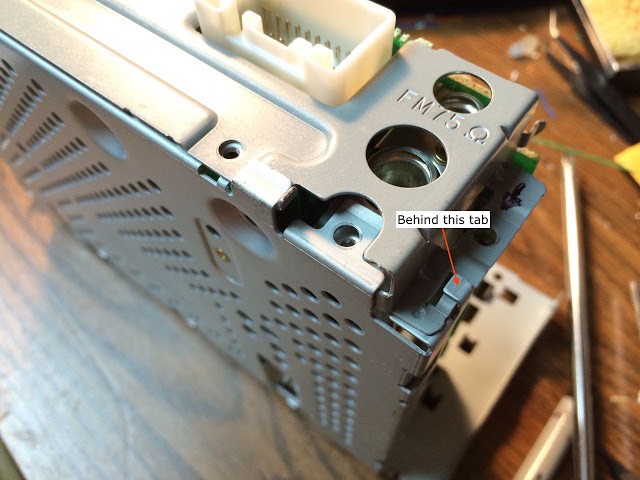
And between tabs:
View from the back side: The front panel fits down behind that tab
Step 21: Reinstall the front top circuit board screws.
These are the two biggest screws we’ve removed on the inside of the cassette player:
Reinstall the front two circuit board screws
Step 22: Reinstall the two ribbon cables.
First feed the back one up through the slot in the circuit board:
Feed the ribbon through the board
Reinsert it down into the socket from the top side. It should be flush when it is seated down into the socket:
Gently push the ribbon cable straight down into the socket
Push the side ribbon cable back into its connector:
Reinsert the side ribbon cable into its connector
This is what mine looks like when it is inserted all the way into the socket (there’s still some blue showing):
Side ribbon reinserted
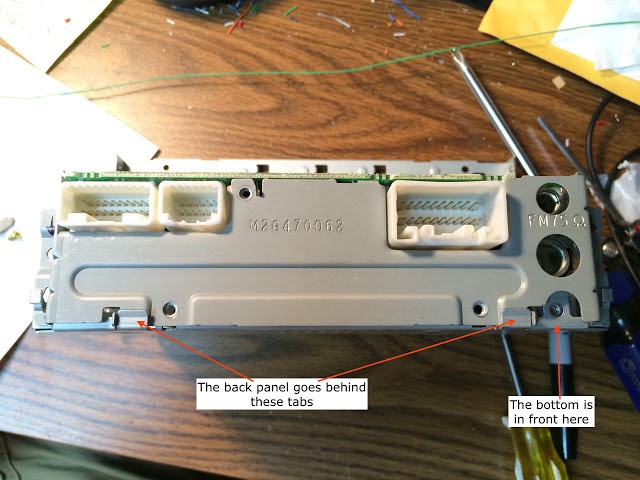
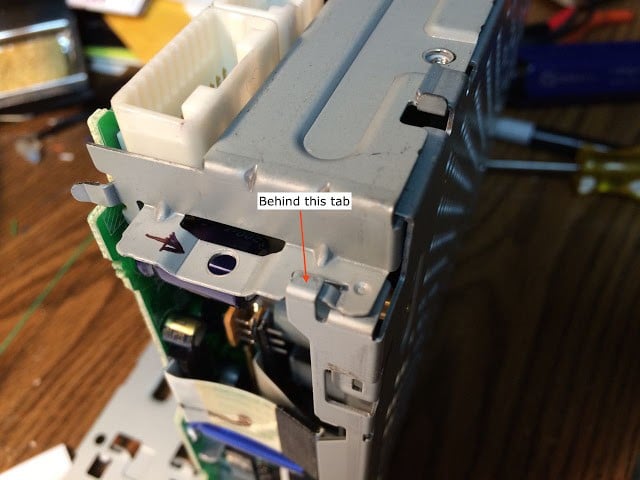
Step 23: Reinstall the back metal panel.
It fits up into slots on the circuit board and down between tabs on the bottom side. This was a bit tricky for me to figure out exactly where the panel should fit down into so I tried to give you a lot of pictures.
Reinstall the back metal panel
Here are some details as to how the back panel fits
The back panel goes behind that tab on the left side
The back panel goes behind this tab on the right side too
Step 24: Reinstall the 5 back panel screws:
Reinstall the back 5 screws circled above
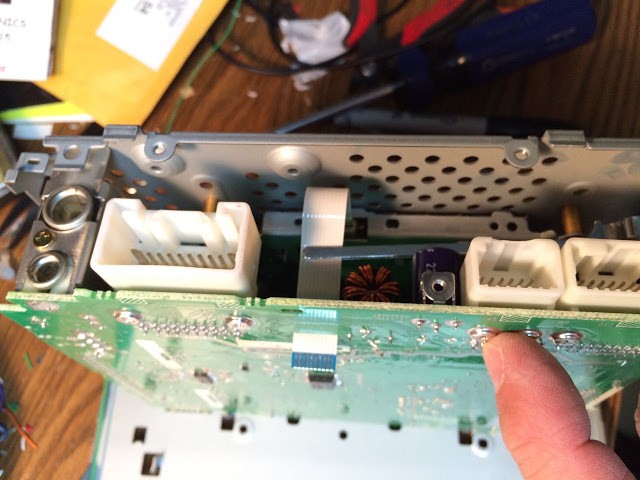
Step 25: Reinstall the CD changer.
Lay the CD changer as seen below and reconnect the ribbon cables:
Reinsert both ribbon cables
Then lay the CD changer on top of the cassette player:
CD Changer on top of Cassette Player
Make sure the tab on the back left and right of the cassette player fits up into the notch of the CD changer:
The Cassette player has a tab on each side of the back that fits into a notch on the CD Changer
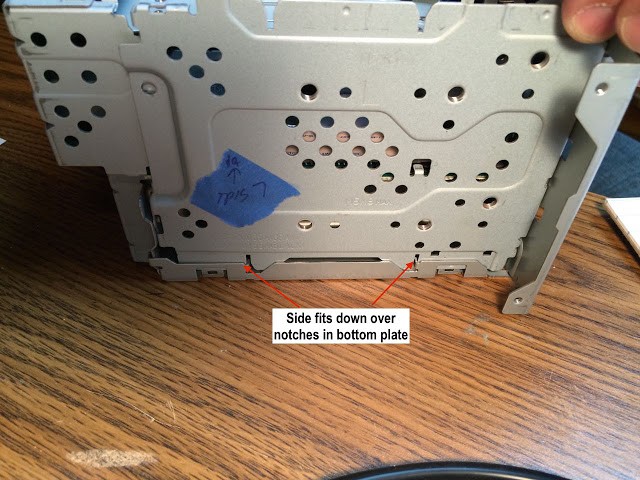
Step 26: Reinstall the sides.
The sides have tabs that go on either side of the metal plate on the bottom:
The side fits down over some notches in the bottom
The sides “lock” the CD changer in place
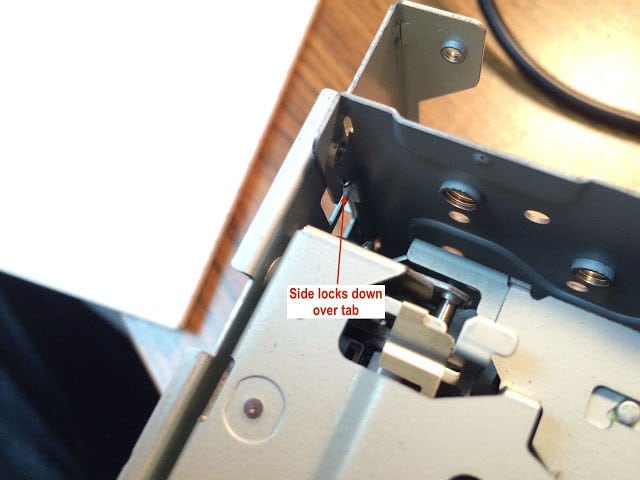
Step 27: Reinstall the top.
The top sits straight down onto the assembly and locks into the sides on both sides exactly the same, as detailed below:
Details of how the top cover locks into the sides (both sides are the same)
Step 28: Reinstall the 2 screws on the top panel.
Reinstall the top two panel screws
Step 29: Reinstall the one screw on the left side:
Reinstall the one screw on the left side
Step 30: Reinstall the two screws on the right side:
2 screws on the right side
Step 31: Reinstall the front side screws.
Don’t forget the little metal panels on the right and left sides of the cassette opening (indicated by the arrows below).
Reinstall the front screws including the metal panels on the left and right sides of the cassette slot opening
Step 32: Reinstall the last two screws on the back, that lock the sides in place:
Reinstall the two last screws on the left and right sides of the back, circled above
Step 33: Follow steps 19 through 22 of my other tutorial to finish reinstalling the stereo in the van:
Now you’ve repaired your Sienna’s cassette player and saved a lot of money!
Amazon Associate Disclosure: As an Amazon Associate I earn from qualifying purchases. This means if you click on an affiliate link and purchase the item, I will receive an affiliate commission. The price of the item is the same whether it is an affiliate link or not. Regardless, I only recommend products or services I believe will add value to Share Your Repair readers. By using the affiliate links, you are helping support Share Your Repair, and I genuinely appreciate your support.
Hi John: Yes, the belt as shown is incorrect: it goes below the wheel closest to motor, then up and around the wheel farther away. I initially installed mine as yours is shown, but knew something was wrong when I saw it dragging lightly on a metal tab between the two big wheels. I tried it the other way, and it’s working great. You went to so much work, your description is so detailed–if you can amend or edit that critical part, great!
Thanks Brian, I had a second stereo that I used to swap out the cassette player but afterwards wanted to see if I could figure out how to fix it myself, just for fun—this was that repair. I never have got around to putting the tape player back into the van though, so I didn’t find the mistake and you may have been the first one brave enough to try it too! Thanks for showing me my error.
That’s a great question Brian! And no, I haven’t tested it yet and for my application it won’t even matter—I’m using a cassette adapter to connect to my iPhone. But thank you for pointing that out. I need to show the correct path.


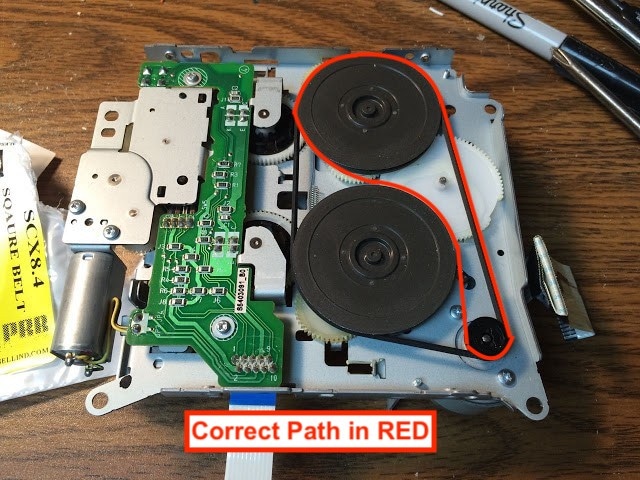


Hi John: Yes, the belt as shown is incorrect: it goes below the wheel closest to motor, then up and around the wheel farther away. I initially installed mine as yours is shown, but knew something was wrong when I saw it dragging lightly on a metal tab between the two big wheels. I tried it the other way, and it’s working great. You went to so much work, your description is so detailed–if you can amend or edit that critical part, great!
Thanks Brian, I had a second stereo that I used to swap out the cassette player but afterwards wanted to see if I could figure out how to fix it myself, just for fun—this was that repair. I never have got around to putting the tape player back into the van though, so I didn’t find the mistake and you may have been the first one brave enough to try it too! Thanks for showing me my error.
Brian, I think I have the picture annotated so that the correct path is now illustrated. Is this correct?

Did you test the cassette player after your detailed repair? I think you have the belt path wrong.
That’s a great question Brian! And no, I haven’t tested it yet and for my application it won’t even matter—I’m using a cassette adapter to connect to my iPhone. But thank you for pointing that out. I need to show the correct path.