I started a blog on Blogger three years ago, only intending to write a few articles. 300 articles later it has become more than a hobby and I wanted to make a serious run at making it into a business and therefore wanted to move it to a new domain and on my own host. The problem was that I didn’t want to lose my high ranking Google search results, my traffic, and any links that pointed to my old site. I found an article that walked you through the process (I’d provide the link but it is no longer good). I want to give credit to them as to giving me some confidence in the process BUT the process DID NOT go according to all their steps, and there were many other crucial things they don’t mention, so I felt like I should share what I learned in the process.
How to Move From Blogger to WordPress-Lessons Learned
Goals:
- Transfer all articles and images from johnfixesstuff.blogspot.com to the new WordPress site
- Add my new domain name (ShareYourRepair.com) to the new website
- Old links will be redirected to the same article at the new website
- All johnfixesstuff.blogspot.com links will forward to their respective links at ShareYourRepair.com
- All johnfixesstuff.com links will forward to their respective links at ShareYourRepair.com
- There will NOT be two copies of my website live (and thus destroy my Google search ranking)
- Set up my website with a great Theme in WordPress
Assumptions:
- You own a domain name (like ShareYourRepair.com) and you are have administrative access to the DNS entries so you can edit the DNS settings and redirect where that domain points.
- This article assumes you have already applied a custom domain to your Blogger blog. This means that people are visiting your Blogger blog by visiting yourdomain.com NOT blogname.blogspot.com. If you haven’t done that your experience will differ from the experience I am sharing.
Step 1: Find a website host for your site.
What I mean by “host” is the company who provides servers to install your website on and a dependable internet connection for people to reach your website through. After surveying the many options, one seemed to rise to the top, bluehost.com and that is the one I chose. I opened up an account and chose a plan that included a WordPress-enabled account.
Step 2: Install WordPress on your new site.
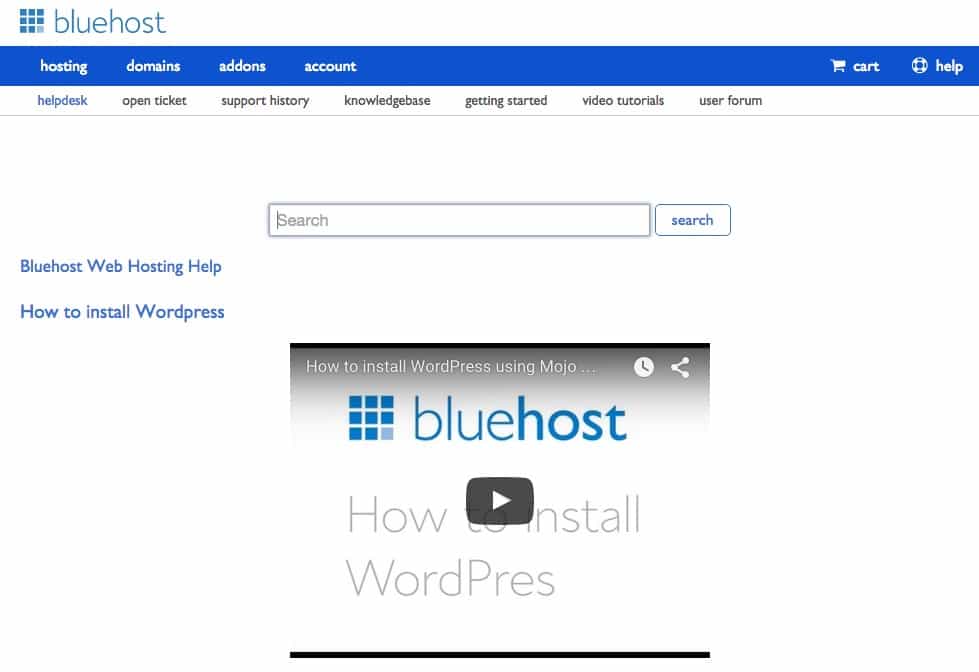
This was easy and bluehost.com has their own tutorial that you can access here. I had no problem getting this done.
Step 3: IMPORTANT SECURITY STEP – DO NOT set your WordPress administrator username as “administrator” or “admin.”
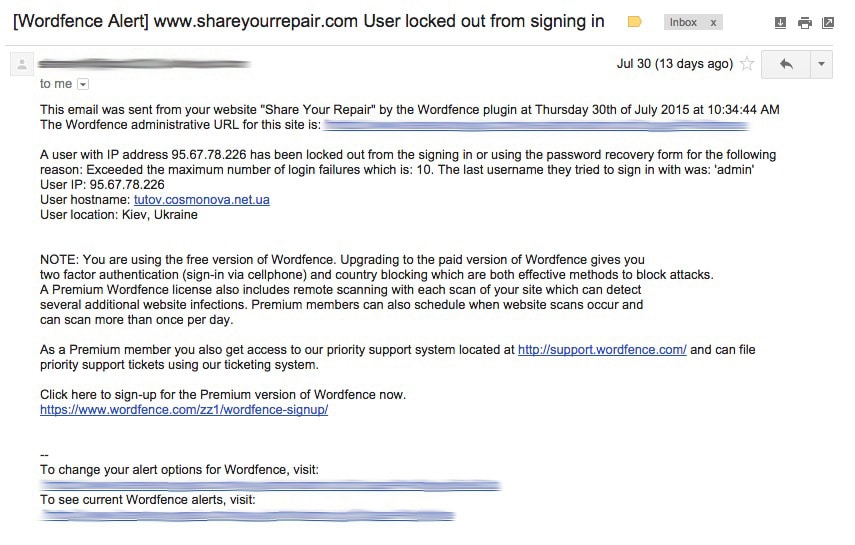
Did you know that anyone can have unlimited tries to log into a bare-bones WordPress installation by default? The tutorial I was following didn’t tell me this (and I must admit that the article wasn’t about EVERYTHING you should do). Hackers will try to brute force login to your administrator account and will have free-rein access to try if you let them. Don’t be that person. If you have already created an administrator account with the username administrator or admin you can change it with a WordPress plugin called Username Changer. Another lesson you can learn from me is to NOT set your username as your email address because it will be published for everyone to see when you write articles. Below is an email I got from Wordfence (which I’ll tell you about in Step 5) of someone trying to brute-force login to a non-existent admin username and Wordfence locked them out. If I had not installed Wordfence or some other security tool, I would never have known someone was trying to break in and they would have had unlimited tries to guess:
In a two-week period here is a report of all the login attempts made on my account:
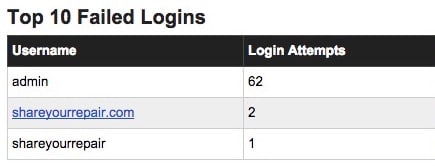
There are 62 reasons why to NOT use “admin” as your administrator login name!
Step 4: IMPORTANT SECURITY STEP – Choose a very good password for your administrator account.
Your password should be at least 10 characters and should include caps, numbers, and symbols. If you don’t have a password keeping program like 1Password yet, now is the time to invest. 1Password has the highest ratings of any piece of software I’ve ever seen–currently it has 4,198 all-time ratings averaging 4.5/5 stars. I would say that their importer from SplashID leaves a lot to be desired but if you are shopping for a password keeping program it is the best out there and is highly supported by other applications, you should get 1Password. Also, 1Password will generate a strong password for you so you don’t need to make one up. FYI: I don’t get anything out of referring people to them, I just am high-security minded and wanted to share.
Step 5: IMPORTANT SECURITY STEP – Install WordFence Security (or equivalent)

Like I mention in Step 3, anyone can try to login to your WordPress site an unlimited amount of times if you leave it as is when you install it fresh. You need to install a Plugin that will help secure up your property. Wordfence came highly recommended to me and has over 1,000,000 installs. It will cap login tries at any number for you and you can even enable 2-factor authentication if you want a small monthly fee. The default installation IS free so make sure to install it. Here is where you put a stop to brute-force login attacks:

Step 6: Set up custom permalinks in WordPress
Step 6a: Why You Must Set up custom permalinks in WordPress.
Permalinks are the (hopefully) permanent addresses each of your website articles will have. For example, the permalink for this page is:
http://www.shareyourrepair.com/2015/08/how-to-move-your-website-from-blogger-to-wordpress.html
Once you name them you want them to stay the same. You want them the same because you want people to link to your site and when they do, the link will always be the same and they can find you for the indefinite future. In order to transfer your website from Blogger to WordPress, you need the non-domain portion of the permalink to be EXACTLY the same. For me, that meant that the blue portions of the URL’s below needed to match exactly on my new site (ShareYourRepair.com):
johnfixesstuff.blogspot.com/2014/01/how-to-replace-the-power-sliding-door-cables-2004-207-toyota-sienna-xle.html
johnfixesstuff.com/2014/01/how-to-replace-the-power-sliding-door-cables-2004-207-toyota-sienna-xle.html
ShareYourRepair.com/2014/01/how-to-replace-the-power-sliding-door-cables-2004-207-toyota-sienna-xle.html
Only the path and the filename needs to be the same because we can redirect the domain portion using DNS and we’ll go over that later.
WordPress doesn’t do this by default. By default WordPress creates permalinks that look like this:
http://www.shareyourrepair.com/?p=123
You DO NOT want permalinks to look like that for MULTIPLE reasons–no one can tell what your link leads to by looking at it and search engines learn nothing about your site by the text in the link, so it’s bad for SEO (Search Engine Optimization). To transfer from Blogger to WordPress you first need to set up custom permalinks as follows:
Step 6b: How to Configure the permalink custom setting in WordPress.
In WordPress, logged in as an administrator, under Settings, click on Permalinks, select the Custom Structure radio button, and enter the code provided below.
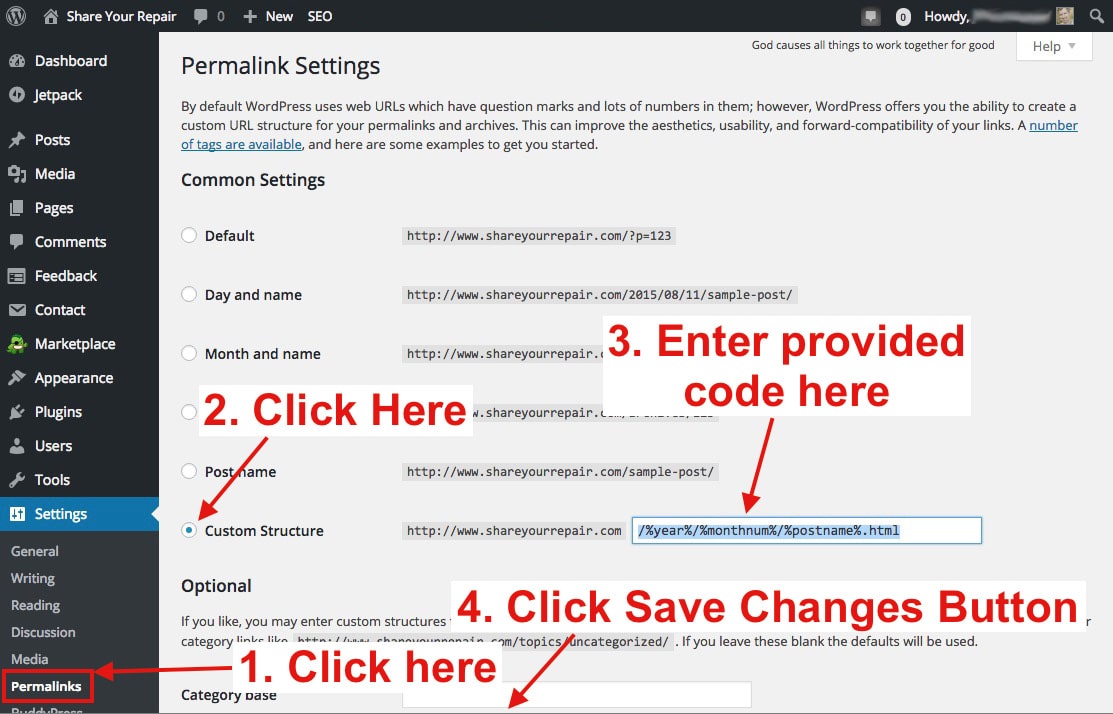
After clicking on the Permalinks sub-Setting, click on “Custom Structure” and then copy and paste the following into the text box:
/%year%/%monthnum%/%postname%.html
Step 7: Import your Blogger site into your WordPress account.
The article I was following suggested using WordPress’s built-in Blogger importer. I tried to do that but it would never authenticate with Google. It could be because I use two-factor authentication in my Google account but I was totally unsuccessful using it. Luckily WordPress is SO supported by plugins that there is an other option. Install this plugin: Blogger Importer Extended.

One nice thing about Blogger Importer Extended is that it imports your images as well BUT the links in your articles will still point to your old blog. But at least you’ll have a copy of your images.
At the time I was importing my Blogger site into WordPress I was focused entirely on getting it right and finding solutions for what wasn’t working (like the default importer failing to authenticate) that I didn’t take screenshots of what happened unfortunately. Sometimes real life overtakes me and I just want to survive!
Important Things to Know About Using Blogger Importer Extended
- If you have an & symbol in any of your image filenames it will RENAME the file without the & symbol in the filename–this will cause broken image links
- If you used parenthesis in your filenames, they will be replace by
- If you have some very long filenames it will chop them off. I didn’t count how many characters it limits you to but you will want to compare the new to the old to make sure everything is the same. You can rename the imported files to make them match the old if a few of them get chopped off. I’ll share the process I used to compare filenames in Step 8.
- It imports your blog’s images but it doesn’t correct the links in your posts to use them. All your posts will still have the same image links as they did before. BUT DON’T WORRY, you are NOT going to close your old Blogger account so your new website can still load those images and you should be fine, except for the broken image links that happen because of & symbols, etc.
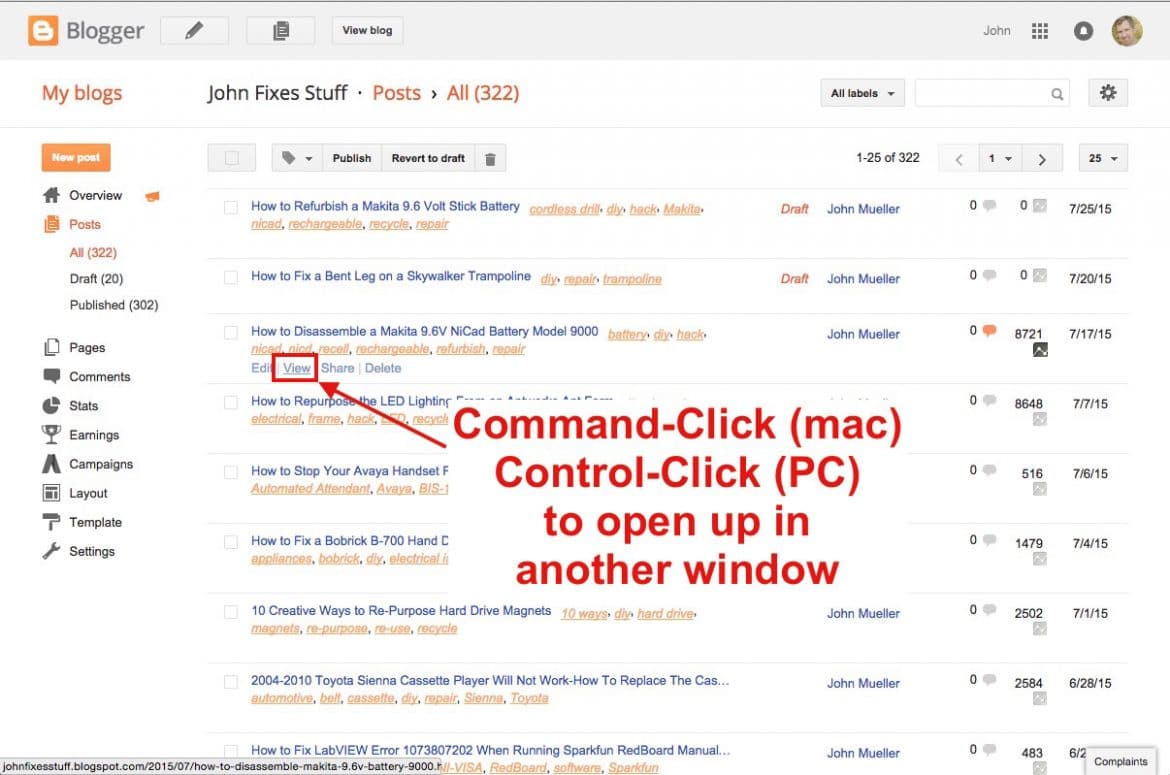
Step 8: Test your new website.
The way I did this was I logged into my Blogger account and I opened up every one of my pages, one at a time, in another tab by Command-clicking on “View” under each post. If you are on a PC you will Control-click on “View.”
Then I went through and changed the domain name in the address bar of the tab I opened up from:
http://johnfixesstuff.com/2015/07/how-to-disassemble-makita-9.6v-battery-9000.html
to:
http://shareyourrepair.com/2015/07/how-to-disassemble-makita-9.6v-battery-9000.html
Then hit the return button and see if it correctly opens your page. I just saved my new domain in the clipboard to make it go faster. This allowed me to test the real links for every one of my pages.
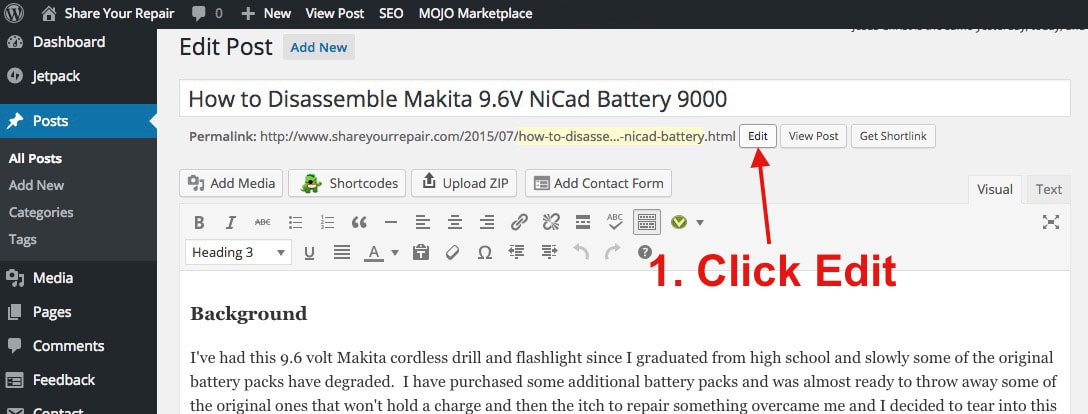
Step 9: Correct the the filenames that got chopped off.
What I found was that some of the imported html file names got cut off if they were extra long. If the filename got cut off then you can add the correct file name back in it by editing that page in WordPress:
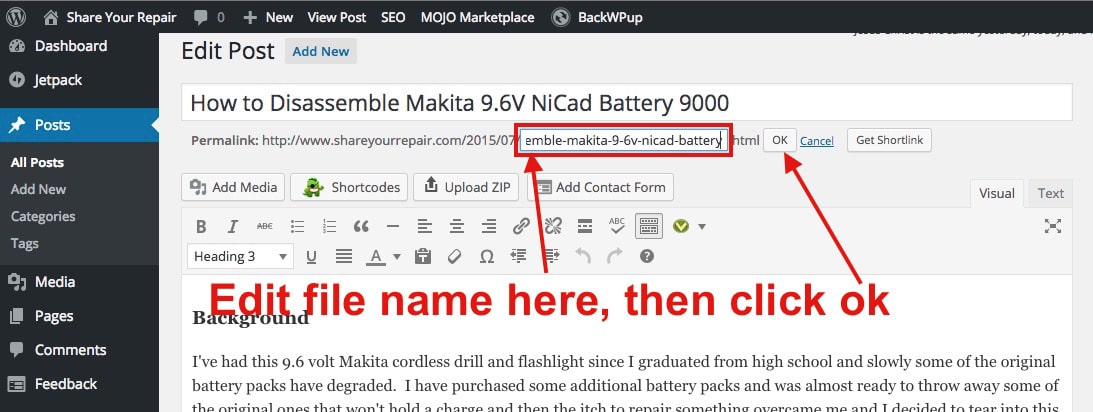
I did this for every post and there were probably 5-6 corrections I had to make.
Step 10: Compensate for PATHS that are wrong.
There was one page that had the wrong date in the path and I have no idea how that happened. For example, the original permalink was this:
johnfixesstuff.com/2015/05/how-to-read-a-dial-caliper.html
but the imported permalink ended up as this:
shareyourrepair.com/2015/06/how-to-read-a-dial-caliper.html
You can edit the filename (the part immediately after the last / and before .html) but you cannot edit the path in a permalink in WordPress. You CAN set up a redirect to automatically forward anyone who tries to visit the old page’s path and filename to the new page. Hopefully you only have a couple of these and it will be easy. There is a plugin I installed called Redirection that makes this very easy. Once installed and enabled it will show up under Tools > Redirection. For the above example, this is how you would set up the redirect to fix it:
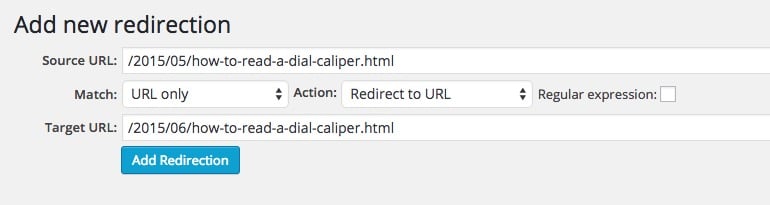
Note: You only enter the URL after the domain name, including the / That fixes that!
Step 11: Edit the DNS settings so that your old domain name points to your new domain name and new website.
Many of you will have a different situation to deal with but it likely will be easier than my situation. I was changing my domain name from johnfixesstuff.com to ShareYourRepair.com so I needed to do two things:
- Configure my DNS settings for ShareYourRepair.com to point to my new WordPress site
- Forward johnfixesstuff.com to ShareYourRepair.com
Most of you will probably only be moving your domain name from Blogger to your new WordPress site. I’ve found that whoever you purchased your domain name from, has very helpful support that will be able to tell you exactly what to do and fix any problems you run into so I’d encourage you to contact them and many of them have live chat which is really handy.
In my case, my domain name johnfixesstuff.com was parked at Hover.com and they only provide for 302 redirects so I set up a 302 redirect from johnfixesstuff.com to ShareYourRepair.com.
Step 12: Install a custom Blogger template that redirects visitors to your new site.
Ideally we would edit the DNS settings at your old Blogger site to redirect people to your new site but Google won’t let us do that so we have to work with what we have and that is the custom HTML we can edit. We are going to do this in two steps. One step involves installing a WordPress plugin that will generate custom code for your Blogger site and the second step is to install that at your Blogger site.
The Blogger 301 Redirect Plugin is designed to do two things. The primary thing this plugin does is uses the information about your new WordPress URL and generates an html template to install on your blogger site to redirect people to your new site automatically. The second thing it is supposed to do is redirect some of the inbound Blogger-type address requests and route them to where the WordPress equivalent page is located.
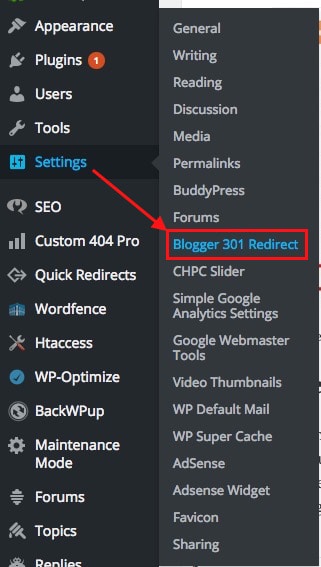
Step 12a: Install the Blogger 301 Redirect Plugin
Click here for the plugin’s download link. After installing the plugin you will want to run Blogger 301 Redirect. You will be able to find it under: Settings > Blogger 301 Redirect
Step 12b: A word about the checkboxes in Blogger 301 Redirect
I tried configuring some of the checkboxes you see below but I did not find much (if any) success in them working for me. What these should do is set up htaccess rules that redirect incoming requests for blogger-formatted links to your new WordPress locations. They didn’t work for me. The plugin is still very useful though.
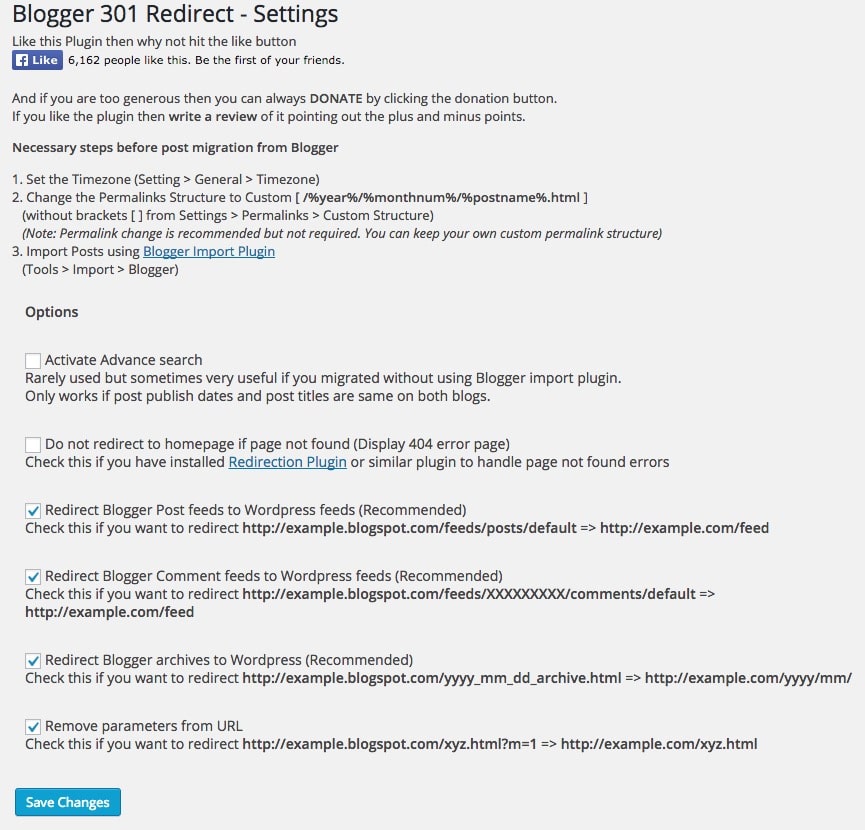
Step 12c: Copy the html code from Blogger 301 Redirect
If you scroll down to the bottom you will see a text box with html code that has been custom created for your website. I used Method 1:

Copy the code:
- On a Mac:
- Keyboard shortcut: Command-C
- Mouse: control-click on selected text and choose copy from the pop-up menu
- Menu: Edit > Copy
- On a PC:
- Keyboard Shortcut: Control-C
- Mouse: right click and select copy from the pop-up menu
- Menu: Edit > Copy
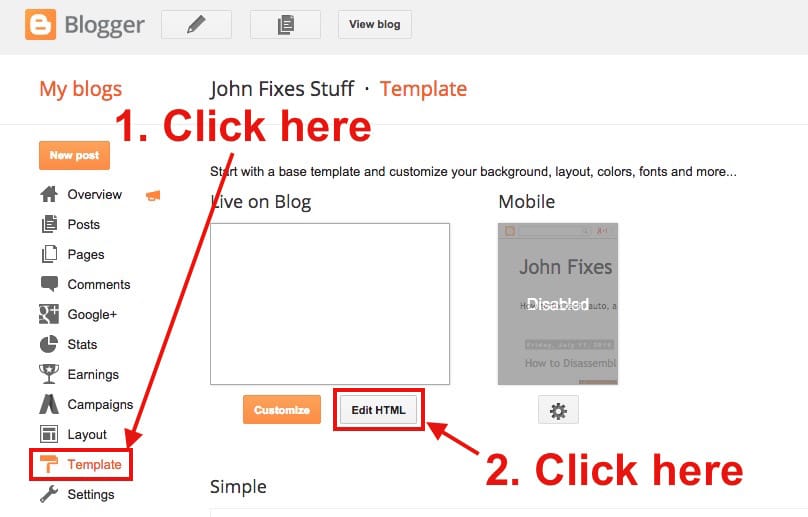
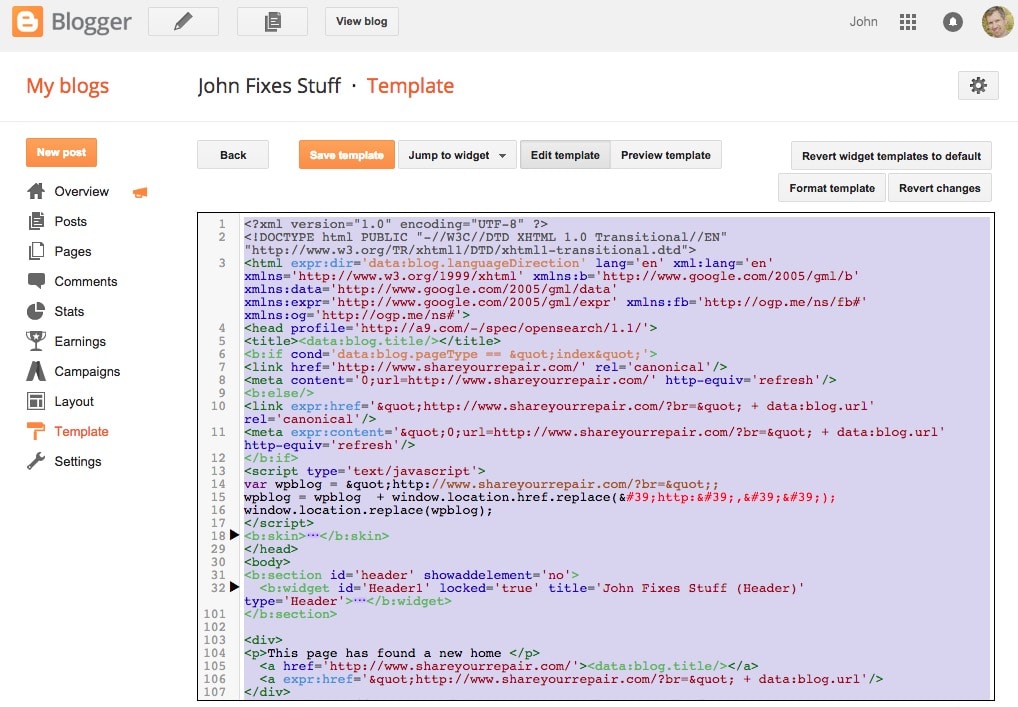
Step 12d: Install the code in Blogger
Log in to your Blogger site with an administrator login and click on Template and then Edit HTML:
Cautionary Note: If you have have customized your Blogger template you should make a backup copy of the code and save it on your computer. If you’ve done that you know how to back up the code so I won’t go into how to do it. If you make a backup of your Blogger template you will need to go back to Step 12c and copy the custom forwarding code again before moving forward…
Select all the code in the window by clicking in the window and using the keyboard shortcut Command-A (Mac) or Control-A (PC). Once you have selected all the existing code you can paste the code you copied in the previous step and click the “Save Template” button at the top by using the keyboard shortcut Command-V (Mac) or Control-V (PC).
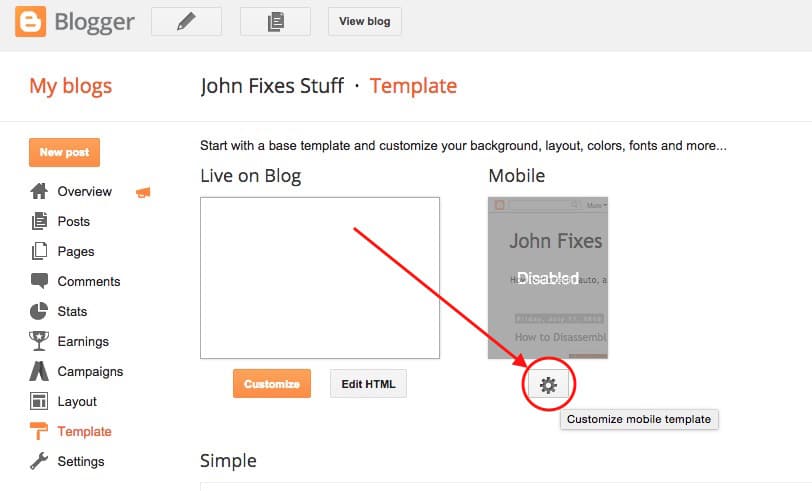
Step 12e: Disable the Blogger mobile template
This is another thing I didn’t know about, and wasn’t told about by the other articles I read. You can gain from my experience. The template we just installed will not run if Blogger senses that the device requesting your page is a mobile device so we need to disable the mobile template so all devices run this redirect code. Click on “Template” and click the gear below Mobile:
In the resulting window that pops up, click the radio button next to “No. Show desktop template on mobile devices” and then click the “Save” button.
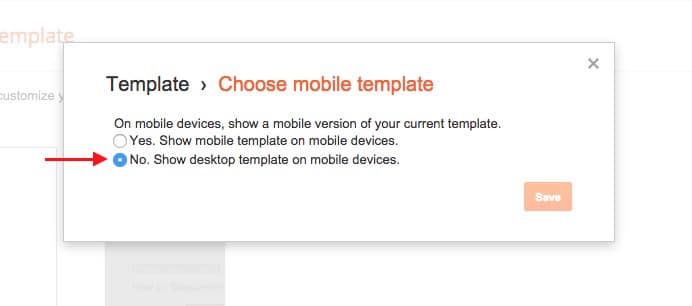
You should then see this on the Mobile template live view:

Now all desktop and mobile viewers of your Blogger site are being forwarded to your new WordPress site!
Step 13: Remove your custom domain from Blogger.
In Blogger click on Settings in the left column and then in the Publishing > Blog Address section click on the X to the right of your custom domain. It will ask you whether you are sure, say ok. After I did this step it took eight days for the google search results I show up in to take off my custom domain johnfixesstuff.com and re-apply the johnfixesstuff.blogspot.com domain name:
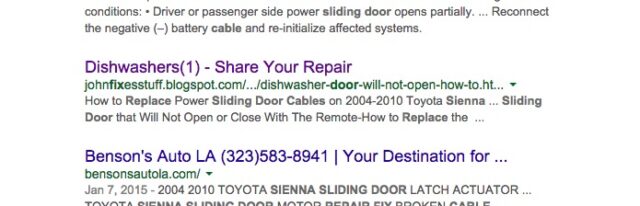
Now it is actually unfortunate that it doesn’t still list the link above as johnfixesstuff.com/…/dishwasher-door-will-not-open-how-to.html because in Step 11 we are forwarding all johnfixesstuff.com links to ShareYourRepair.com and it is fast and automatic because it is a server-side redirect. When people start visiting johnfixesstuff.blogspot.com links then the custom template we pasted in there will still forward people to the new site but it is browser-side redirecting, which takes longer and isn’t as clean. At this point I wished I had not deleted the domain in the Blogger settings and actually went back and added it back, which didn’t require anything but just typing it in and clicking “Save.” I thought this might cause google to return all my search listings to johnfixesstuff.com, which will speed up the redirection to my new site. BUT this is NOT the case. It actually slowed things down even further. When you have a domain assigned to a blogger site but the DNS doesn’t point to Blogger it will give you this warning when you visit a link at your old Blogger site:
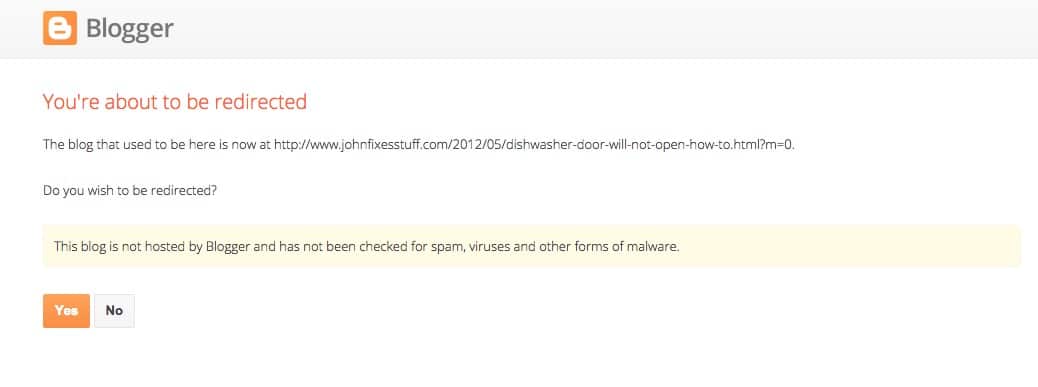
It doesn’t forward people to your new site and it actually scares people by this warning about spam, viruses, and other forms of malware that you don’t want your viewers to have to deal with. So I deleted the custom domain name again from my site and it immediately returned to the automatic browser-side redirect, whew.
Step 14: Install the Plugin Custom 404 Pro
This was a big deal for me because at this point I was unaware of how many errors my site was encountering. A 404 Error is when someone tries to visit a URL at your website that does not exist. When I finally installed this I had 200,000 errors in the log already! This includes every bad page link and every bad image link, which helped make that number as high as it was.
This plugin allowed me to do a couple things that were really useful:
Custom 404 Pro Advantage 1: Custom 404 Page
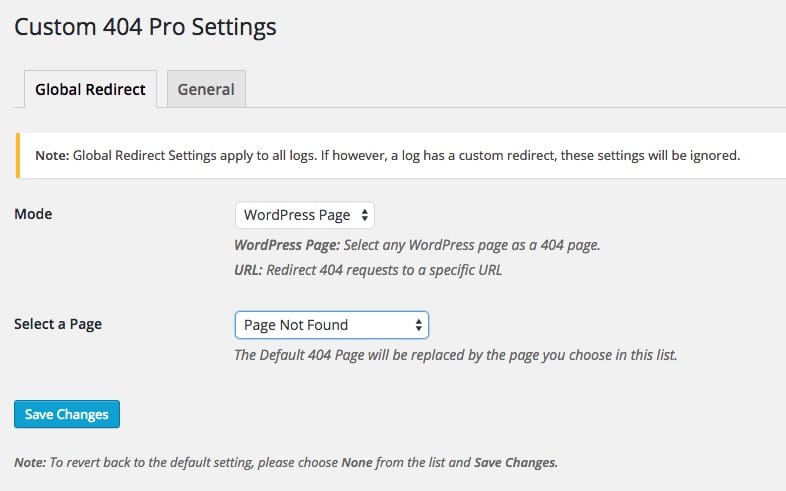
Because so many people were ending up at my 404 page they were turning around and leaving. I wanted to leave a special message that told them that the article was still here and to encouraged them to search for what they were looking for. The Custom 404 Pro plugin allows you to have a custom 404 page. In the Custom 404 Settings page which can be found directly in the sidebar under Custom 404 Pro > Settings:
Once you are in the settings you can select a particular Page from your site to display when a viewer gets a 404 error:
This is what my Custom 404 Page looks like:
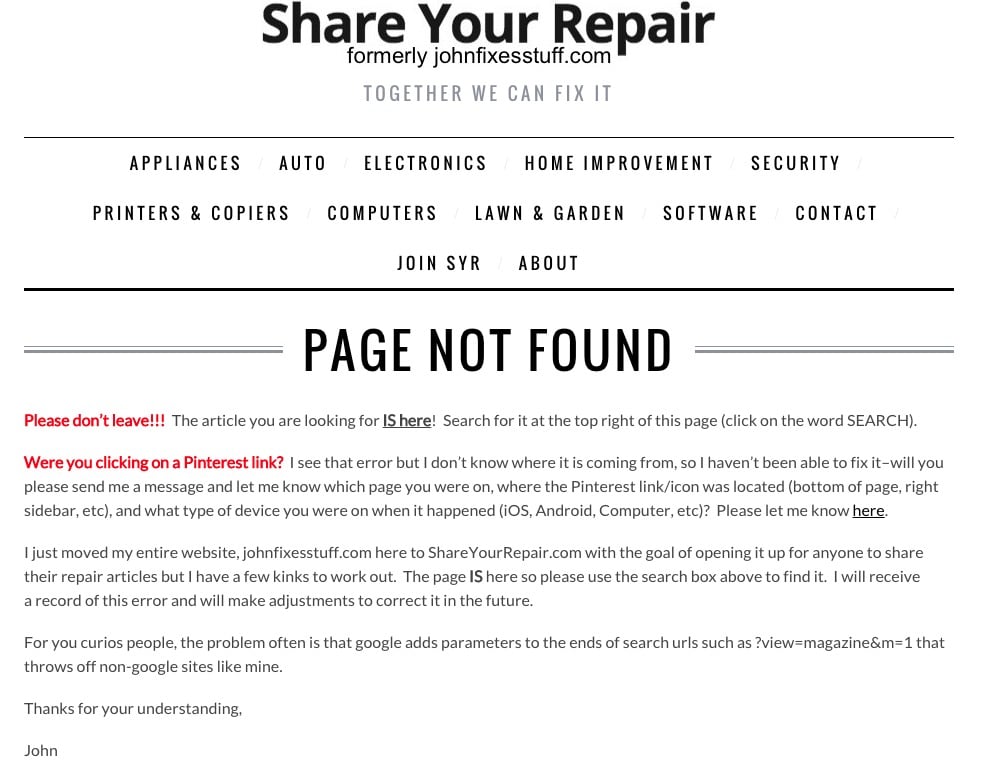
This allowed me to urge users to search for the actual page they were looking for instead of leaving. I don’t know how effective it was but it made me feel little better.
Custom 404 Pro Advantage 2: Email Notifications of 404 Errors
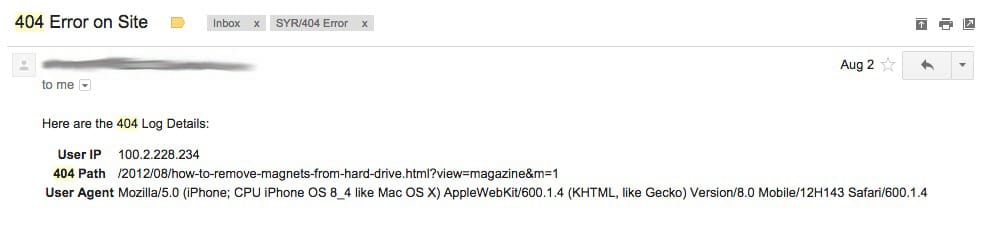
You can enable email notifications in the Custom 404 Pro Settings General Tab:
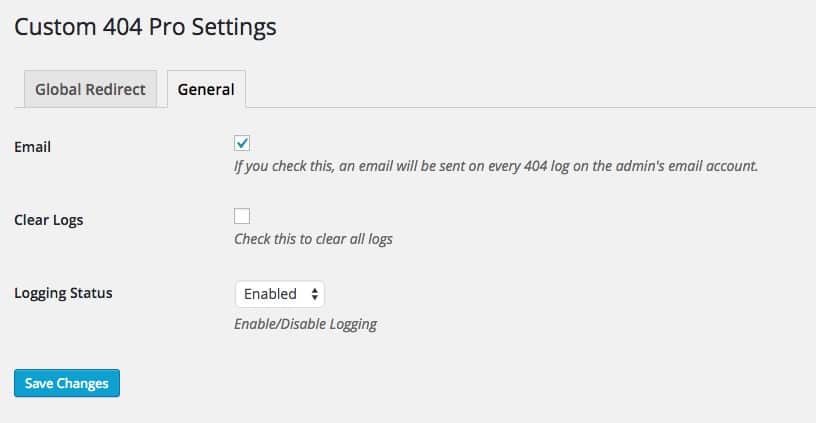
An example of the email notifications is the one below where I learned that Google was appending ?view=magazine&m=1 parameters to the end of my links and causing 404 errors:
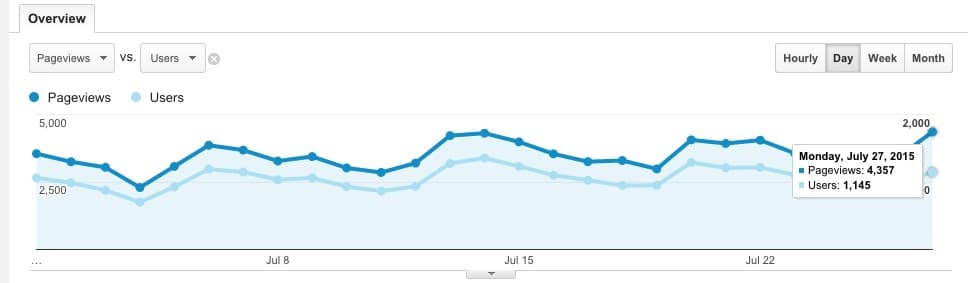
Step 15: Watch your site traffic.
If your main source of internet traffic is followers you should be fine, but it your main source of traffic is google searches, well what happened next made me sick to my stomach to tell you the truth. This is what my traffic looked like for the month before I switched–an average 3,000-4,000 pageviews/day:
After switching and doing everything right that I’m aware of, this is what happened, it went down, down, down, finally bottoming out at only 264 users on August 9th, 12 days after making the transition:
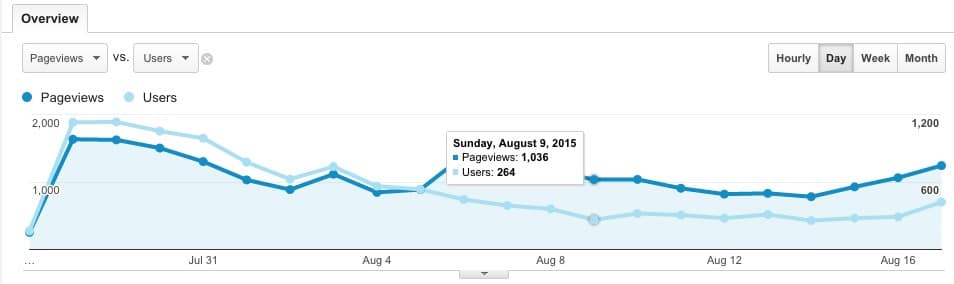
One thing I’ll note about the graph above is that you will see a jump in pageviews/user on August 6th–that is when I installed a much better WordPress theme, SimpleMag. SimpleMag is graphical and really invites the user to explore a website and you can see the big difference it made! It was very easy to install the new theme, which is another great perk of using WordPress for your website.
Step 16: Edit your htaccess file to handle Google’s parameters
After installing Custom 404 Pro I really became aware of exactly what was going on, on my website and the source of errors. My WordPress site needed to be able to handle the parameters that Google adds to your urls when you have been a Blogger site and have moved to WordPress. Here’s a sample of the various parameters that were being added to my page urls:
?view=classic&m=1
&_escaped_fragment_=?view=classic
&_escaped_fragment_=?view=flipcard
&_escaped_fragment_=?view=magazine
&_escaped_fragment_=?view=mosaic
&_escaped_fragment_=?view=snapshot
&_escaped_fragment_=?view=timeslide
A word of warning: You can completely immobilize your WordPress site by editing the htaccess file. I actually did that early on in my trying to fix the parameter issue but was able to recover in less than 5 minutes. If you do, you’ll need to access your site (at the host) via ftp and restore your original htaccess file. Make sure to make a backup of the contents of your htaccess file before making ANY changes so you can revert back to it if you mess things up. Please move forward at your own risk.
I started two different discussions on stackoverflow.com (here and here) and quickly was given a solution that now handles these parameters by trimming them off and forwarding the viewer to the actual page on my site. I installed WP Htaccess Editor and then added the following code towards the top of my htaccess file:
RewriteCond %{QUERY_STRING} ^view=[^&]+ [NC]
RewriteRule ^(.+?)&_escaped_fragment_= /$1? [NC,NE,R=301,L]
RewriteCond %{QUERY_STRING} ^.+$
RewriteCond %{REQUEST_URI} !.*wp-admin.*
RewriteCond %{REQUEST_URI} !.*wp-content.*
RewriteRule (.+\.html?)$ $1? [NC,R=301,L]
http://stackoverflow.com/questions/31775721/how-to-strip-google-blogger-view-classicm-1-parameters-from-url-now-self-hoste
Step 17: Transfer your old domain to your new domain in Google Webmaster Tools
Google allows you to transfer a domain name to another on their end. I don’t know how advantageous this is for Blogger custom domain users because they already had stripped my domain name from all links and reverted back to the johnfixesstuff.blogspot.com links in the Google search results. I wanted to do EVERYTHING I could so I wanted to do this too—to officially transfer all johnfixesstuff.com links to ShareYourRepair.com on Google’s end.
In order to do this though you MUST have 301 Redirects set up from your old domain to your new one. This must be server-sided. What we are doing at Blogger is NOT a server-side redirect. In order to accomplish this I had to transfer my domain name johnfixesstuff.com from being parked at Hover.com to my host at Bluehost.com and then set up 301 redirects between the two:

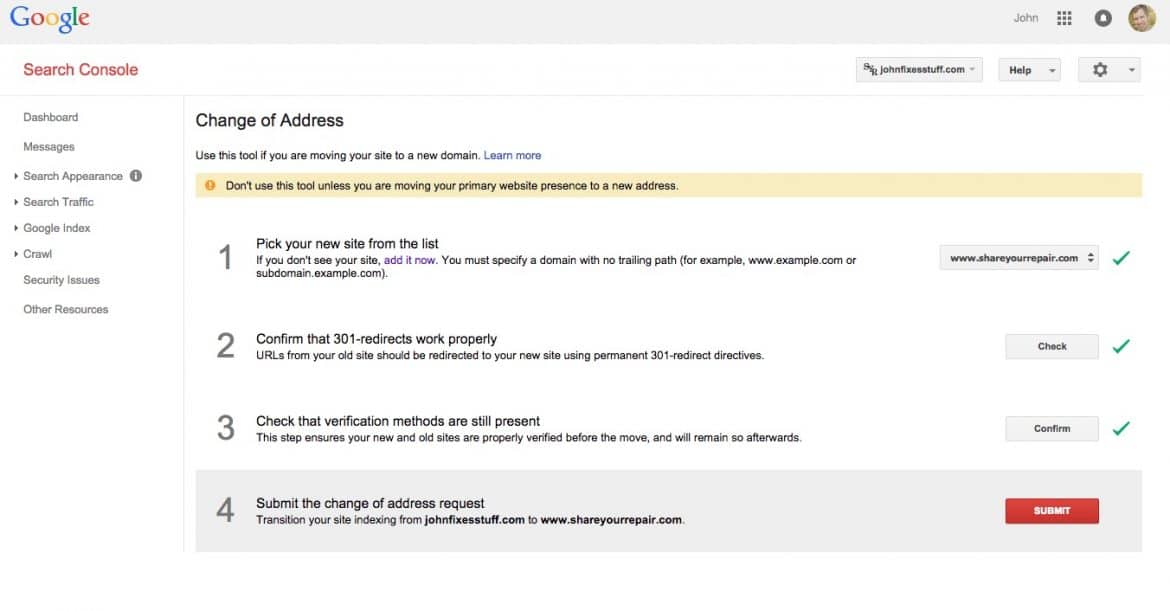
Once you have that set up and you’ve verified your domains in the Google search console you can officially, on Google’s side, complete the Change of Address form:
Step 18: Waiting for the rebound.
Below is a broader view of the analytics chart I have pictured above. Traffic has leveled out but it’s nowhere near what it once was. I hope it will return over time:
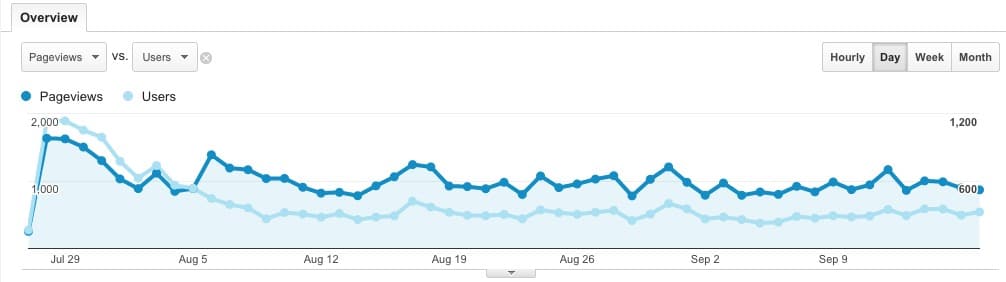
I’ll be back to update this article and let you know how the traffic is going!
In Retrospect-Lessons Learned
- It’s bad to heavily rely on Google search for most of your pageviews. The nature of my website–specific solutions for very specific problems forces me to rely on that at this point since my site is still relatively small. I don’t think that my website is the kind that people would follow so they could read every post that comes up. If people don’t have the problem I’m solving they aren’t interested.
- If your traffic is high be very cautious about changing things. It takes time to earn hits from Google and it will take time to re-earn that traffic. I don’t rely on my income from this site to live but if I did I would have really jeopardized my livelihood. On the other hand, it’s better to change now than wait till your popularity increases greatly because the hit will be felt even more then.
- I’ve wondered if changing the domain name at the same time as the move hampered me. I don’t think it made much of a difference honestly.
- I learned a tremendous amount through this transition and have really enjoyed working in WordPress and finally really making my website mine.
- I’m interested to get your feedback on what I did and how I went about it. Please share in the comments.
Amazon Associate Disclosure: As an Amazon Associate I earn from qualifying purchases. This means if you click on an affiliate link and purchase the item, I will receive an affiliate commission. The price of the item is the same whether it is an affiliate link or not. Regardless, I only recommend products or services I believe will add value to Share Your Repair readers. By using the affiliate links, you are helping support Share Your Repair, and I genuinely appreciate your support.