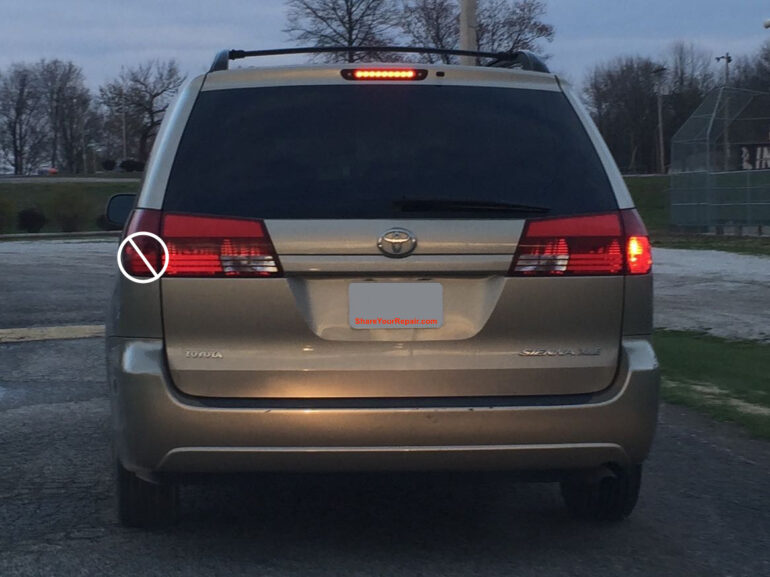
My left brake light went out, the bulb on the outside corner of our 2004 Toyota Sienna van. This is time for another repair. If your tail light assembly breaks when you remove it I have a solution for that too! Follow along to learn how you can replace the brake light bulb on your 2004-2010 Toyota Sienna:
How to Replace Toyota Sienna Brake Light Bulbs
Vehicle:
Parts Needed:
- Tail Light Bulbs (I would replace BOTH while you are at it because you don’t want to take this apart twice, especially if yours breaks like mind did when I took it apart):
- Top Tail Light (tail light): SYLVANIA 7506
(single filament)
- Bottom Tail Light (tail light/brake light): SYLVANIA 7528
(two filaments)
- Top Tail Light (tail light): SYLVANIA 7506
Tools Needed:
- 10mm socket and ratchet (get this and much more in a 210-Piece Stanley Tool Set
)
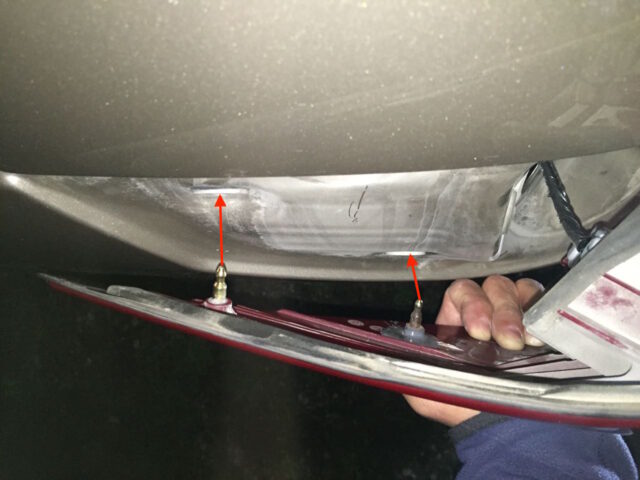
Step 1: Open the lift gate.
There are two bolts that hold the tail light assembly onto the van that will be exposed when you open the lift gate. You can see them here:
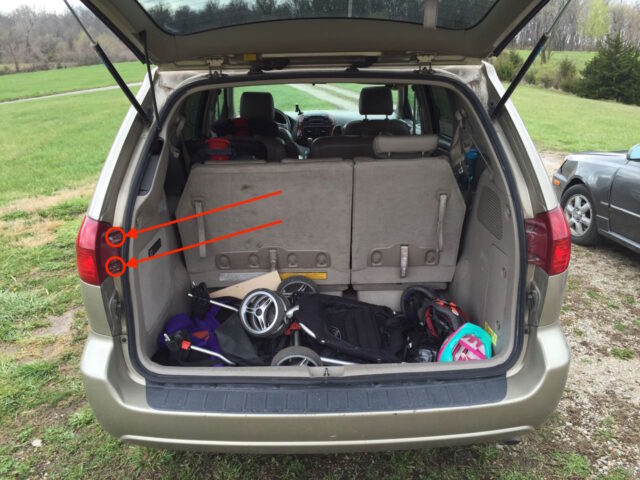
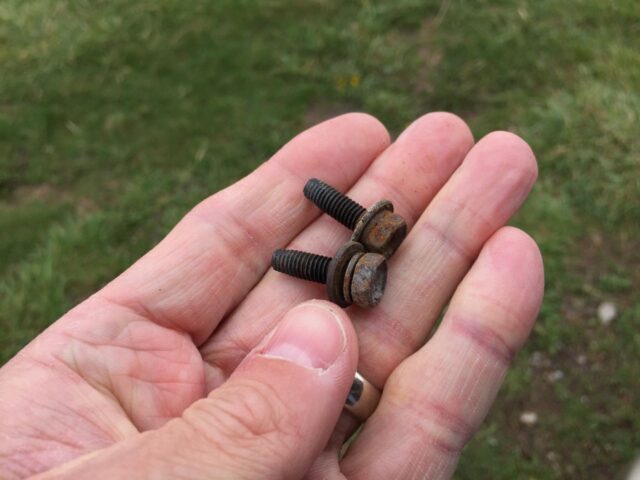
Step 2: Remove the two 10mm bolts.
Important Note: These are not the only fixtures that hold the tail light assembly in place so do not get in a hurry and start prying on the thing. Remove the two 10mm bolts:

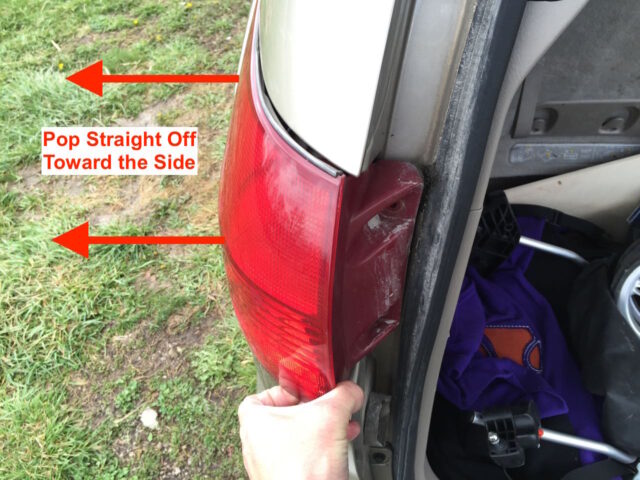
Step 3: Pop the tail light free from the pins on the side.
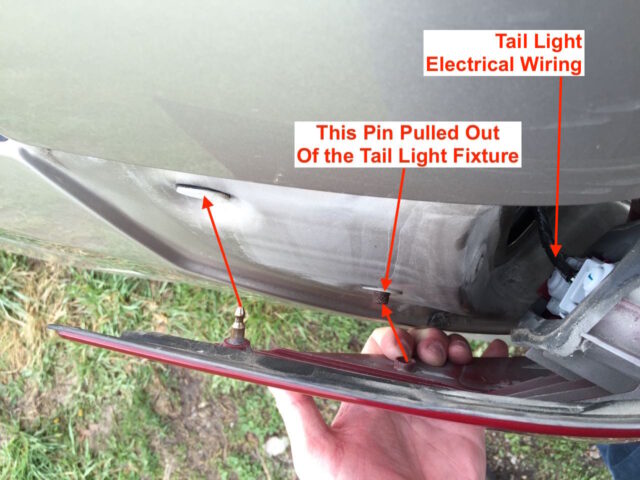
There are two brass pins that stick into the side of the van that must be CAREFULLY popped out. You will want to pull the tail light straight out as seen below (and read on ahead for pictures of what you are disconnecting). Also, remember that the fixture will be attached to the van wiring so you do not want to pull the tail light away from the van.
This is what it looked like when the tail light popped free for me (one of the pins had pulled out of the tail light fixture):
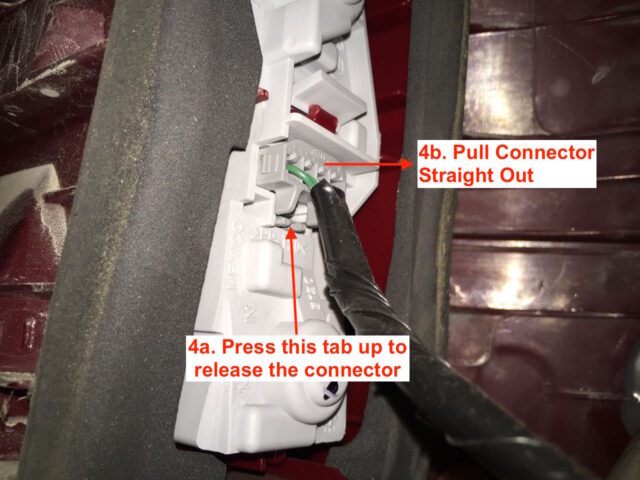
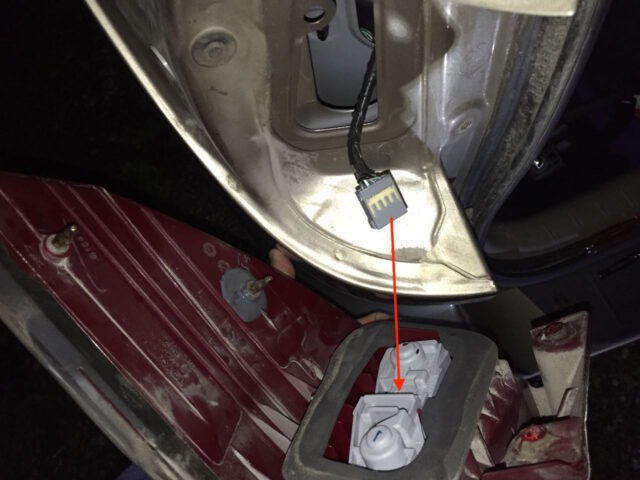
Step 4: Disconnect the tail light electrical connector.
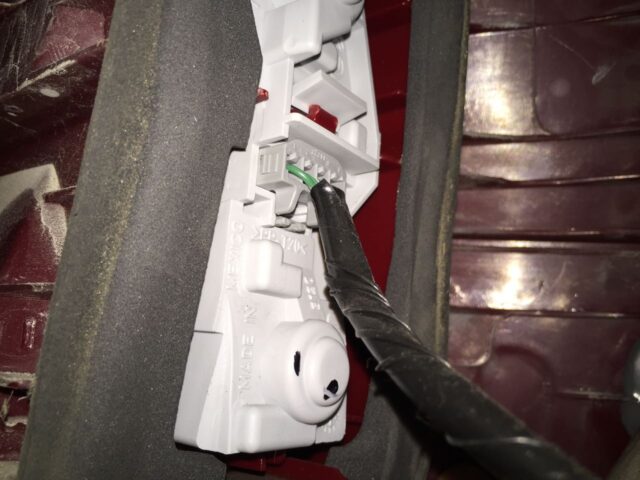
In order to remove the electrical connector you must press in the tab located on the bottom of the connector, as shown below:
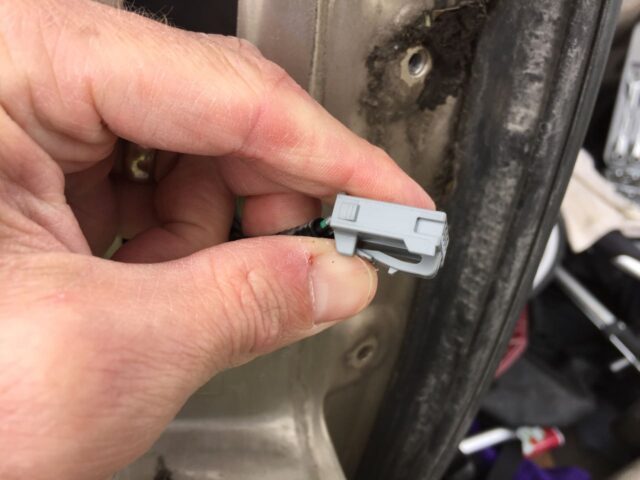
I would never pull out a connector by the wires themselves, so reach in there and pull the connector with your fingernails. It’s a bit of a trick to get that tab depressed and you could use a small flat screwdriver if you cannot get it with your fingernail. This is what it looks like to press in the tab:
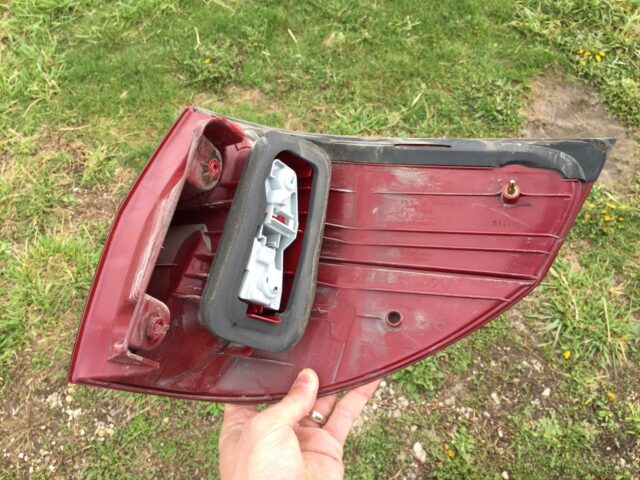
Here’s the tail light removed:
If one or more of the brass pins pulled out of your tail light like mine did you can read my article below on how to repair them:
How to Repair Toyota Sienna Tail Light
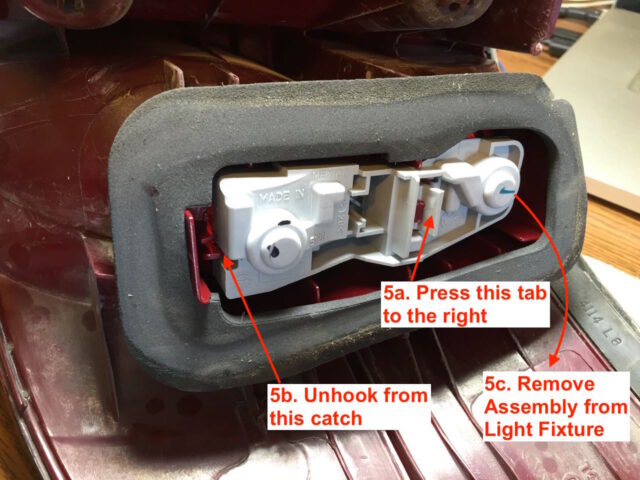
Step 5: Remove the light bulb fixture assembly.
The tail light bulb fixture snaps into place so you must remove it before being able to replace the bulbs. Depress the tab indicated below and lift the assembly up and out of the tail light. The fixture does not come straight out and it does not hinge from the left side where the catch is (because the bulbs go through holes and will get caught), so you will need to play around with getting this piece out. It does not need to be forced though so take your time:
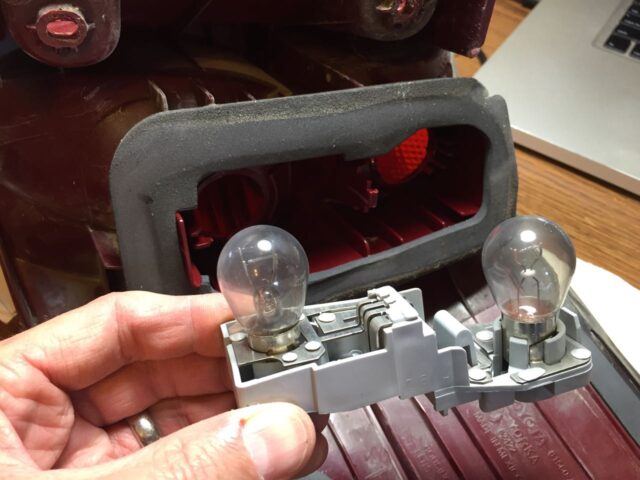
This is what it looks like once you get it out:
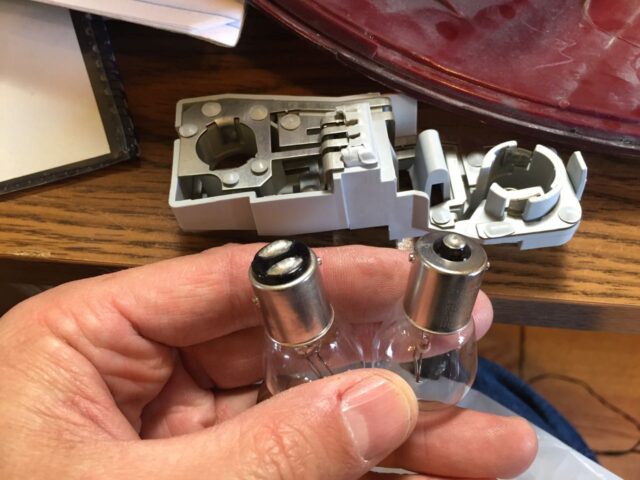
Step 6: Replace the bulbs.
The two bulbs are different–one has two filaments (and two contact points on the end) and the other has one filament and only one contact point in the center of the end. The posts that stick out the side of the base are different too, the one on the left has its posts offset and the right one has them even:
The bulbs can only go in one way and you can see which one goes into which socket by looking in the socket to see if there is one contact point or two. I didn’t get a picture of that but here you can see me about to put in the two filament bulb and the two notches the posts slide into:

The bulbs are inserted and then you press them in and turn them about 1/8 of a turn to lock them in place.
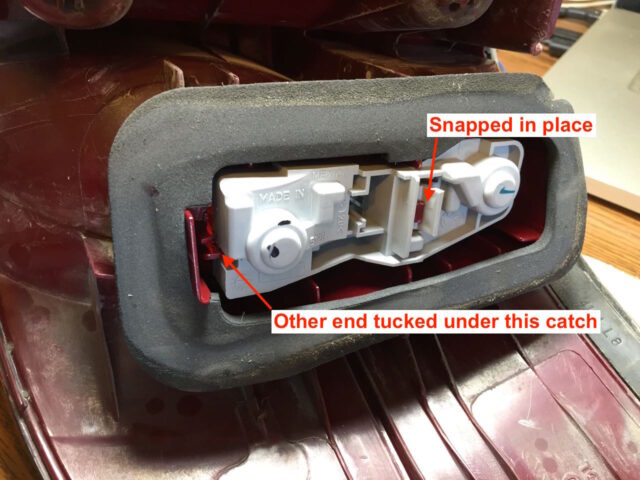
Step 7: Reinstall the bulb assembly into the tail light.
Remember that one side has to fit under the catch on the end and then the snap holds it in place:
Step 8: Reconnect the tail light electrical connector.
It can only go on one way and it should snap in place:
This is what it should look like when it is reconnected:
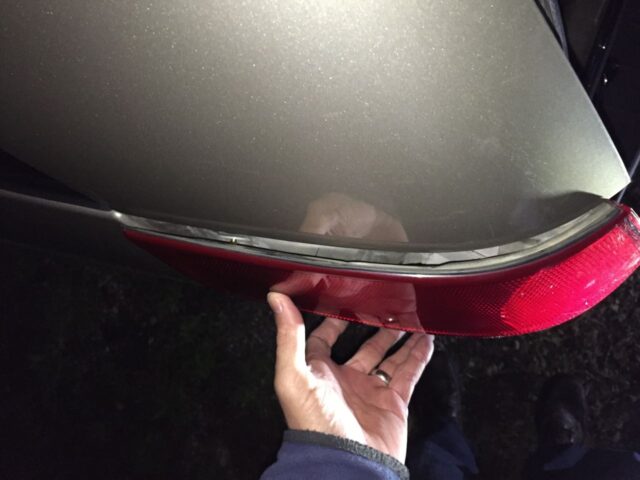
Step 9: Snap the tail light in place using the pins.
Line up the brass pins with their holes and carefully push them into the holes until the tail light assembly snaps into place.
It should go on evenly like this:
Step 10: Reinstall the two 10mm headed tail light fixture bolts.

Be careful not to over tighten the bolts or you could crack the tail light.
Now you have tail lights again!
Amazon Associate Disclosure: As an Amazon Associate I earn from qualifying purchases. This means if you click on an affiliate link and purchase the item, I will receive an affiliate commission. The price of the item is the same whether it is an affiliate link or not. Regardless, I only recommend products or services I believe will add value to Share Your Repair readers. By using the affiliate links, you are helping support Share Your Repair, and I genuinely appreciate your support.
John, I’ve been a bookmarking and part sourcing fool since discovering your site.
My 2006 XLE LTD AWD was brand new when I took it to Europe for a 3 year military tour that put 60K miles on it so it’s a member of the family; you’ve motivated me to tackle several repairs to make sure it’s with us many more years!
Some questions for you, Sir:
— Why didn’t you replace the fender brake/turn bulbs with LEDs like you did for all the bulbs on the lift gate? The backup lights absolutely need to be LED brightness!
— Did you ever pull out the rear interior to rebuild the JBL subwoofer to replace all the dry rotted foam to eliminate the terrible rattle that remains even on the lowest bass setting?
— Did you suffer the terrible gummy sticky dash and how did you solve it?
— Did you ever replace your Aux Jack? The left channel goes out and I have to wiggle the jack/plug and that only intermittently returns the left channel
— Any secret solution to the headlight haze/glaze?
Thanks!!
Ike
Ike, thanks for the questions, here are my responses:
-As for the other exterior lights, I didn’t replace them since I did the inside LEDs, so the opportunity didn’t present itself. I always look at the LED option whenever I replace a bulb now.
-I never messed with the back speaker and didn’t notice any issues with the sound. I actually sold this van today as we’ve replaced it with a 2013 Sienna.
-Our dash didn’t crack until the extended warranty had expired. It never got really gummy on us but it did scratch easily and did got torn up a bit when people put their feet up on it.
-Our van didn’t come with an AUX jack. We used a tape adapter until the tape player belt broke. I wrote an article on how to fix that but I did that repair on an extra stereo I had and never put it back in the van because we didn’t use it that much anyway.
-I used a 3M kit to refinish the headlights but it didn’t last. what I’ve learned since is that you need to spray some kind of clear coat finish over the refinished surface to keep it from oxidizing, which is the yellowing we experience.
Thanks for the questions! –John
The title of this post says Brake lights…These are tail lights. I am trying to figure out how to replace the brake lights on my van. They are the lights on the hatch. Do you have any info or guidelines for that? I cannot seem to find anything liek this online.
These are the brake lights–in the main image you can see that my headlights are not on, the light above the rear window is on, it’s solely a brake light, and only one side of the brake lights are on. If I recall correctly, I put a 2×4 on the brake pedal to get that picture. But, I do have an other article on how to replace the lights located on the hatch: How To Replace Toyota Sienna Liftgate Tail Lights
Ok. On my van those lights are tail lights. My brake lights are on the hatch.
The title says brake light replacement. These are the tail lights. I can’t seem to find anything online on how to replacement the BRAKE lights. They are the ones on the hatch. ANy way to find out?
John…I have a 2004 Sienna Van. When you turn the vehicle on there is an intermittent humming or buzzing sound from the back right side like something trying to “kick in”. It comes from the area of the rear blower or AC. This happens even if the rear AC is off. I don’t know if something is trying to start up. It isn’t consistent and eventually goes off. It is annoying and you can even hear it outside the vehicle. Just to note we do have an issue with the power sliding door on that side but it doesn’t seem to be from that….I may be wrong though. Any suggestions would be helpful. I was going to pull the fuse on the rear AC just to see if that would stop it but that fuse is in the fuse assembly linkage so I haven’t tried it yet. Can you help with where to go?
Thanks for the question David. If the door on the side of the van you are hearing the noise has broken cables I would push the button by the driver’s left knee to turn off the power sliding doors and then go through the process to see if you still hear the noise. If that turns it off you know it is actually the door making the noise. If it is not the door, I have no experience with any AC noises back there so without looking at the van myself I can’t offer much help. Let us know if you figure this out.
Hello John,
Thanks for the website. I have 2000 Sienna, the power sliding door is broken. I would like to convert the the broken auto sliding door to manual sliding door. Would you please tell me how to do fix it. Thanks.
I have an article that teaches you how to trim the cables off but I have never worked on a 2000 model, so that van may differ in design. The article I wrote on trimming your cables can be found here: How to Trim Broken Sliding Door Cables on 2004-2010 Toyota Sienna