
If your Kenmore Elite dryer runs but does not heat then there are a series of troubleshooting steps you can do yourself to repair your dryer. The problem could be a bad thermal fuse, a thermistor, or in my case, the electric heating element. In this article I cover all the disassembly steps and how to fix Kenmore Elite electric dryer not heating. This repair will also cover changing the drum belt, since you must remove the drum.
How to Fix Kenmore Elite Electric Dryer Not Heating
Appliance Involved:
- Kenmore Elite Electric Dryer Model 110.606932990 (discontinued)
Parts Required:
Manual:
- Kenmore Elite Electric Dryer Model 110.606932990 Service Technician Manual Part No. 3977696 (pdf download)
Optional Parts:
- Genuine Factory OEM Original Dryer Drum Belt 661570 661570V
- Whirlpool 4392067RC 27-Inch Dryer Repair Kit (if you want the belt, drum rollers, and tensioner pulley)
- Thermal Fuse Part Number 3390719
- Thermistor Part Number 8577274
- Thermal Cut-Off Part Number 279769
Tools Required:
- Phillips and Flat Head Screw Drivers
- 1/4″ hex driver
- Multimeter (for testing the electrical components–I love my Fluke 177)
- Needle Nose Pliers
- Regular Pliers
Repair Instructions
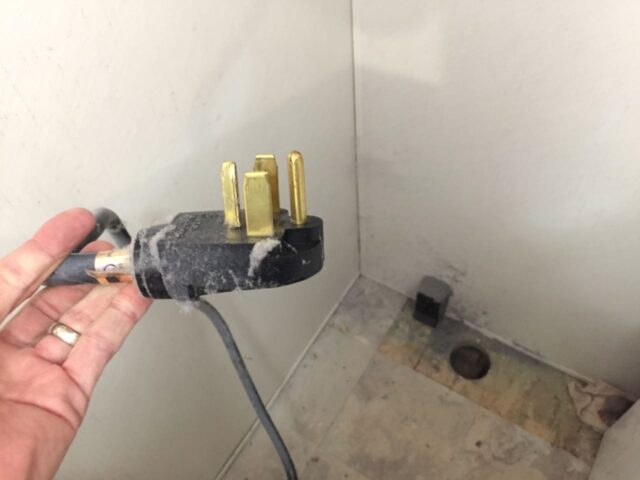
Step 1a: Verify the proper voltage.
One of my readers, Mike, who is a 30-year appliance repair veteran shared a step I initially missed, which could save you from unnecessarily replacing the heating element. Electric dryers are 220 Volts where normal US outlets are 110 Volts. They get the 220 volts by adding two legs of the 220 V service. If one of the legs are dead you could have power at the dryer, enough to turn the drum and run the electronics, but not the power necessary for the heating element. Here is his suggestion:
You should always check for correct voltage supplied. 240 volt circuit has two 120 volt circuits sharing a common neutral. It is possible and quite likely for a circuit breaker or fuse for one leg of that circuit to fail while leaving the other leg live. That could leave the controls and motor circuit operating normally but depriving the 240 heating circuit dead. All components would test good but still no heat.
Easiest way to test is to pull power cord plug out slightly to access male terminals with multimeter set for ac voltage. Should measure approximately 120 volts between each side post and center post and approximately 220 volts between two side posts.
If you don’t have 220 volts then you need to look into the electrical wiring and circuit breaker at your house but I’m not going to cover that here. If you do have 220 V AC at your dryer then read on for how to troubleshoot your dryer.
Step 1b: Unplug your dryer.
We are working with an electric dryer so the first thing you are going to want to do is to unplug the dryer from the wall. When we open up this dryer you could be electrocuted if you do not unplug your dryer.
Alternatively, if you cannot get behind the dryer to unplug it, you can cut the power in the circuit breaker panel:
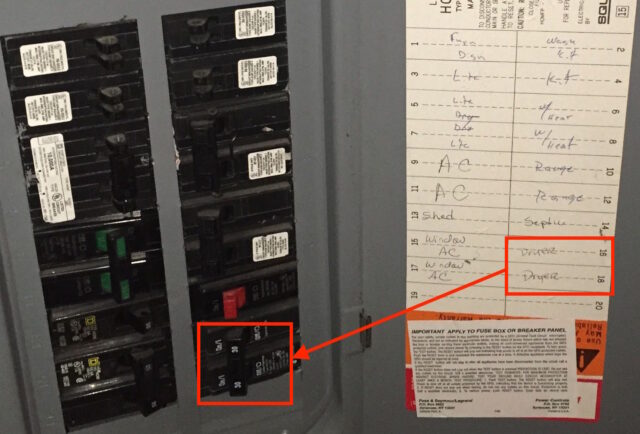
If you use the circuit breaker panel to cut power to the dryer you should really test that the dryer will not come on before you proceed to make sure the label on the circuit breaker panel was correct (or that you switched the correct breaker off).
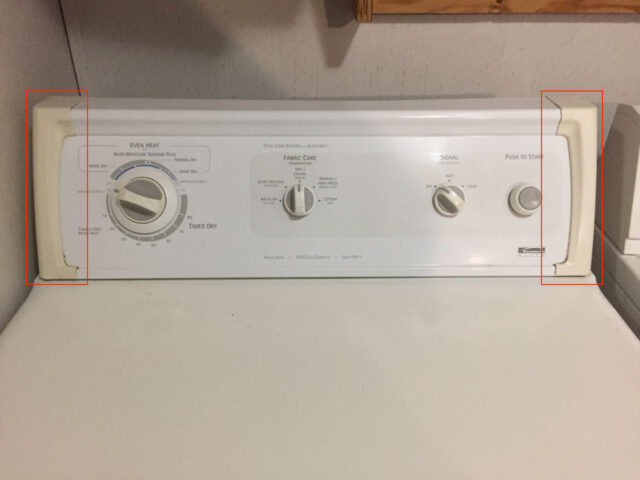
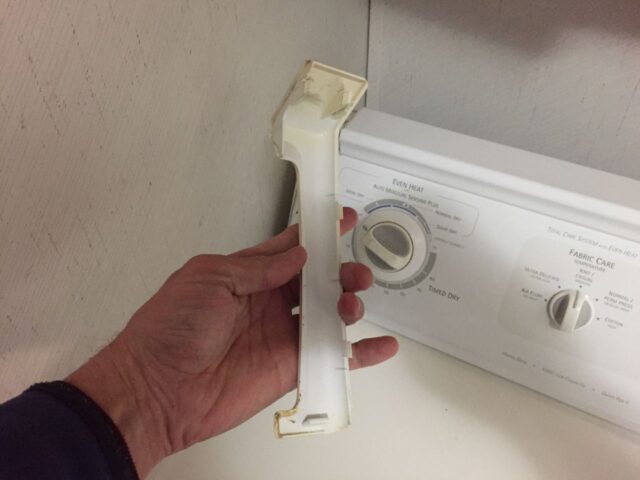
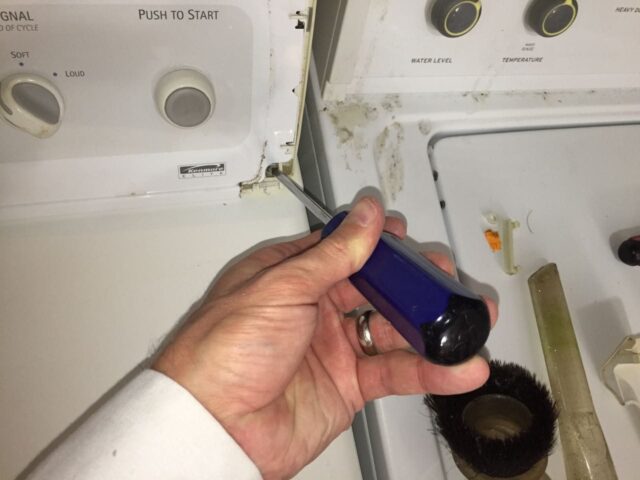
Step 2: Remove the control panel bezel ends.
There are snap-on plastic covers on each end of the control panel:

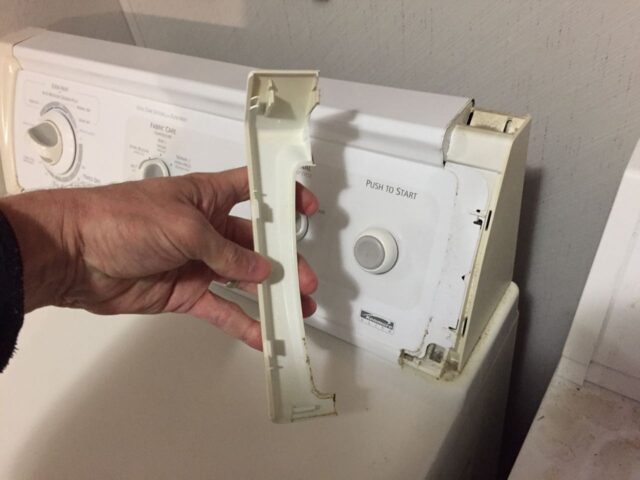
Repeat for the left end cap.
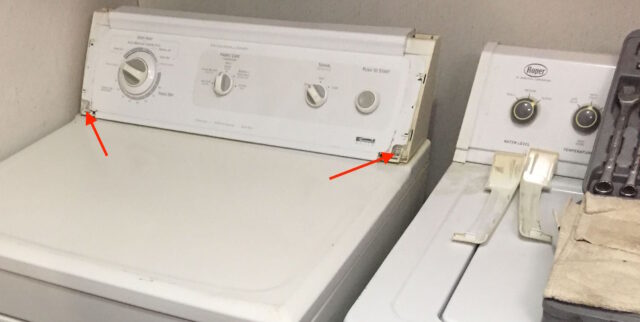
Step 3: Remove the two control panel screws.
There are two Phillips head screws on the left and right lower corners of the control panel:
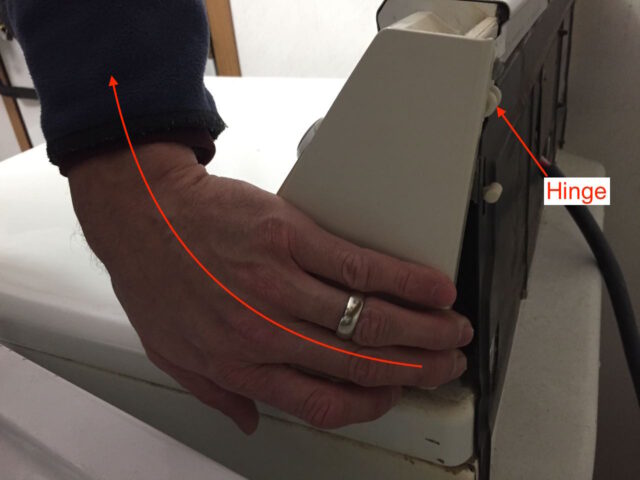
Step 4: Lift the control panel up and out of the way.
Caution: If you didn’t unplug your dryer in step 1 then you must do it before proceeding–you will be exposing the high-amp wiring that powers the dryer.
The control panel is hinged at the top back corners. Grab low on each side and swing the bottom out and rotate the panel up and over:
Here is a picture of the control panel opened up:
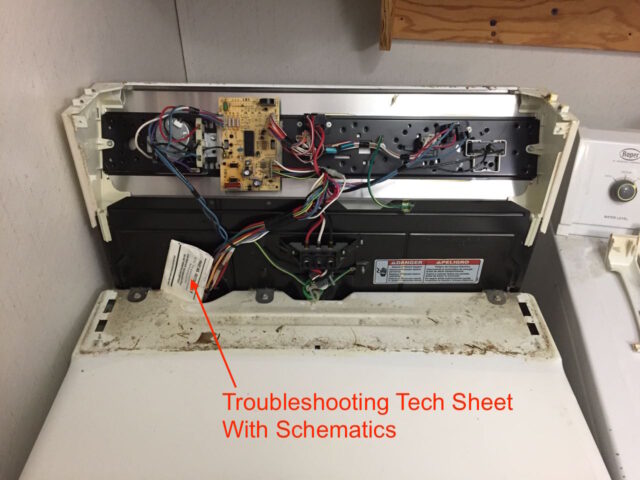
I was lucky that the tech manual was tucked under the control panel, which can really help in troubleshooting.
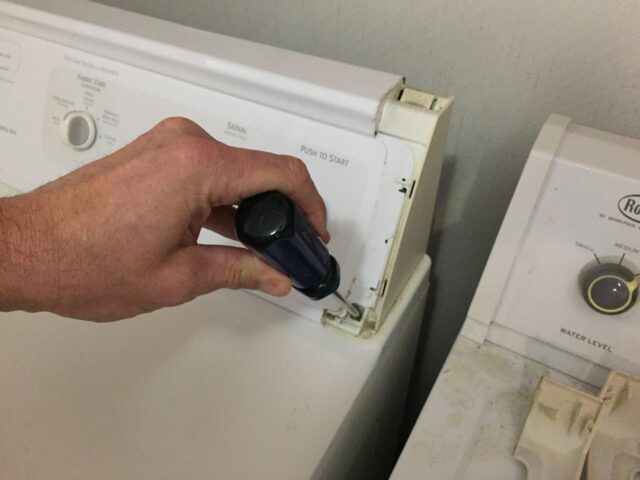
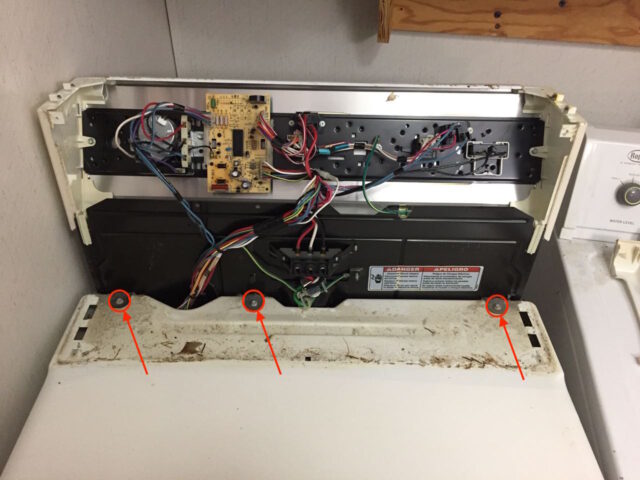
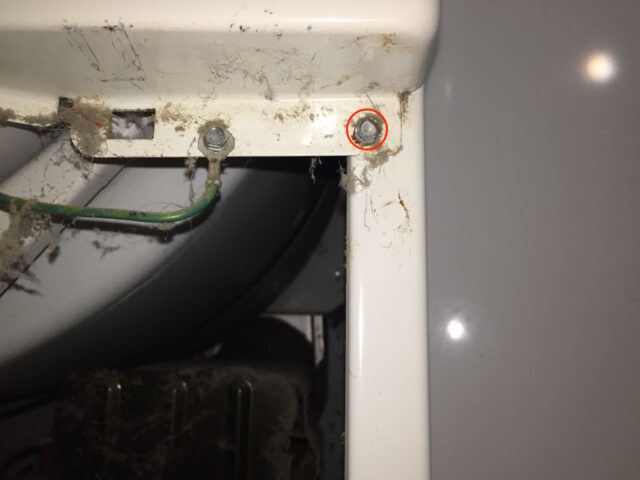
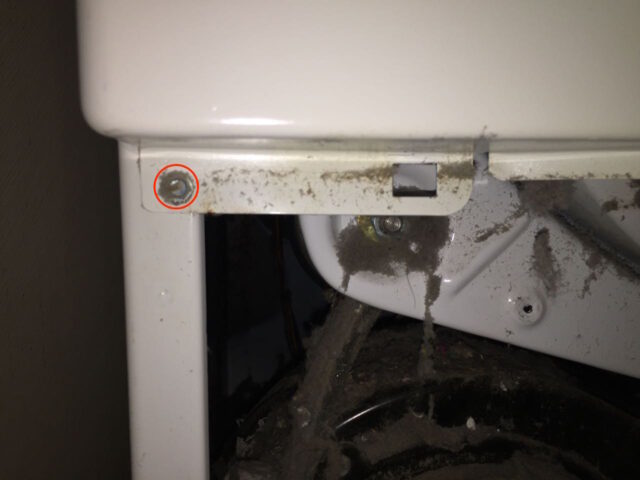
Step 5: Remove the screws from the rear of the top cover.
Unscrew the 3 hex head (and slotted for a flat-head screw driver) screws from the top of the back edge of the top cover. The screws are 1/4″ hex heads so if you have a screw bit driver, it will fit perfectly over them:
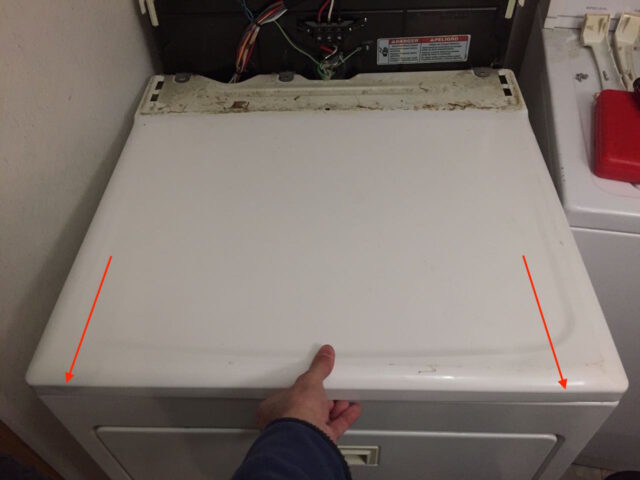
Step 6: Remove the top panel.
Caution: The edges of the sheet metal can be sharp.
Slide the top a little more than an inch straight forward and then lift the top panel off.
Once you have slid the top out you can lift it off:
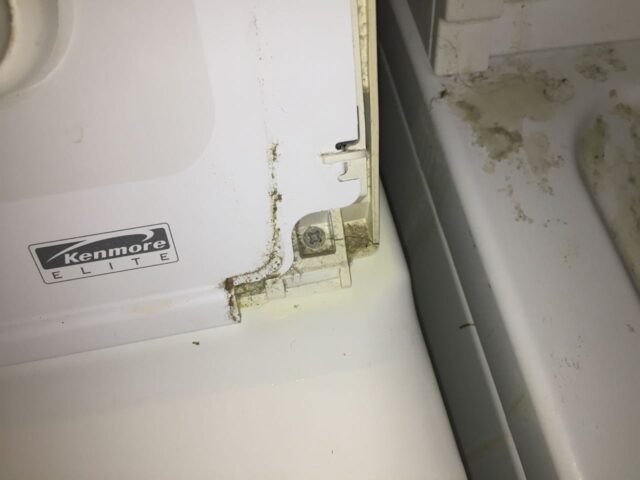
Set the top panel aside. I also cleaned the top while I had it off since a previous owner of the dryer had spilled laundry detergent up under the control panel.
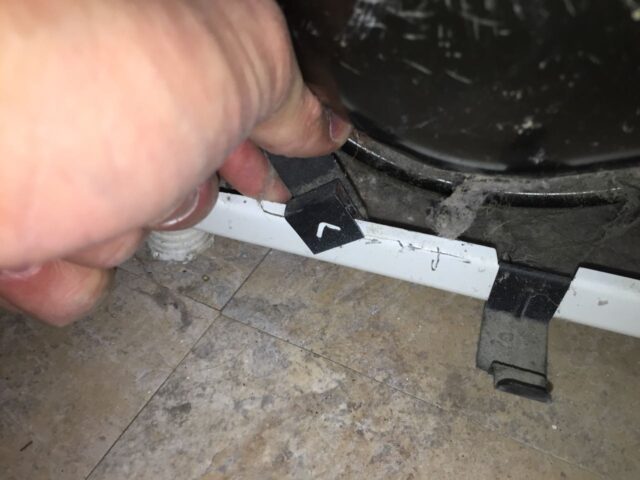
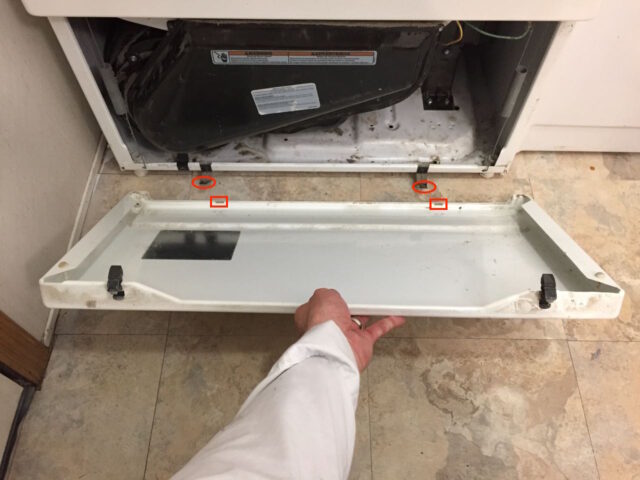
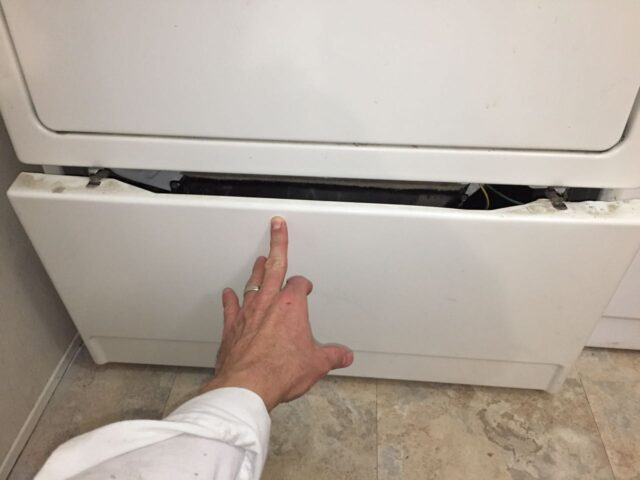
Step 7: Remove the lower front panel.
There are two spring clips on the top of the lower panel in the following locations:
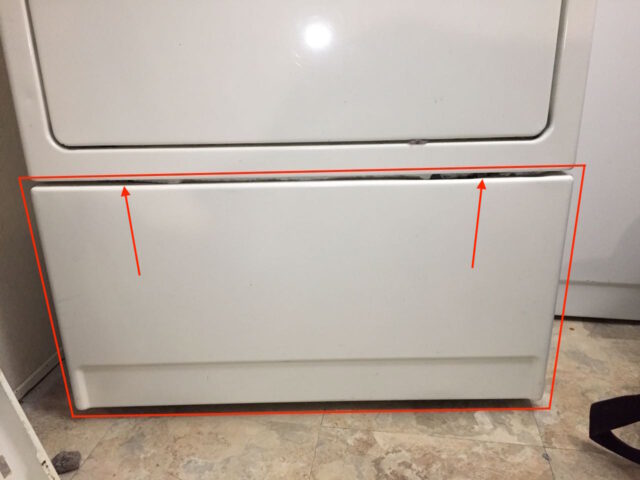
The instructions I read elsewhere said to just pry the top edge till it came loose but that just resulted in bending the top edge. I found an easier way–insert a thin flat screwdriver on the top of the clip and then gently lift the screwdriver up, which will release the lower panel:
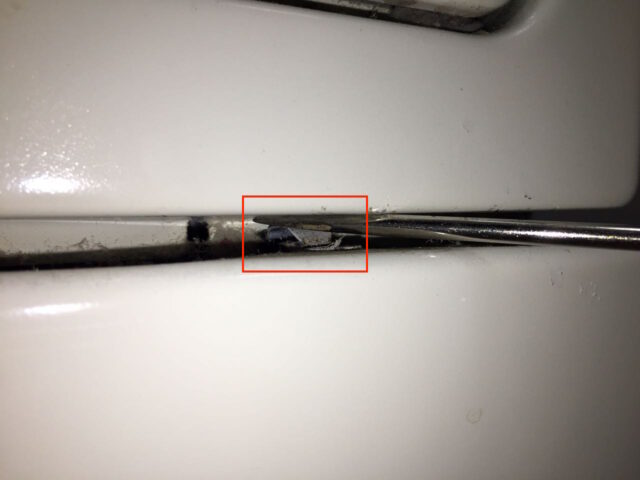
Here’s the top edge of the panel released:
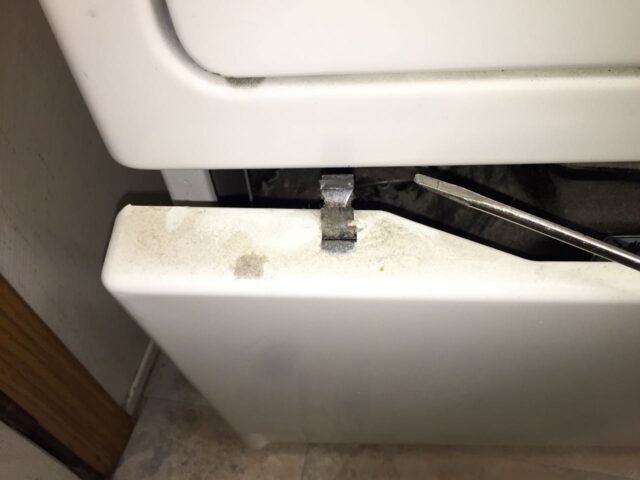
The bottom edge of the panel is sitting on two spring clips that thread into a slit on the bottom edge of the door:
Set the lower panel aside.
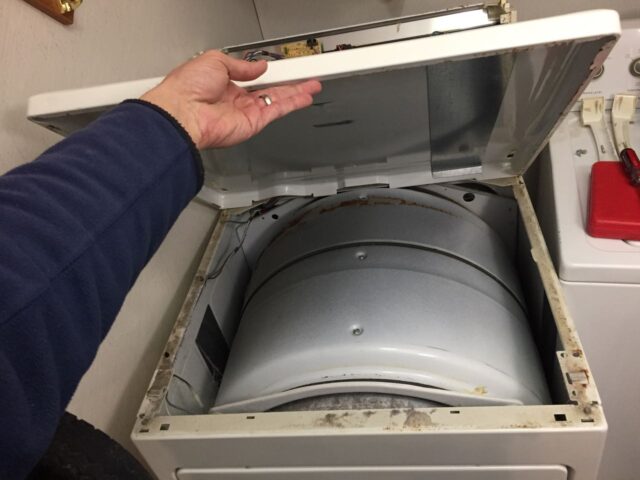
Step 8: Remove the lint screen.
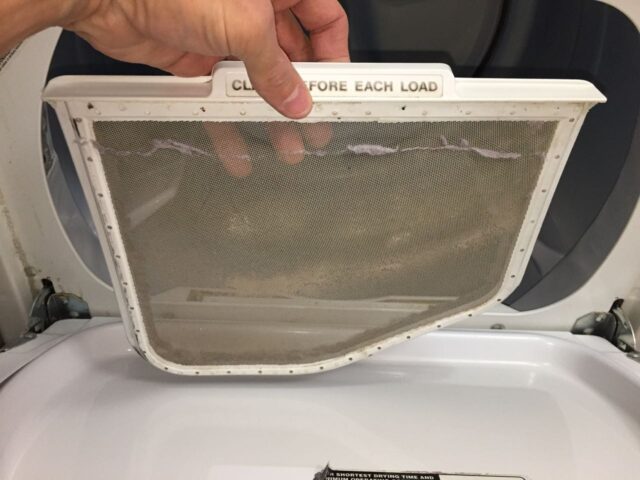
Set the lint screen aside. You need to remove the screen because soon we will remove lint duct that it inserts into.
Step 9: Remove the door springs.
There are two door springs that we will need to remove, one on each side:
The easiest way to remove them is to unhook the bottom end from the dryer shell and then unhook the top end. Here’s what they look like
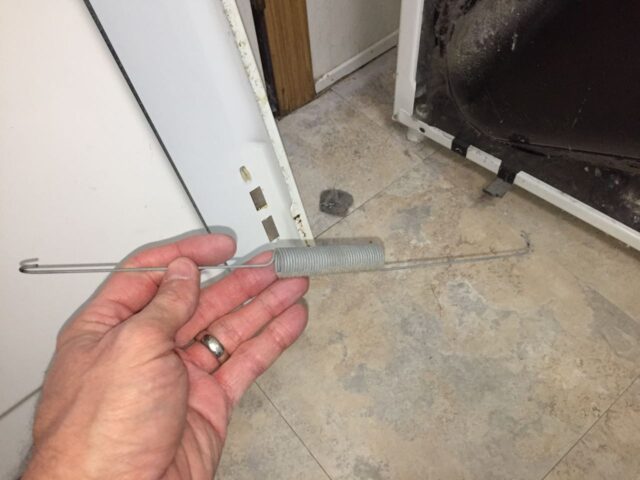
Note: if you open the door, after removing the springs, the door will fall open as the springs support the door when it is being opened.
Step 10: Remove the lint duct.
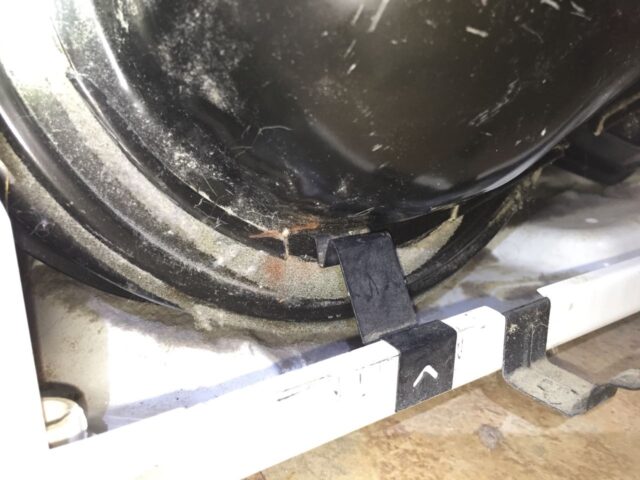
The lint duct is held in place with two screws and a spring clip. The spring clip is on the bottom left and the screws are on either side as shown below:
Remove the two screws and then take a flat head screw driver and slide the spring clip to the left and up and off the bottom edge of the dryer shell. Here I am removing the spring clip:
Here is the lint duct removed. I cleaned it out before I put it back on because it was packed with lint:
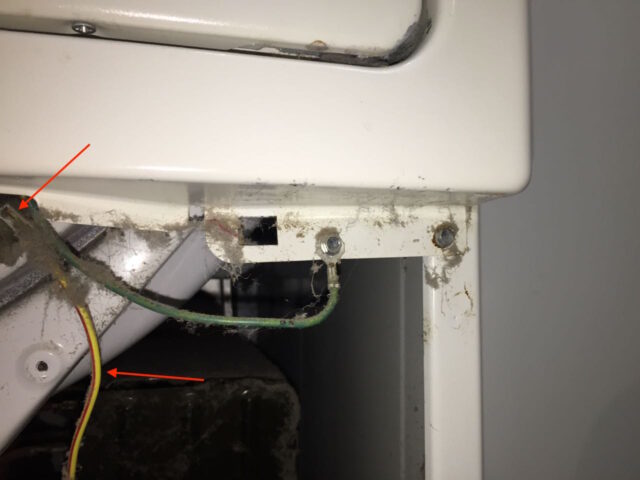
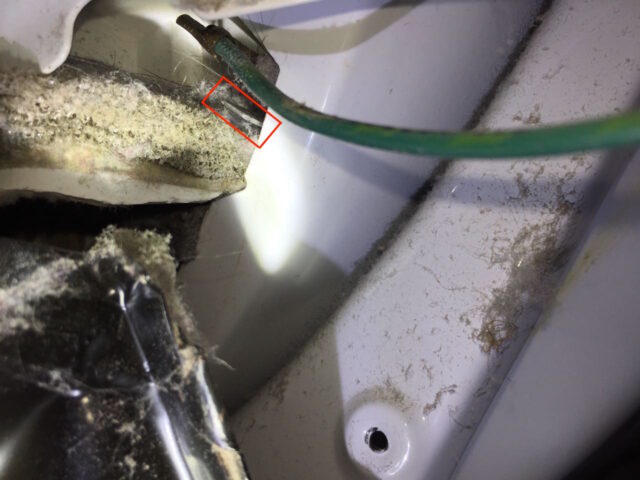
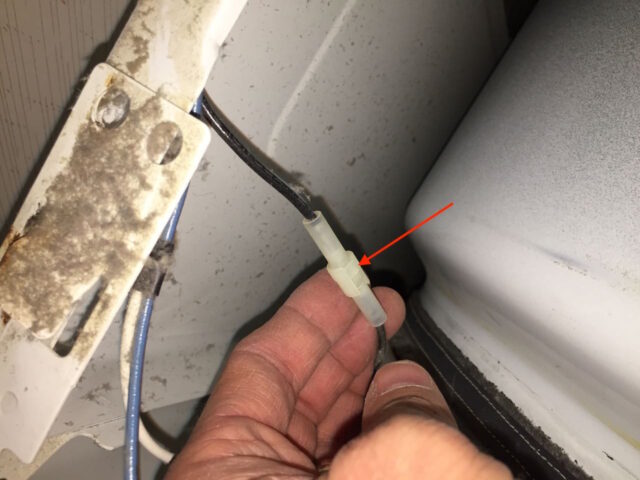
Step 11: Disconnect the drum lamp electrical connector.
In the top front left corner there is a black single electrical connector, which can be seen in the picture below:

To disconnect this connector simply grasp each end of the connector and pull the connector straight apart. A closer look at the connector:
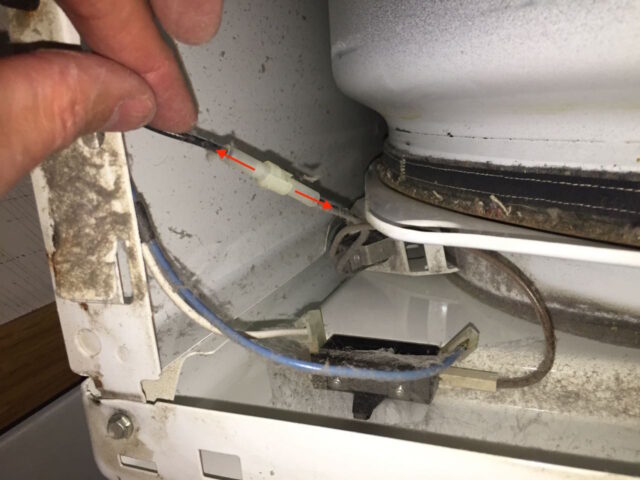
Here the connector is disconnected:
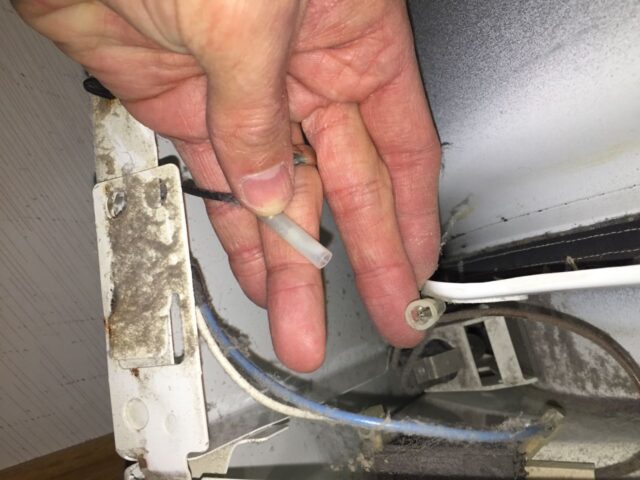
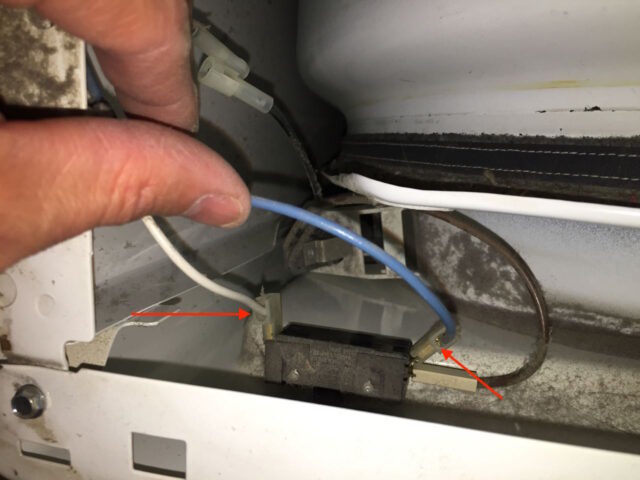
Step 12: Disconnect the door switch.
Directly in front of the drum lamp connector there is a two wire switch with a white wire and a blue wire switch. Pull the connectors directly off the terminals as seen below:
Here the electrical connectors are disconnected:

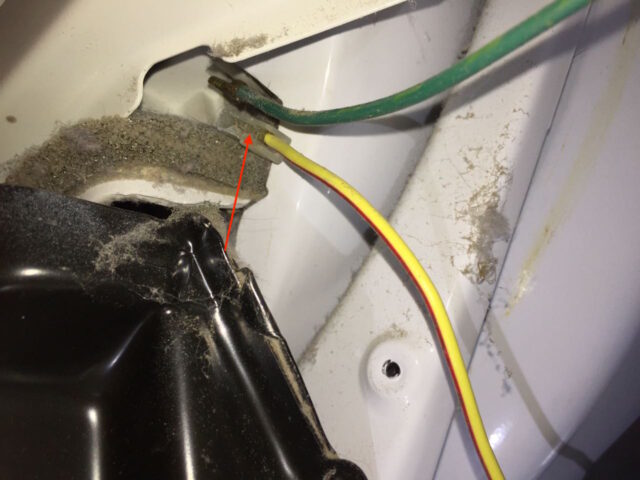
Step 13: Disconnect the moisture sensor wire.
There is a yellow wire with a red strip on it on the lower right:
Pull the connector straight off as indicated below in the picture which is taken looking up from below:
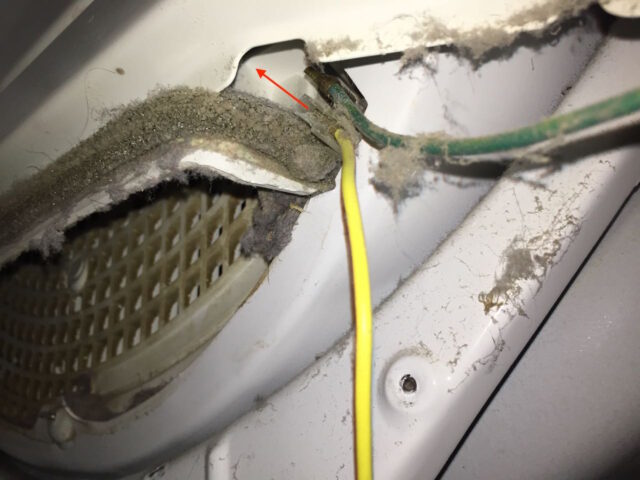
Here the moisture connector is removed:
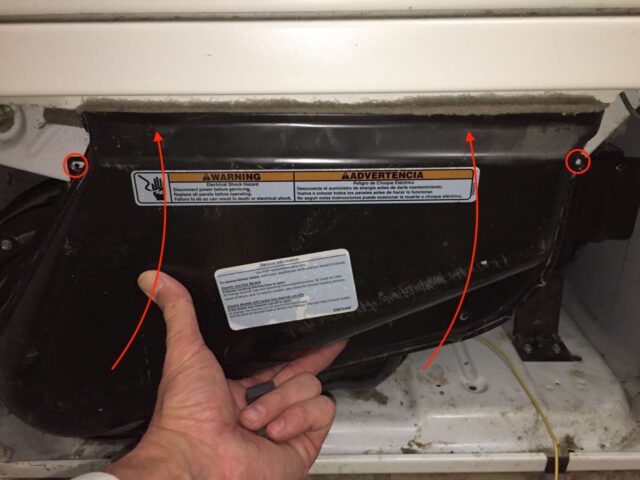
Step 14: Remove the 4 Front Door Panel Screws.
First remove the bottom two screws. They are 1/4″ hex head. Here is the lower right screw:
The lower left screw:
Once you have removed the bottom two screws, remove the top two screws:
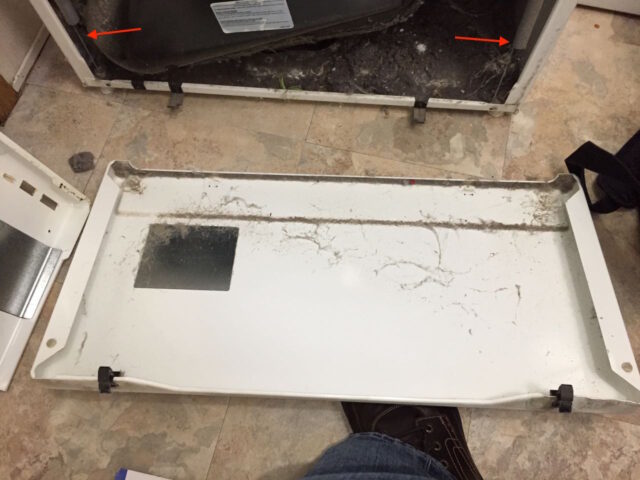
Step 15: Remove the front door panel.
Caution: there are sharp edges on the sheet metal.
Support the drum with one hand and carefully grab the top of the door panel. The door assembly is supporting the front end of the dryer drum but it can safely rest on the other internal components of the dryer. Lift it about a half-inch and then pull it straight off. Here is the door panel removed:
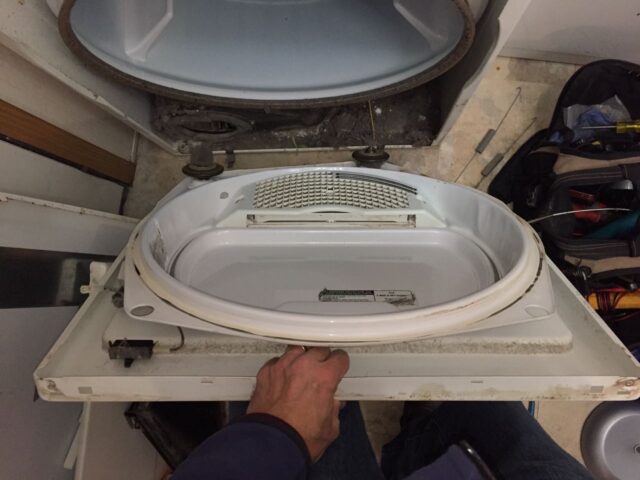
Set the door panel aside. Be careful because there are two rollers on the bottom.
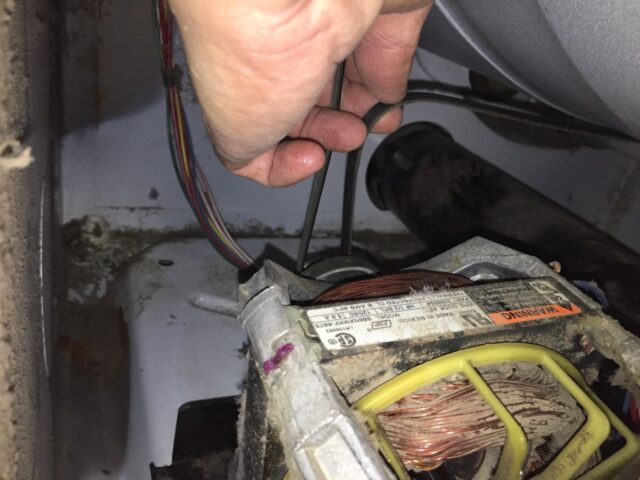
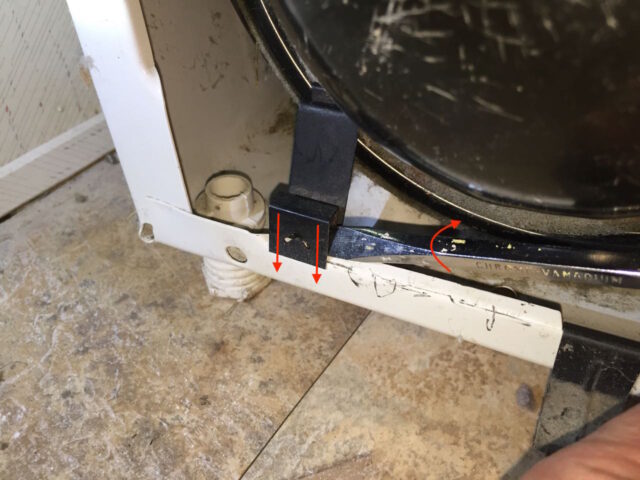
Step 16: Disconnect the drum belt tensioner.
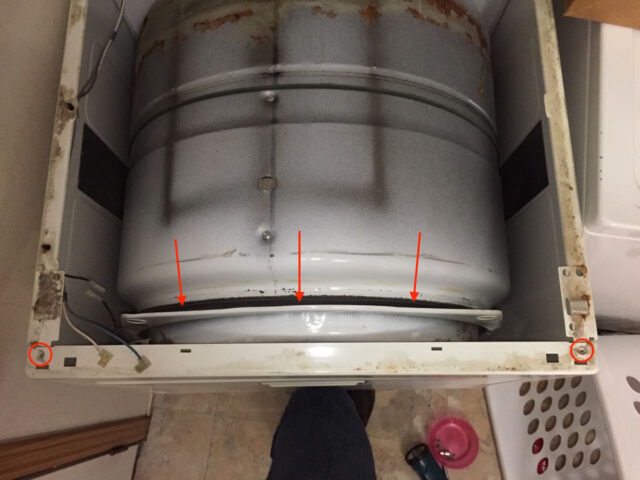
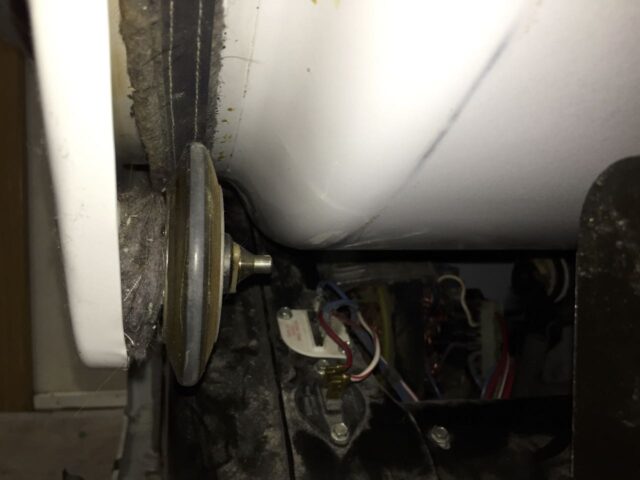
We need to remove the drum to access the parts we need to troubleshoot. To remove the drum we need to remove the belt from the tensioner. You can access the tensioner on the lower left side of the drum as indicated below:
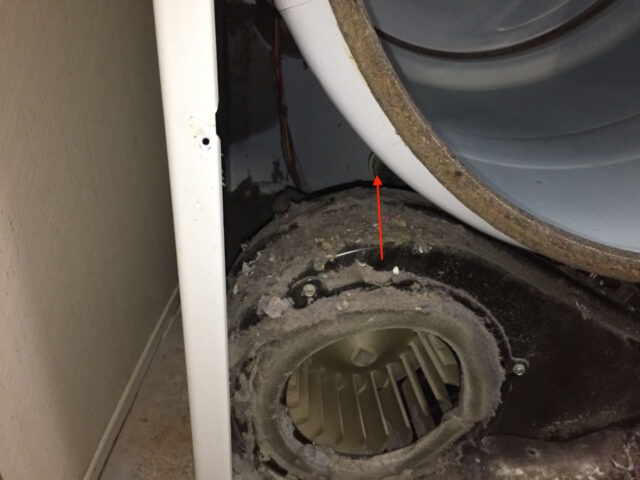
Use a flashlight to see back around the drum. Rotate the tensioner pulley up and to the left and slip the belt out from under the pulley:
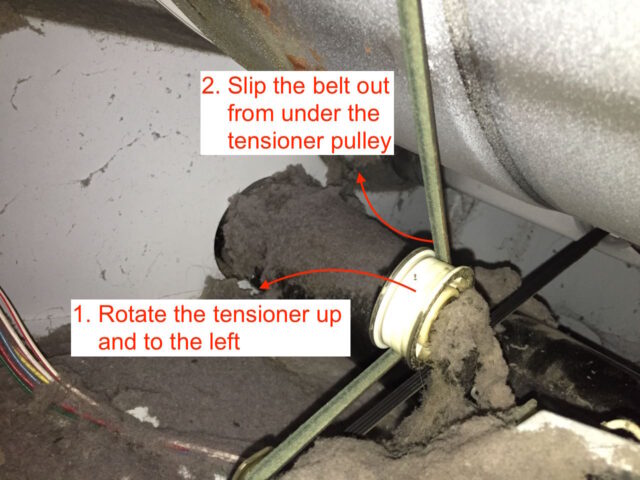
Here the belt is disconnected from the tensioner:

Make sure the belt is not looped over the shaft of the motor so the belt will not “snag.” The motor shaft is at the lower center of the picture above.
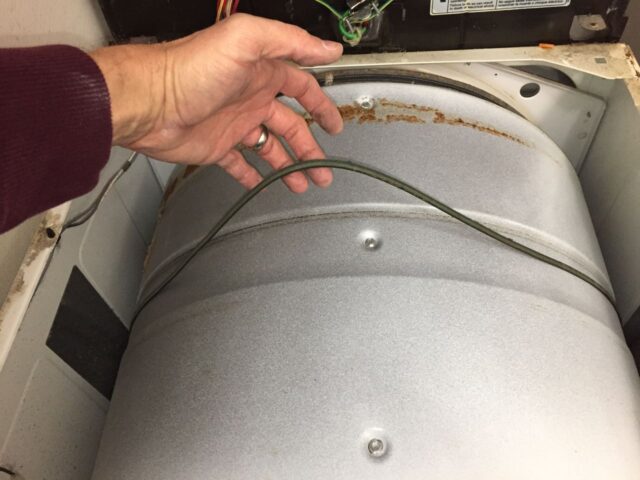
Once you have the tensioner disconnected, the belt around the drum should be loose like this:
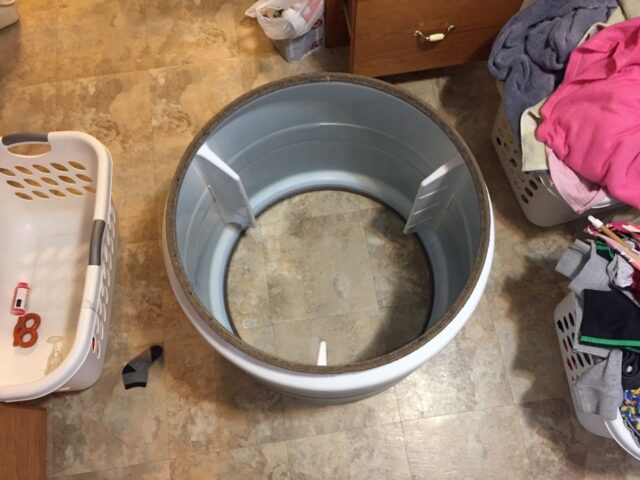
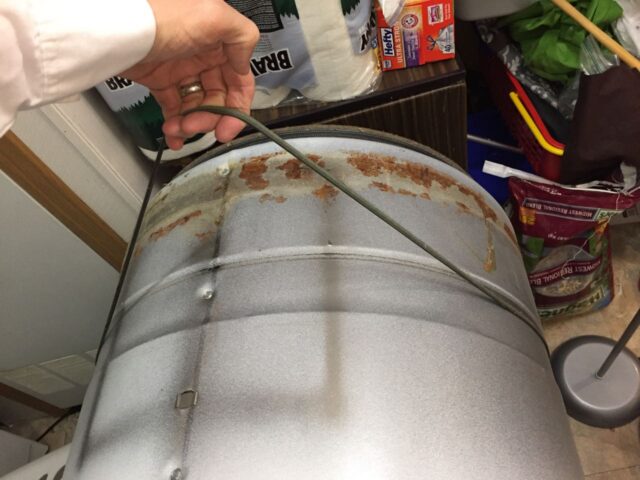
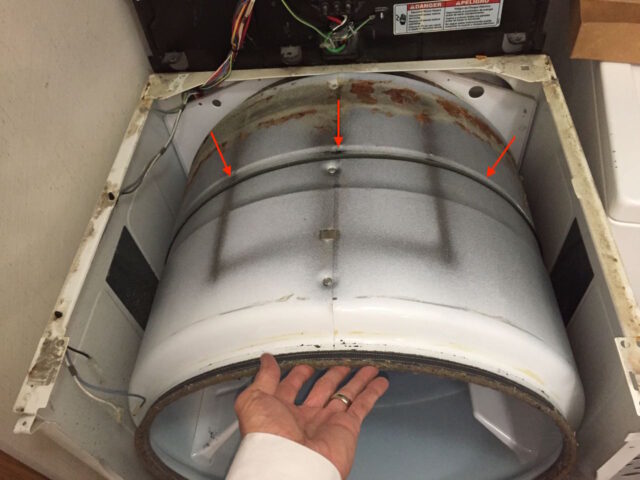
Step 17: Remove the drum.
Tip: I think this drum is exactly the same on the front end as it is the back end but you may want to mark which end went in first at this point, before you remove your drum. Mine had some rust on the back end which let me know which end was which.
The easiest way to remove the drum is to put one hand into the drum, lift the drum slightly, and bring the drum straight out the front of the dryer. you may need to spread the sides slightly.
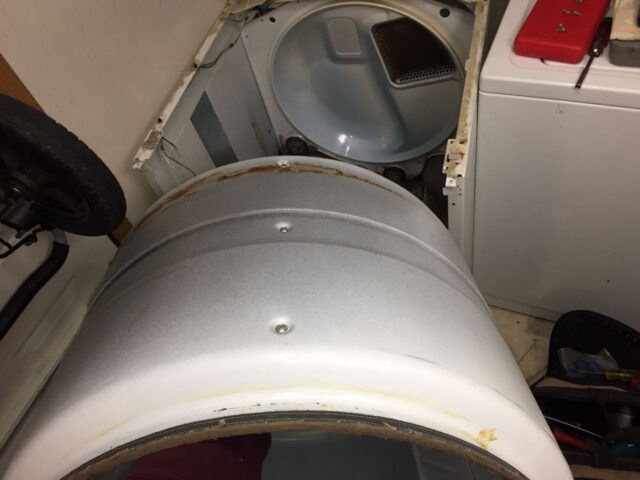
Set the drum aside. You can set it on one of its end so it doesn’t roll around:
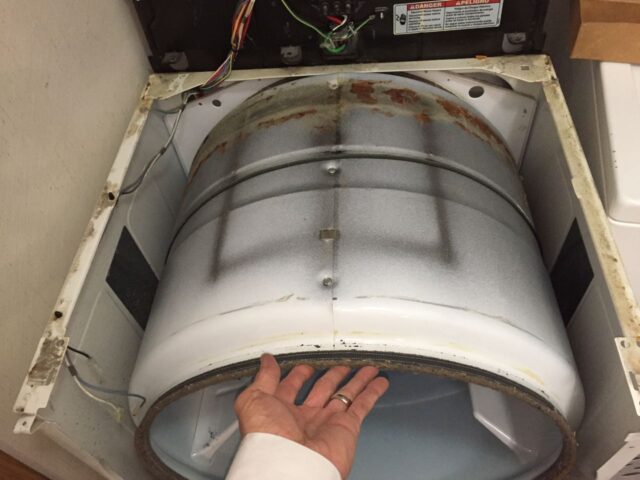
Step 18: Clean out the inside of your dryer.
This dryer was extremely dirty inside, which is actually dangerous as all that lint could catch fire. You should definitely clean out ALL lint out of your dryer when you perform this repair.
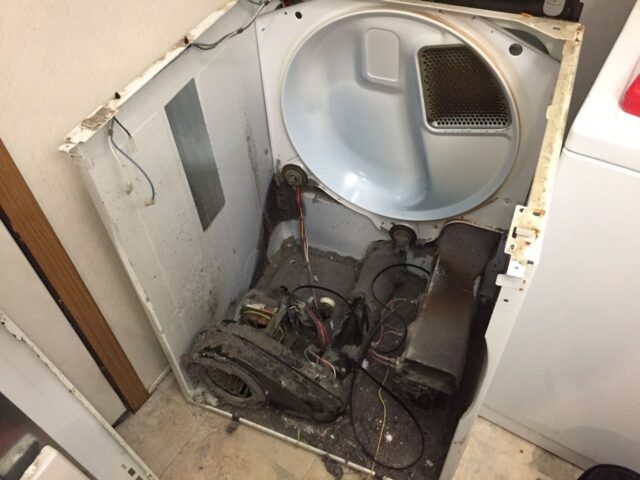
I used a vacuum and cleaned it out.
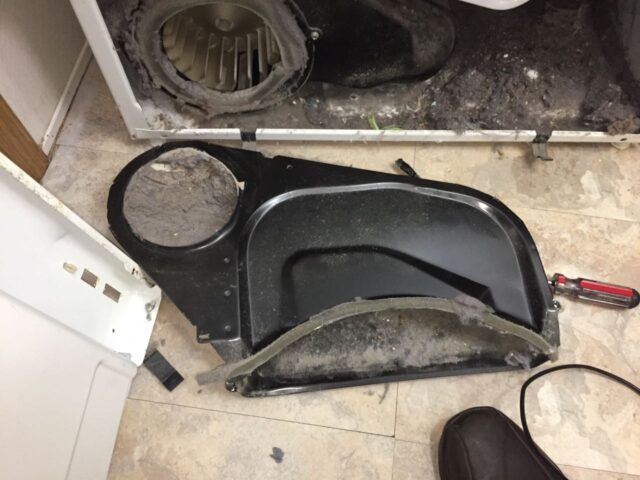
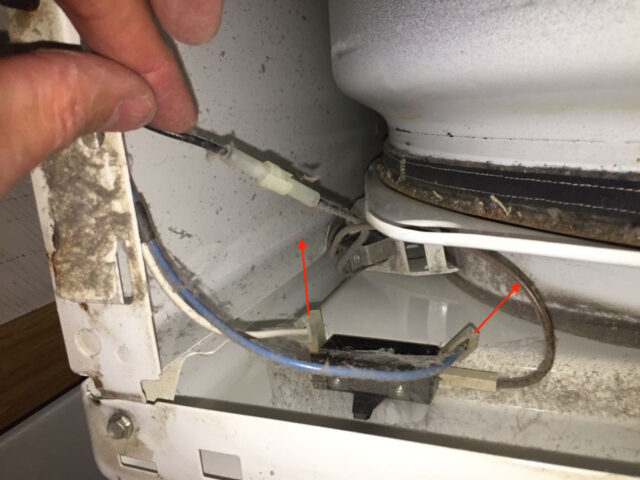
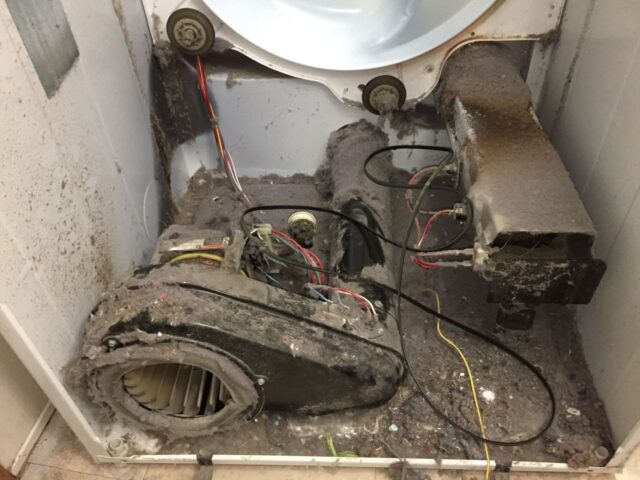
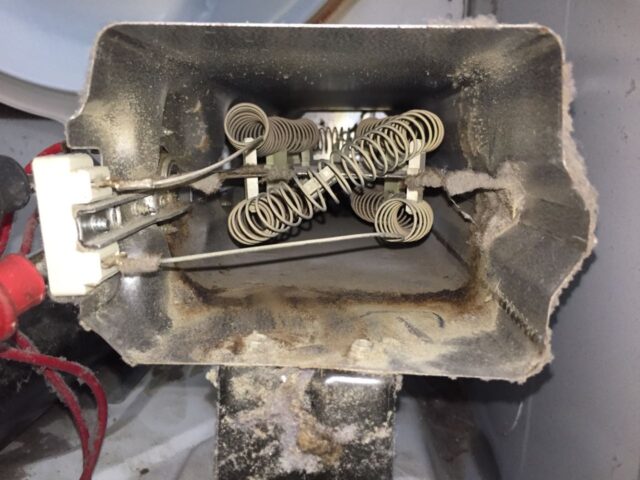
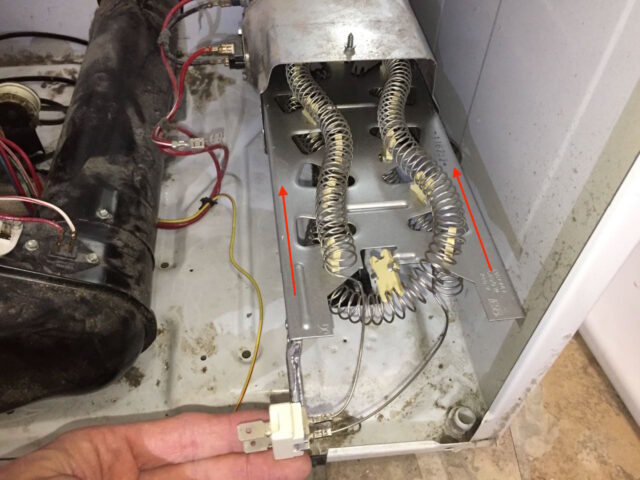
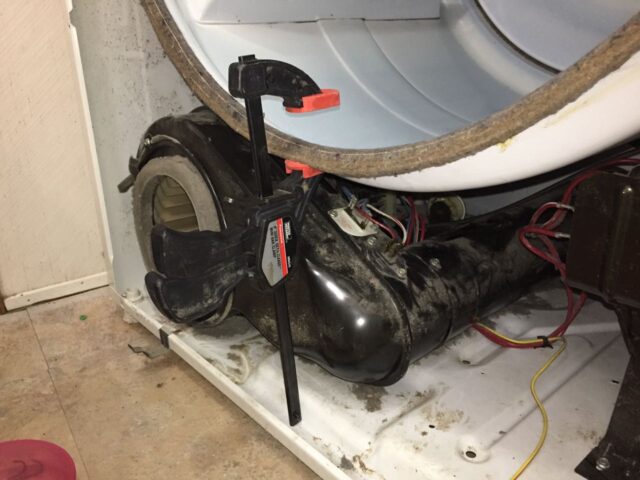
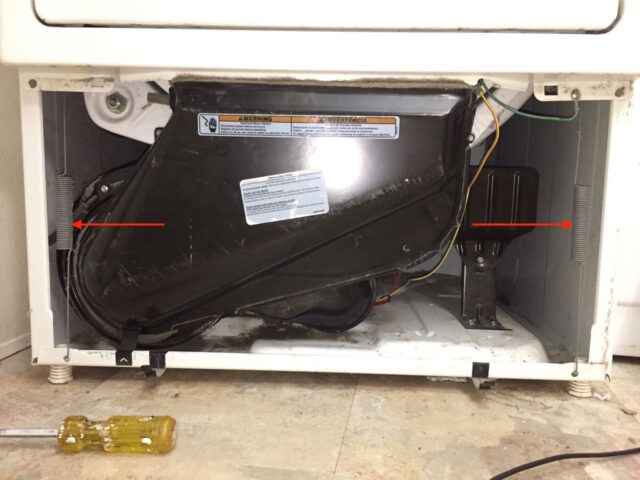
Step 19: Identify the components of the dryer heater assembly.
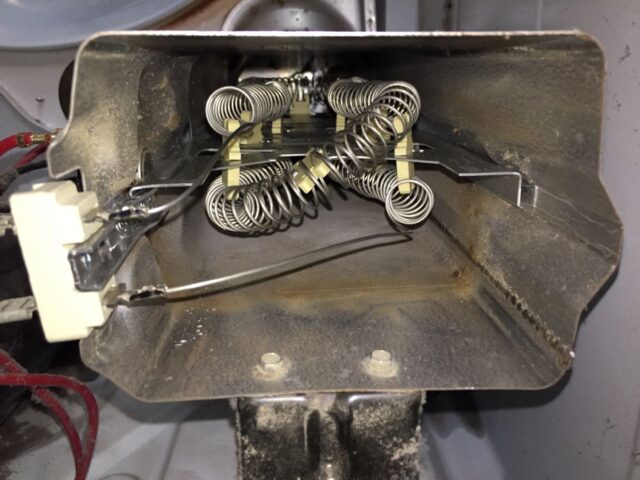
We are now at a point where we can really get in there and determine the root cause of the dryer not heating. Because the dryer drum turns but the heat does not come on we are going to focus on the heater and the three main parts of that assembly: the thermal Cut-Off, High Limit Thermostat, and the Heating Element (all you can see is the connector in the picture below):

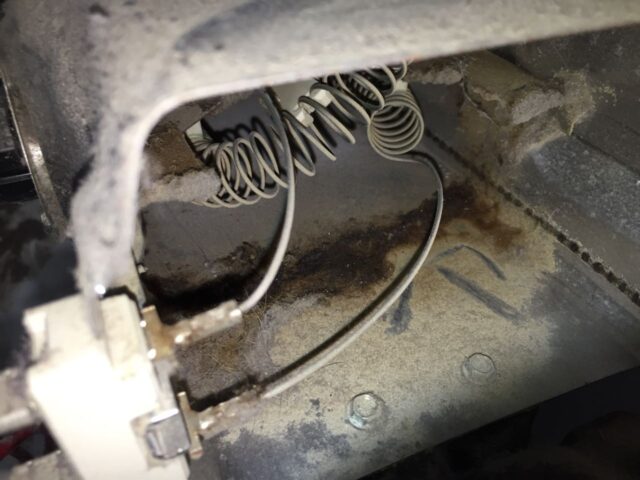
These thermal switch, thermostat, and heating element are in series, and here is a snapshot of the schematic:
Because each of these components are in series you can test them in place without disconnecting their electrical connectors. Because I’m in the habit of “isolating” components, I disconnected one leg of each component when I was testing it, but it is not necessary because there is nothing in parallel with each component.
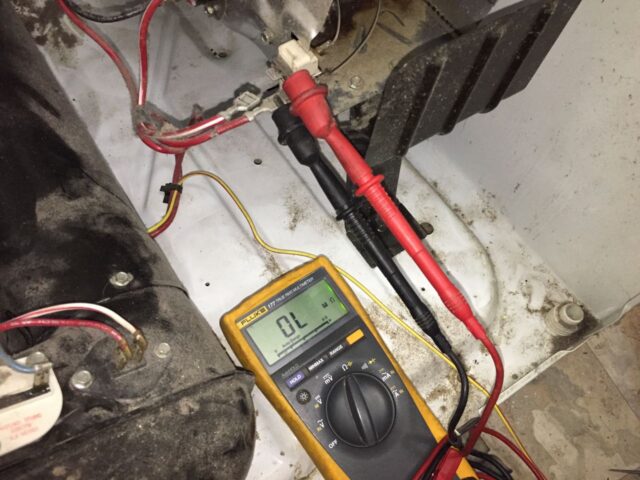
Step 20: Test the heating element.
Set your multimeter to resistance (the horse shoe shaped symbol) and measure the resistance across the terminals of the heating element. The resistance should be between 7.8 and 11.8 ohms. When I tested mine, the multimeter read “OL” which indicates an open circuit, or infinite resistance. This means that at some point in the heating element circuit, between where the two leads on the multimeter are connected, there is a break in the wiring. THIS IS THE PROBLEM! I’m going to go on and test the thermal switch and hi-limit thermostat too, to verify they are good while I’m in here.
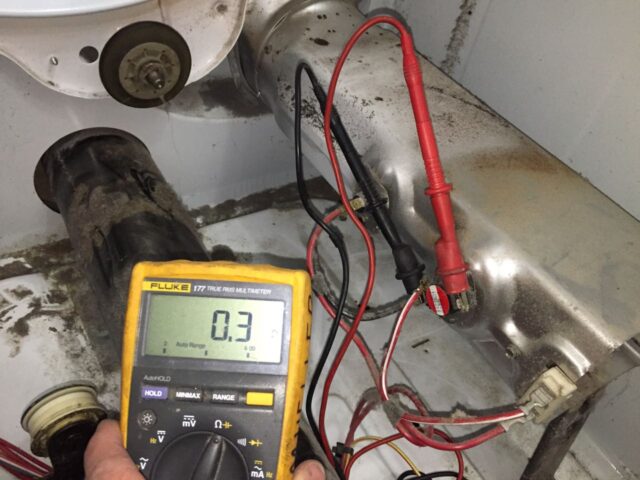
Step 21: Test the high limit thermostat.
Keep your multimeter on the resistance setting and put one lead on each of the high limit thermostat and read the resistance across the thermostat. The resistance should be nearly zero because the component is a “normally closed” circuit. Mine read 0.3 ohms, which should be fine:
Step 22: Test the thermal cut-off switch.
Move your multimeter leads down to the two terminals of the thermal cut-off switch, keeping the multimeter in the resistance setting, and measure the resistance across that switch:
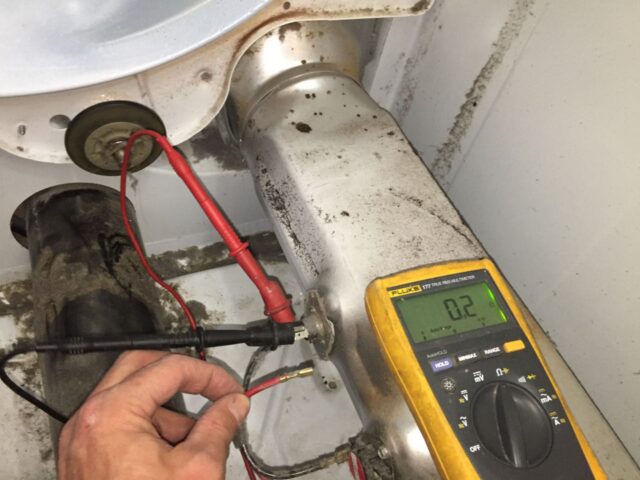
Technically the high limit thermal switch is a fuse, so it should be a normally closed short circuit as well and should be nearly a short circuit. Mine read 0.2 ohms, which is fine.
Step 23: Troubleshooting summary.
The way this heating circuit works is that all three of the components are in series. The thermal cut-off “blows” (i.e. opens the circuit) if the temperature gets above 350 degrees F, the high limit thermostat temporarily opens if the temperature reaches 250 degrees F and then closes again when the temperature drops below 250, to modulate temperature. Each of these two components decide whether the heating element gets voltage across it, which heats the elements. In my case, both the thermal cut-off and high limit thermostat are good, but the heating element is an open circuit, meaning the metal element wires have worn out and broken. The heater assembly needs to be replaced.
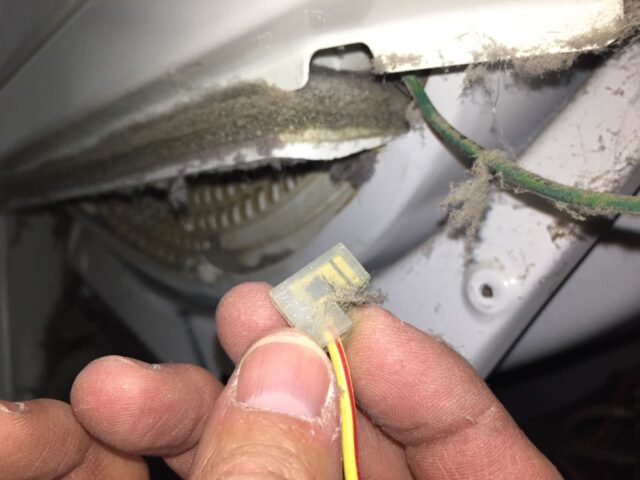
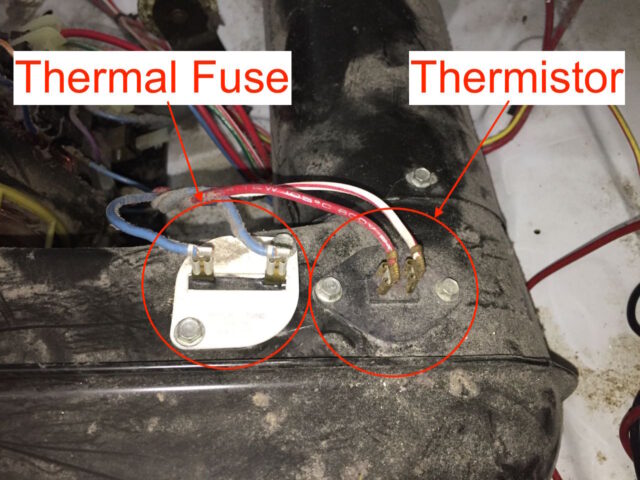
Bonus: Thermal Fuse and Thermistor Testing
I wanted to poke around a bit more while I was in this dryer to point out the components for readers. Two other components that are easy to access, that could keep the drum from turning and the fan from blowing, are the thermal fuse and thermistor. They are on the blower housing:
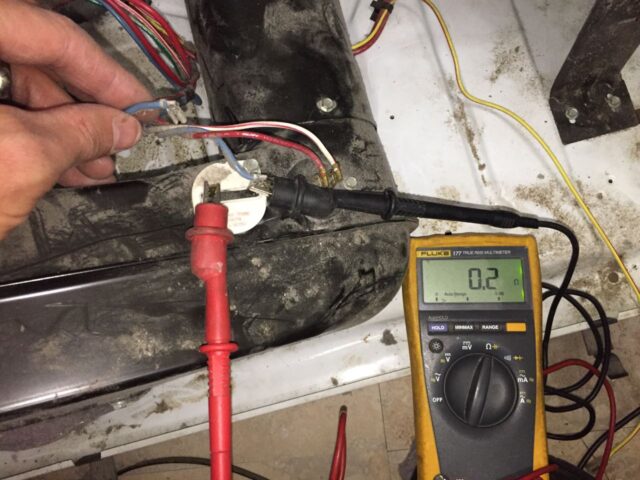
I removed one of the wires from the thermal fuse and checked the resistance. It read nearly a short circuit, which is about what it should be:
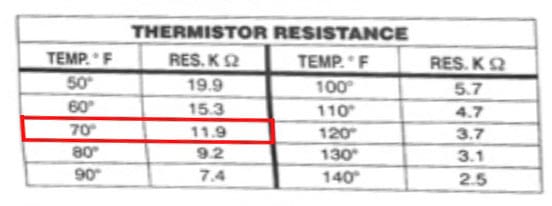
The thermistor read around 11k ohms:

I looked up the thermistor in the troubleshooting manual and 11K is right around what it should read at room temperature:
Now back to the repair–replacing the heater assembly…
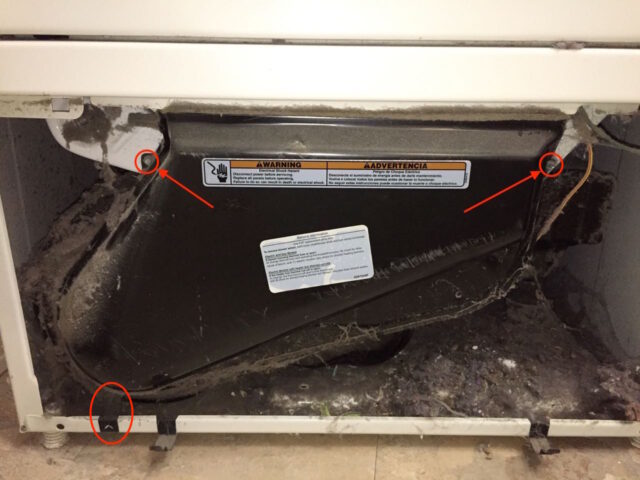
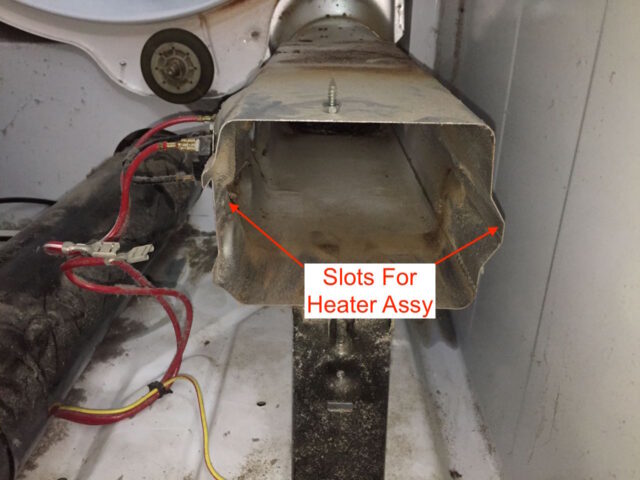
Step 24: Remove the heater assembly.
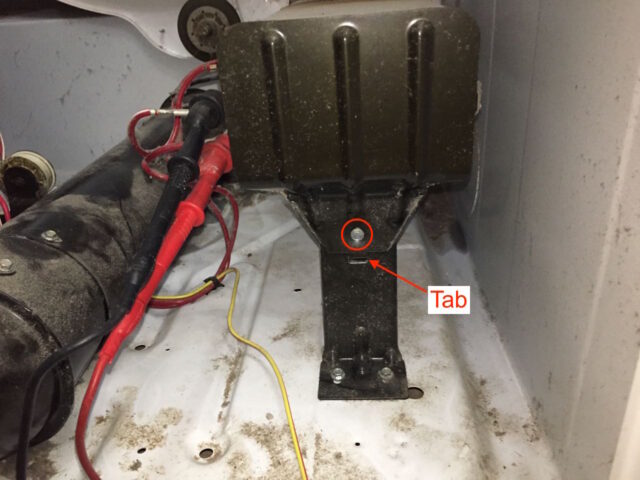
Remove the single screw and lift the heater shield out of the slot which its lower tab is tucked into:
Here is what the heater element looks like from the end, with the heater shield removed:
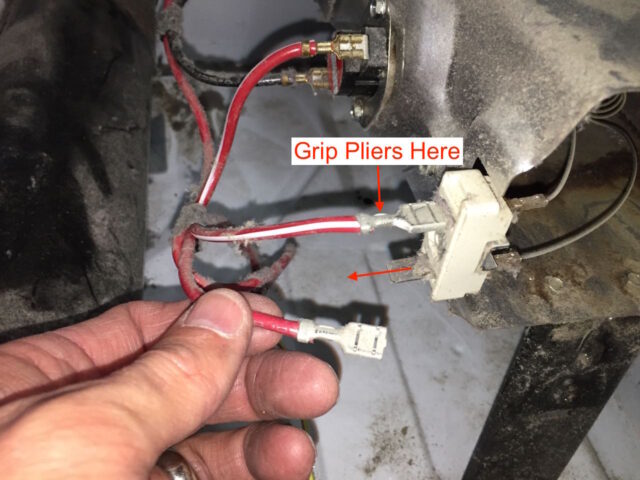
Disconnect both electrical connectors from the heater element. They are on there pretty tight and I had to use a needle nose pliers to get them off. Grip the connector in the location indicated below and never pull on the wires when removing electrical connectors:
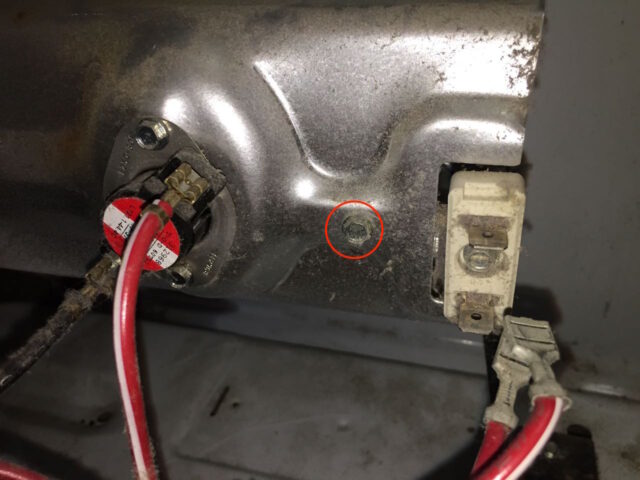
Remove the single heating element bracket screw:
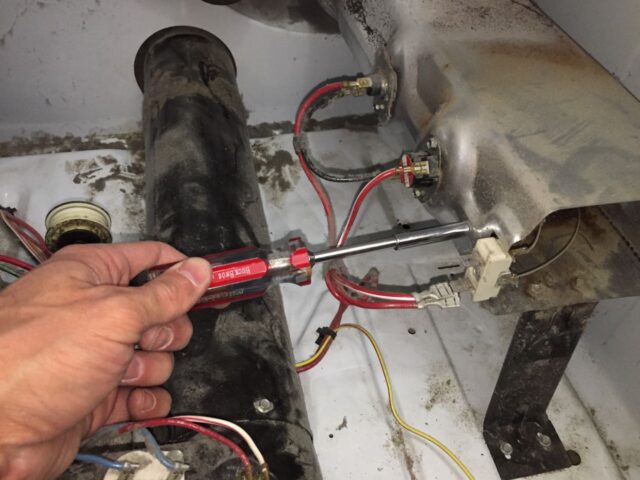
The heating element assembly slides straight into the heater box on two rails, one on each side. Mine fit rather tight. To remove it I first pulled on the ceramic body where the electrical connectors are mounted (with my fingers) to get the heating assembly pulled out about an inch and then I clamped a pliers on the side and pulled on the gripped pliers (close to the end) and pulled it straight out the rest of the way:
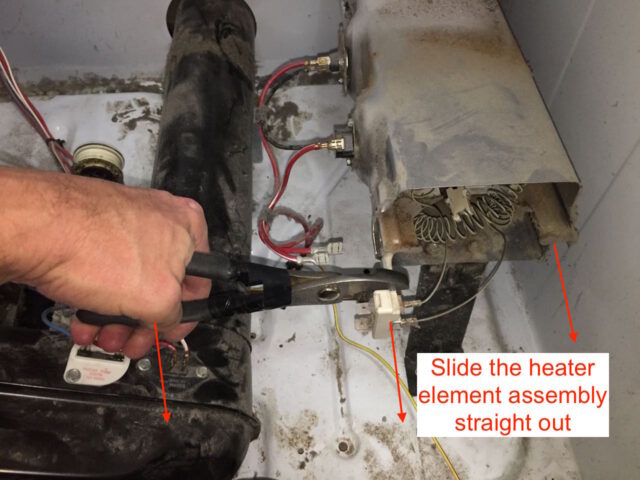
Here it is pulled all the way out:
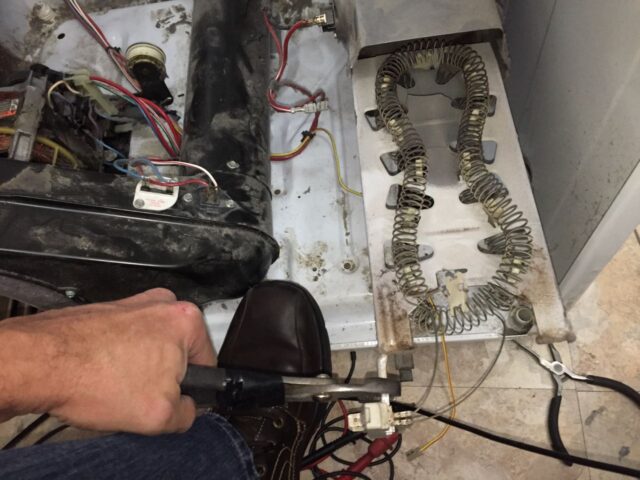
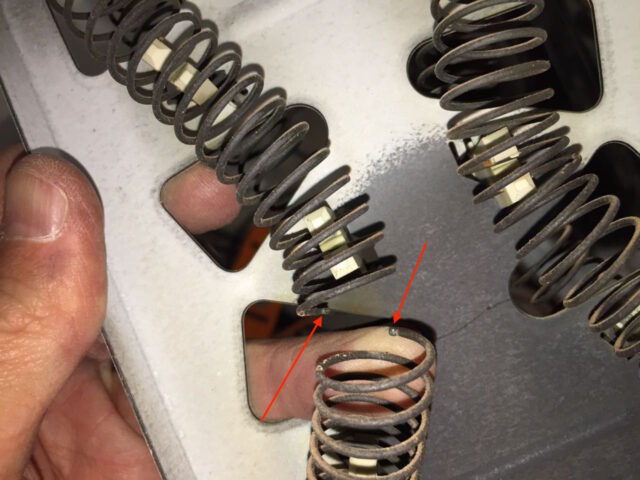
Step 25: Find the open circuit (optional).
Because I’m curious I want to really understand how things work and why they don’t. I wanted to find the open circuit on my heating element so I could verify I was replacing the correct component. I knew it was bad because of my multimeter readings which could not be wrong, reading an open circuit, but I wanted to see the break for myself. FYI: you cannot solder a heating element because it gets so hot that the solder would just melt. I quickly was able to visually locate the element break:
Step 26: Install the new heater assembly.
I would not touch the spiral heating element with your bare hands as the oil from your skin can cause the element to prematurely fail when it heats up. Below is a picture of the new part. Unwrap the bubble wrap from the electrical connector end:
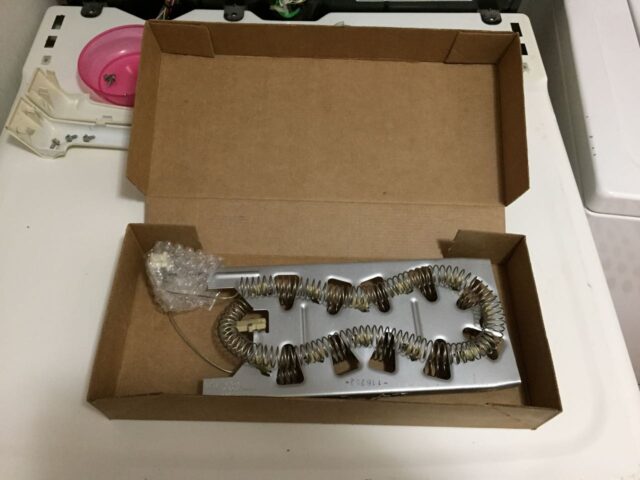
It’s not a bad idea to verify that the new part is the same size as the old part before you move on. Mine checked out:

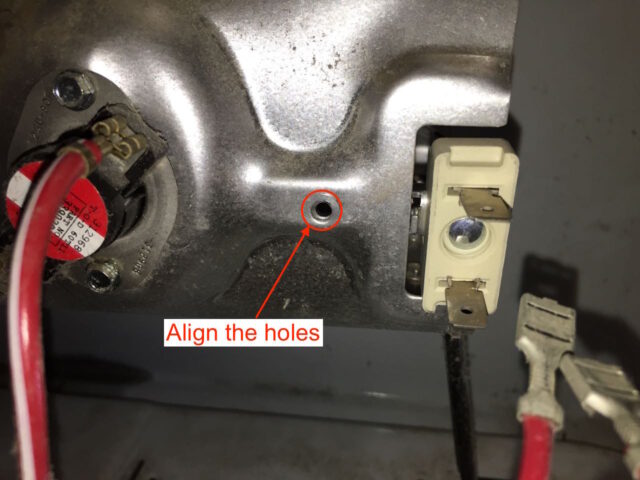
Slide the new heater into the two slots on the side:
The assembly gets pushed in until the ceramic electrical connector hits the heater box. Watch the hole where the mounting screw goes to align the hole on the heating assembly rail with the hole on the heater box as seen below:
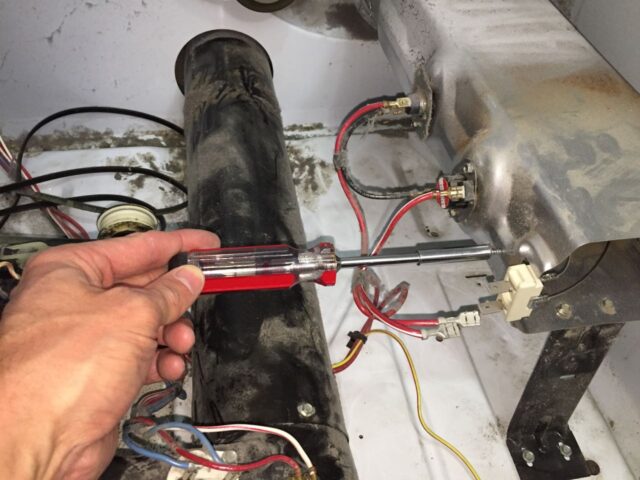
Install the single mounting screw:
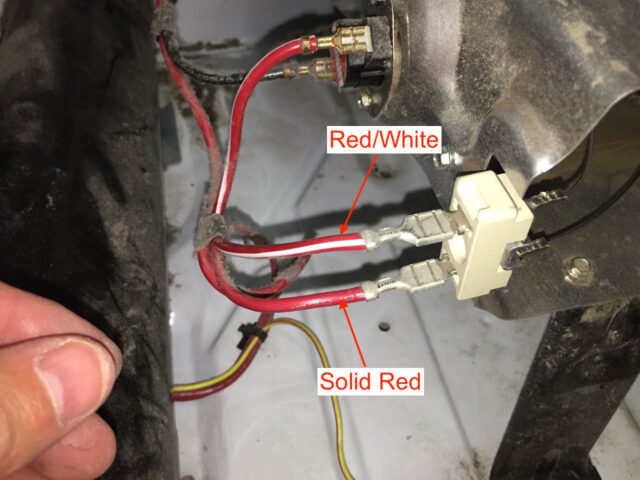
Reconnect the wires. I have a hard time believing that it matters which one goes on which terminal but the red wire with the white strip was connected to the top connector and the solid red wire was connected to the bottom connector on mine, so that is how I reconnected it:
Here’s the new heater element installed:
Step 27: Reinstall the heater shield.
Tuck the tab in the slot:

Then reinstall the single screw:
Step 28: Verifying the new heater element.
This is optional. For fun I wanted to verify the resistance of the new element:
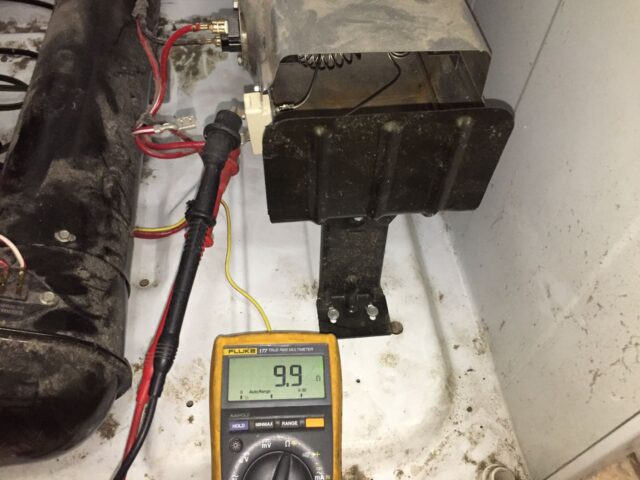
The new element measures a resistance of 9.9 ohms, which is almost exactly in the middle of the 7.8-11.8 ohms range–we are good to go!
Step 29: Put the drum back into the dryer.
I took the belt and put it around the drum to aid my lifting of the back edge of the drum (and because you cannot be holding the back edge when you insert it). Put one hand in the front opening of the drum and support the back end of the drum with the belt as seen below:
Feed the drum into the housing via the front of the dryer and guide it on the round ledge on the back of the housing, which the drum glides on:
If not supported on the front edge, the drum will come off the back lip where it rests. I actually used a quick grip with limited success, to help support the front edge while I was moving on to the next step:
Make sure the back of the drum is seated on the back of the dryer as seen in the two images below:

Step 30: Reinstall the drum belt.
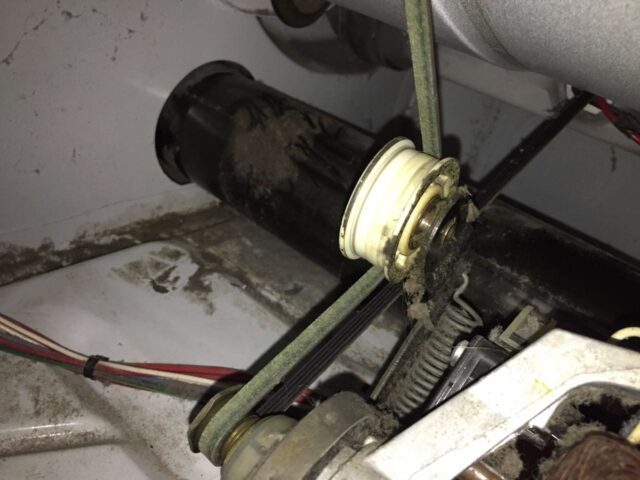
First position the belt in the correct location on the drum. You should be able to see where the belt was wearing.
It’s a bit tricky to put the belt back on as it is difficult to see what you are doing while you are doing it as you reach back to work with the belt. Access the belt from below and left of the drum:

Loop the belt around the motor shaft, with the ribbed side towards the motor shaft and bring both ends of the belt together as seen below:
Keeping the two ends of the belt together push them down and to the right, making the belt tight and removing any slack from on side of the belt. Bring the belt tensioner pulley up and slip the belt under it. This is what you should have:
Step 31: Reinstall the door assembly.
Put the door assembly back in place. This involves positioning the drum on the lip of the door assembly and the corners of the door assembly back up on the lips on top of the dryer sides as indicated below:
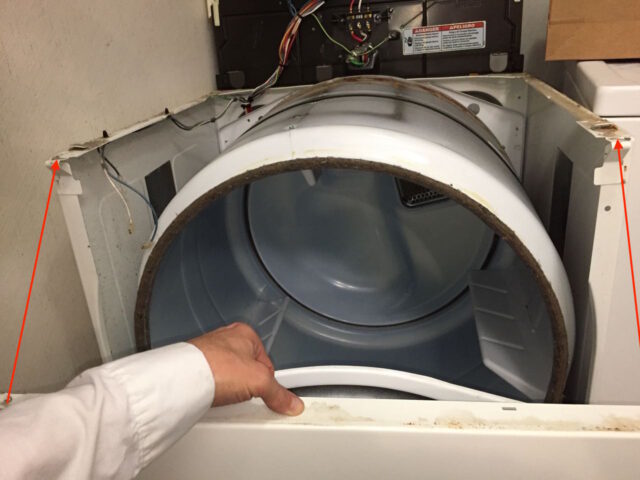
Slip the door assembly on the drum and put the corners of the door assembly up on the top edges of the sides as seen below. Reinstall the screws in the top two corners of the door assembly:
You may need to lift up the bottom of the drum and push in the door assembly so the rollers slip under the lip of the drum as seen below:
With the lower end of the door pushed into place you can install the lower two front screws. Here’s the right one:
Step 32: Reinstall the lint duct.
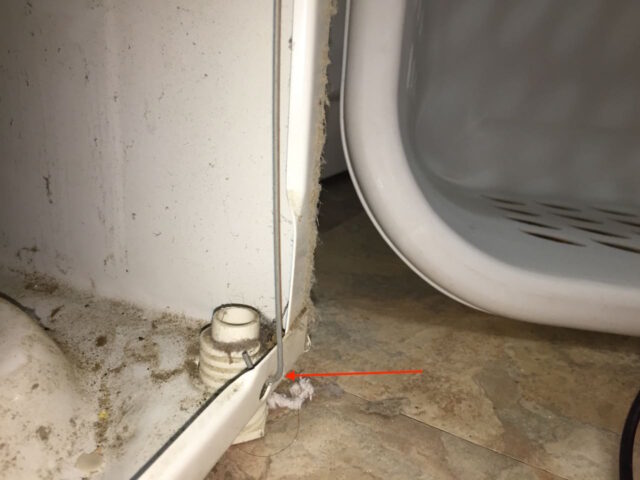
Reinstall the moisture sensor wire connector (the yellow wire with red stripe). It goes on this terminal:
Here it is reconnected:
Now slip the lint duct up on the lint trap frame and reinstall the two screws:
Reinstall the spring clip on the bottom. Spread the spring open with a flat-head screwdriver and push it down on the lip of the dryer frame as seen below:
Once it is down on the lip you can slide it to the right into place to help hold the lint duct in place:
Step 33: Reinstall the door springs.
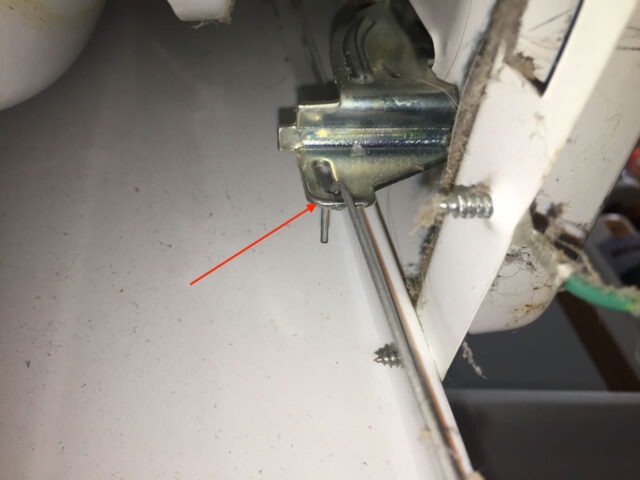
Here are the lower holes where the door springs hook into:
First hook the lower end of the spring on the bottom hole (insert from the front).
Then hook the top end straight above. Here is the right side top end hooked:
And the left side:

Now that you have the door springs installed, reinstall the lint trap:
Step 34: Reconnect the dryer light wiring.
In the front top left corner of the dryer there are three wires that need reconnected. First the dryer light connector, two black wires, must be reconnected:
Secondly, reconnect the two wires to the door light switch. The white wire goes on the left terminal and the blue wire goes on the right terminal:
Step 35: Test your dryer (optional).
At this point, before I got the dryer buttoned up any further, I wanted to make sure it was running correctly. To test it out I had to do the following:
- Reconnect dryer exhaust line (not critical but I didn’t want to blow any dust around the house).
- Carefully flip down the control panel so you can turn it on (and to cover the place where the main power comes into the dryer).
- Reconnect the dryer to power.
I wanted to see that the drum was spinning smoothly and that the heater element glowed. Here is a short video I shot demonstrating the dryer at this point:
Step 36: Unplug your dryer.
Important: If you plugged it in to test it out then you should unplug it before completing the re-assembly.
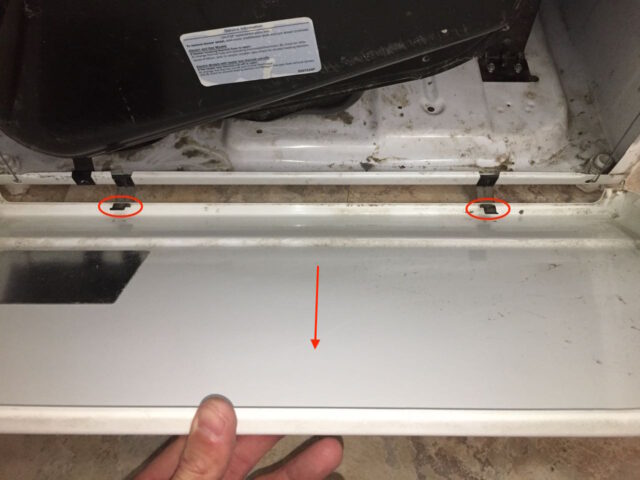
Step 37: Install the lower front panel.
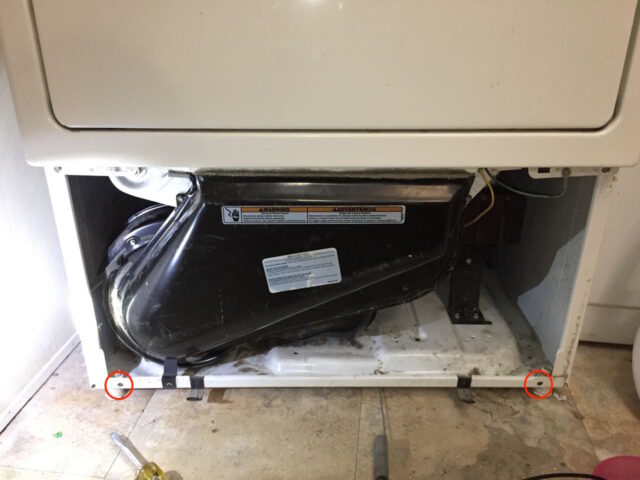
There are two slits on the bottom edge (red squares) that sit down on the two spring clips (red ovals) on the bottom front edge of the dryer:
Here the panel is sitting down on the springs:

Once you have the panel slipped on the springs you can rotate the top edge of the panel toward the dryer and push it shut and the top springs will snap the top into place:
The panel replaced:

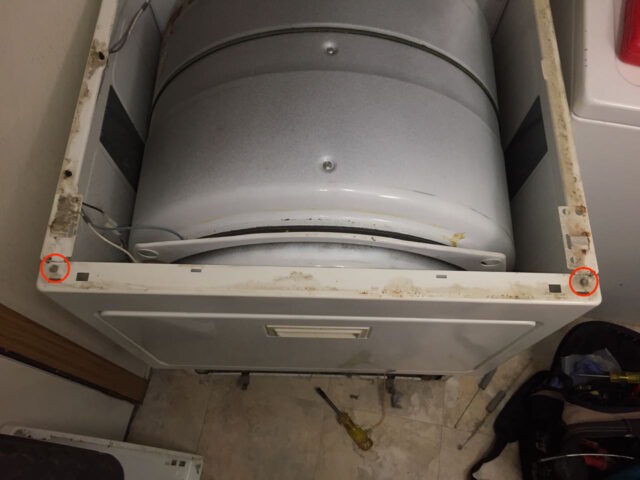
Step 38: Reinstall the top panel.
If you had lowered the control panel to test the dryer, flip it back up and out of the way. The top panel is held in place by three tabs on the back and two catches toward the front on the underneath side of the panel. Lay the top on the dryer in the position shown below:
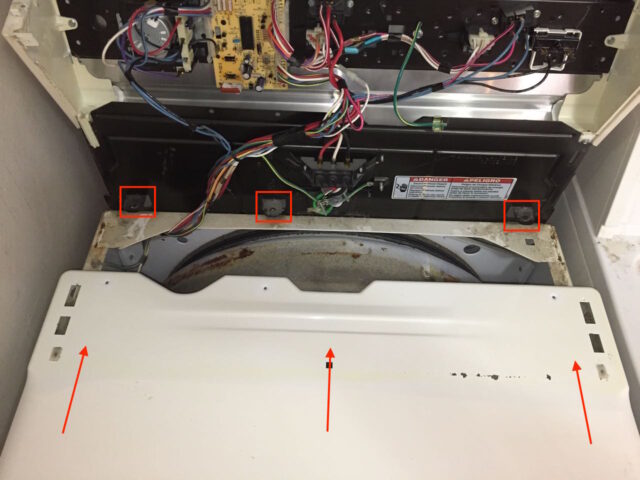
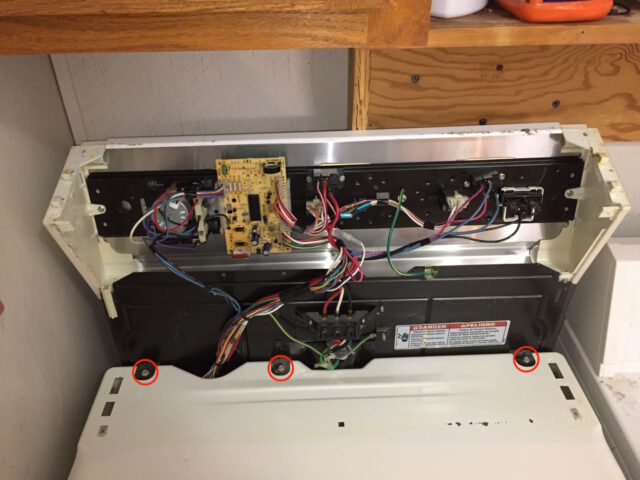
Once you have the top on the position pictured above, slide the dryer back under the tabs. There are catches that stick out from the top of the sides that “catch” the top as seen here in this picture from the right side on the front corner:

Once it is latched in place and you cannot lift up on the front edge, reinstall the three screws in the top back:
Step 39: Reinstall the control panel.
The hinges are fragile so be careful not to force it. One thing to note is that the back edge of the hinges are in a track which allows them to slide up and down. Lift the back edge of the control panel up before you fold it down to avoid shattering one of the hinges like I did. Then carefully fold down the control panel and then lower the back edge until it rests on the top panel of the dryer. Now you can line up the screws on the lower right and left corners. Do not over-tighten the screws.
Snap the end bezel pieces into place. There are six clips that must be inserted into slots for the end caps to snap into place:
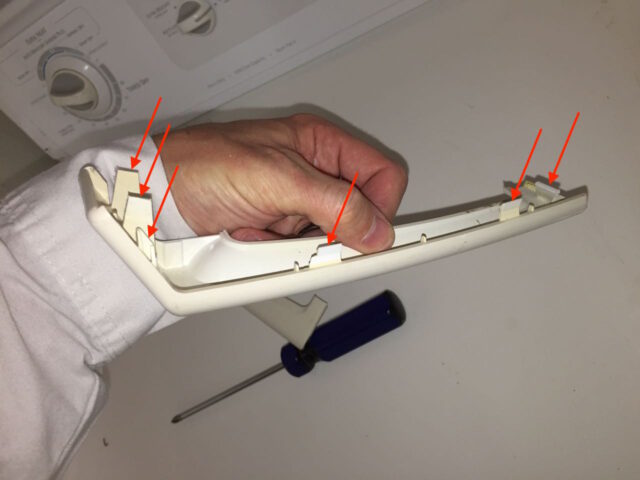

Repeat for the left side, which is a mirror copy of right side. Now you are done!
Share your repair in the comments section!
I have repaired about a half-dozen dryers and once you have worked on one you have learned quite a bit about all other dryers as I’ve found that they are pretty similar and you’ll be confident to tackle the next one that breaks. After fixing a couple of them you’ll become known to all your friends as the one who can fix everything 🙂 If you were able to repair your dryer because of the help of this article, please leave a note in the comment section. If you learned a trick that would be helpful to others please leave that too!
Amazon Associate Disclosure: As an Amazon Associate I earn from qualifying purchases. This means if you click on an affiliate link and purchase the item, I will receive an affiliate commission. The price of the item is the same whether it is an affiliate link or not. Regardless, I only recommend products or services I believe will add value to Share Your Repair readers. By using the affiliate links, you are helping support Share Your Repair, and I genuinely appreciate your support.
John.. Used your notes and photos on the analysis and repair of the Kenmore Elite electric dryer. You did an excellent job putting it together and I’m very grateful Thank you! Soooooooooo after I took my dryer apart and tested all the components I found NOTHING wrong. They all checked out. I did have a lot of lint in the bottom and I suppose it could have stopped the centrifugal switch from working. I cleaned all very well, put it back together, and tested it. On timed dry, the element did not kick on. After I let it run a while I checked the voltage on the element. It was 121 (Just as before I started). While I had my test leads there… the element kicked on and glowed as is normal. Started cycling I let it do this for a few times and then turned the dryer off. Let it sit for half hour. Tried it again and it’s still working. I sure wish I could have found a defective part and replaced it. Oh well. Again, thank you for a job well done!
Kevin, make sure you are being very careful and are experienced with working around high voltages if you are poking around the inside of your dryer with live power. You didn’t mention what problem you were facing before you tore into your dryer–what problem were you attempting to fix? If you are only measuring 120V across the coil then you only have one 120V leg of the AC power on–it should measure 240V AC (note step 1A: Verify the Proper Voltage). See how the trace around the very outside of the schematic, which powers the heating element, is connected to 240V:

This would mean that one leg of the switch breaker may be tripped. Most likely there are two breakers which have their switches fused together (120V each) and one is on and one is actually tripped. Turn them off and turn them back on to attempt to reset the one that is tripped.
If you don’t believe in guardian angels, you can’t explain this repair. It is done. The appliance repair parts store guy is a close friend, I just didn’t know what he did for a living, he is my late neighbors son in law, so I bought the element which listed by him for $97, I paid $57, and he confirmed by plan which you gave me. Then my daughter came to help me and she stepped on the limit switch, and when I showed it to her, she bent it back breaking off the lead – oh well I did appreciate her help. So when i called the shop, he said come on by and I’ll see if I can help you. He had a take off from a prior job that still works, And now is’ the tropics in my dryer. Thanks for your help, I gave my son in law your information I think you’ll have a great connection with each other.
Glad you got it fixed Jim—good work.
John this is a beautiful and detailed explanation of repairing this old machine. I took the entire tunnel with the heat element out of the dryer, I put tags on the wires with descriptive legend so I would know where to put them back on the various fittings. Then I took the tunnel outside to extract the element. During this process the glue gave way and tags fell off. I could see that the connectors were short and probably connected the shut off and hi temp. I’m not an electrician, but will it matter which terminal I connect to and from? I will buy the heat element tomorrow, I found the break in it. I tested the switches and the heating element didn’t register, then I discovered the broken coil.
I think I can dodge the bullet on buying a new dryer, but I’ll need to study your photo’s to make sure I don’t connect incorrectly. On the element connection ultimately are there two wires? One solid red and one red with a white stripe? which goes back to the blower motor? I seriously thank you for this tutorial, I’ll pray for you and this site.
Jim, I think you have all the information you need to reconnect everything. The pictures show what colored wires are connected to which device. Additionally, the schematic gives the wire colors as well. The heating element does have two wires, which according to the schematic, the red goes to the centrifugal switch and the red/white wire goes to the NC (normally closed) high limit thermostat (which I have clearly labeled in the pictures). The high limit thermostat terminals are reversible so it doesn’t matter as long as the black is connected to one of them and the red/white to the other. Let me know if you have any other questions.
Can this repair be done from removing the back panel instead of all the steps you outlined including the drum removal?
No, as you can see from the picture in Step 22, the heating element must be removed by pulling it out the front as the back side of the pipe, which houses the element, tapers down.
Excellent photos and explanation of the repair process. i had also watched several videos as I worked through troubleshooting the repair of this same dryer. I narrowed my problem down to a bad heating element and thermistor. I have ordered and received both OEM replacement items and have installed both into my dryer. however, as you noted above, the wires connecting to the heating element terminals were very snug and difficult to remove. Now, these are difficult to reconnect to the terminals on the new heating element. i am wanting to be careful to not break the wires from the connectors as I try to get these reconnected. Any suggestions?
Grab the metal head of the connector (where the wire is crimped into the connector) with a pliers and push them on.
Thank you so much for your instructions. After I determined that only the thermal cut-off was bad, I replaced it. I worked for 1 week, then stopped. It was the same problem, so I replaced it again. The heater element was fine when I expected it. It worked for 1 more week, then stopped. The third time, I changed both thermal cut-off and the heater element (even though it was good). I also used the lawn blower to blow the vent that went into the wall into the attic out on the roof. Everything worked. It has been more than 2 months. Thank you so much.
It appears you got to the root of your problem. What you shared would indicate the heating element was defective and possibly overheating and blowing the thermal cut-off. Great job!
i would of never thought to check the 240 Volt circuit breaker, by replacing it the drier now heats on all cycles. One leg had power and the other was dead. THANKS AGAIN !!!!! YOU SAVED ME A LOT OF TIME AND MONEY.
Good to hear Joe, that tip was compliments of another reader, which I added to the article. Thanks for sharing your repair!
Also, the jumper wires were somewhat burnt at the disconnects ( where it connects to the terminals). So I need to replace the jumper wires. Most of the wire I can find is rated 105C. I thought I read somewhere that one should use high temp rated wire/disconnects. Perhaps rated 200C. Should I be ok with using the 105C rated wiring or do I need to find some wiring that is rated 200C. Since the location of the thermostat and thermostat cutoff is on the heating element housing, not sure what I should use. Thanks.
Fred, if your wires are burnt I would say you have more severe problems. You should not be having burnt wires. I would not recommend using the dryer unless you have fixed the cause of the burnt wires.
Also, the jumper wires were somewhat burnt at the disconnects ( where it connects to the terminals). So I need to replace the jumper wires. Most of the wire I can find is rated 105C. I thought I read somewhere that one should use high temp rated wire/disconnects. Perhaps rated 200C. Should I be ok with using the 105C rated wiring or do I need to find some wiring that is rated 200C. Since the location of the thermostat and thermostat cutoff is on the heating element housing, not sure what I should use. Thanks.
I’m replacing both the thermo cutoff and the thermostat located on the side of the heating element. There are two jumper wires that go to the thermostat, one these wires connects to the heating element terminal and the other goes to the thermo cutoff. Just wondering if it matters which of the terminals get connected to either one of the jumper wire. Since they are wired in a series (I believe) I don’t think it matters.
The terminals for the thermal switch/fuse should be interchangeable.
Hi John, your pictures are great. I am trying to fix my dryer the short cut method (ha!) of not testing the components since I don’t have a do-hickey to measure the circuits. So I’ve been replacing part by part, also trying to not take out the drum! I have replaced the thermal fuse. Still no heat. Now I’m on the heating element. I have removed it and inspected it and I don’t see any breaks. Could it still be the heating element? (our dryer turns, no heat at all. ) I am comfortable replacing it but if it is any of the other things ( thermal cut off or high limit thermistor) I’m calling a guy. Thought to a total rookie please!
Without a multimeter it will be difficult to know if you are on the right track Debbie. If there isn’t a physical break in the heating element I don’t think it likely is that part. It is a stretched spring so if it broke, it should be obvious where. You can get a cheap multimeter at any hardware store, measure the resistance across the heating element and be light-years ahead in knowing for sure what is wrong and what is not. If you have come this far I think you ought to go buy yourself one and know for sure.
I did remove power and disconnect each component before testing continuity with the results as reported. I did check the heater relay under power to make sure it was closing. I do have a copy of the troubleshooting specs that you posted and used that along with your instructions to troubleshoot the problem. I have validated 240VAC across the heater strip circuit but still no heat – at a loss as to what to do next
John – great instructions! I have the identical dryer that is not heating. I disassembled the dryer following your instructions and verified the following: 240 Volts inputs, heating element (~10 ohms), thermal fuses (0.2 ohms), thermistor (~16K Ohms) which is consistent with the ambient temperature, heater relay closing, All these checks and still no heat – any suggestions?
I’d encourage you to download the linked manufacture’s troubleshooting guide pdf and work through that. That is what I’d have to do to evaluate the information you provided but given you were able to take those measurements you seem sharp enough to follow the guide. One question- did you isolate, ie unplug, each device before taking your resistance measurement or were they connected to the dryer—if they were still connected it will measure the entire circuit, not the individual device, and you may not get an accurate measurement.
John
I replace the the thermal cut off sensor ( was damage ) , and checked the other ones and they were fine .. also the heating element was good too .. Then I checked the timer control ( was bad ) and I replaced it …. Now when I turn on the dryer works for about 5 mins , then the heating element turns off , but the dryer still running …
What do you think what could be happening ??
John, thanks for the question. I would encourage you to download the Service Technical Manual I also have linked above and go through all the troubleshooting tests in that document–it’s pretty good actually. Have you gone through those steps? It could be the centrifugal switch, which keeps the heater element running as long as the drum is turning–I’m not sure where that is located. Let us know if you figure it out.
very indepth showed me it;s too much for my skill set thx
Thanks for your extremely thorough tutorial. This easily helped me diagnose and fix my dryer (same model as yours). 🙂
Good to hear, thanks for leaving a note and good work on fixing your dryer and saving money by doing it yourself.
I have been repairing appliances for over 30 years. Your repair discription was very good, however you skipped a vital step that could have saved you a lot of time and frustration. Before disassembling an electric dryer for “no heat” complaint, you should always check for correct voltage supplied. 240 volt circuit has two 120 volt circuits sharing a common neutral. It is possible and quite likely for a circiut breaker or fuse for one leg of that circuit to fail while leaving the other leg live. That could leave the controls and motor circuit operating normally but depriving the 240 heating circuit dead. All components would test good but still no heat.
Easiest way to test is to pull power cord plug out slightly to access male terminals with multimeter set for ac voltage. Should measure approximately 120 volts between each side post and center post and approximately 220 volts between two side posts.
Thanks for taking the time to share Mike. I do see how you could have a single leg be dead. Typically the circuit breakers for 220V are permanently jumpered so you can’t trip a single side of them but if somehow one side was bad it would be a big waste to replace the element if it was only a power issue. I’ll update the article with your suggestion.