This is an exhaustive list of the locations of 2004-2010 Toyota Sienna fuse boxes, descriptions of the circuits each fuse protects, definitions of each fuse, and links to where to purchase them. When troubleshooting your Sienna often it is nice to be able to easily located the fuse for that particular electrical component. I’ve also tried to explain what fuses are and why they are different sizes for people new to electronics. If you need a replacement fuse, click on the fuse names to be taken to purchase the fuse. Use your browser’s search function (keyboard shortcut Control-F in windows, Command-F on a Mac) to search for keywords within this article.
Toyota Sienna Fuse Locations
Applicable Vehicles
Parts
- Fuses 1-51: 120-Pack of Mini Fuses (Type A) Which includes 5, 7.5, 10, 15, 20, 25, and 30 Amp fuses (Type A fuses, it’s good to have a multi-pack of fuses around)
- Fuses 56-67: Fusible Link Assembly (also referred to as the “Junction Block”, a type C fuse)
- Fuse 52: MAIN 30 A Fusible Link (headlights, daytime running light system, “H-LP RL” and “H-LP LL” fuses), part Number 90982-08280, get at Amazon.com or Toyota Parts. (this is a Type B fuse)
- Fuse 53: AM2 30 A Fusible Link (protects the “INJ”, “IGN” and “GAUGE2” fuses), part Number 90982-08280, get at Amazon.com or Toyota Parts. (this is a Type B fuse)
- Fuse 54: P/SEAT 30 A Fusible Link (protects the Power seats), part Number 90982-08280, get at Amazon.com or Toyota Parts. (this is a Type B fuse)
- Fuse 55: PWR 30 A Fusible Link, part Number 90982-08280, get at Amazon.com or Toyota Parts. (this is a Type B fuse)
Tools Needed
- Needle nose pliers (very handy for removing blade-type fuses)
- Note: In the engine compartment fuse box there is a small white tool designed to remove mini fuses.
Why do vehicles have fuses?
The Purpose of Fuses
Fuses are designed to be the weakest electrical link in a given electrical circuit. In the mechanical world, a comparable technology would be the sheer pin or sheer bolt–the bolt is a designed weak point so that if you exceed the torque on a drive shaft, the sheer bolt breaks instead of really destroying the machine. When I was replacing all the incandescent light bulbs in the interior of my Sienna I accidentally (how I’m still not sure) shorted out the terminals of one light bulb and blew the fuse. You can read about how I got myself out of that one here: How to Replace 10-Amp Dome Light Fuse on 2004-2010 Toyota Sienna
Why are Fuses Different Sizes?
A given circuit has electronics in it that are known to use a maximum number of amps. Engineers who design electronics determine the maximum amperage a circuit will ever require at a time and then put a fuse slightly higher than the sum of all the current of those components. The fuse is placed in series with the circuit. That way, if anything abnormal happens, if there is a short-circuit, or if a component fails and causes that circuit to draw more amps than safe, the fuse blows and protects the wiring and other components in the circuit. If a fuse was not used in series with the circuit, the next weakest component would fail instead, and who knows where that might be–it could be another component in the circuit or it could be the wiring. Fires would be caused by overheated wiring. If you don’t have fuses, when something went bad, you would be replacing wiring harnesses or replacing multiple electrical components. A fuse is easy to replace and since you know what is on the fuse’s circuit, you can immediately begin to troubleshoot the components on that circuit (or remove them to eliminate them as a cause) and determine what is causing the current to exceed the normal levels and the fuse to blow.
Why You Should Not Install a Higher Amp Fuse
Someone may be tempted, if they keep blowing a certain amp fuse, to install a higher amp fuse instead, or even worst, to short-circuit the fuse socket and bypass the fuse. Like I mentioned in the previous paragraph, the fact that the fuse is blowing is a nice and controlled warning that something is wrong. If you install a higher amp fuse or short out the fuse socket you are asking to severely damage who knows what on that circuit and/or blow other higher amp fuses in the fusible link assembly. This warning goes for anything that has a fuse.
WARNING: DO NOT install a higher amp fuse, or worst, short out the fuse!!!
What are Amps?
Amps is the abbreviation for Amperes, often simply written by the letter A, which is the basic unit of electric current. It’s like saying miles or kilometers when talking about distance. Current is the flow rate of electrons through a given circuit–like how fast water is flowing through a pipe. When you see the amp rating on a fuse, it is how much current can pass through that fuse before the material of the fuse overheats and then melts, opening the circuit of the fuse.
Can I be Shocked When Changing a Fuse?
Someone may see that they are choosing a 30-amp fuse and become scared that they could be shocked. Some household electrical wiring circuits are 30 amps (wall outlets for example), but those are on 110V AC circuits, not 12V DC like in an automobile. You do not need to worry about being shocked when working on your vehicles 12-volt wiring. Anywhere else in your car you are behind a fuse and the worst thing that really could happen is that you might get a short burst of sparks if you shorted a positive wire to ground but the fuse would blow immediately, stopping anything else from happen.
You can touch the positive and negative of a 12-volt car battery, with dry hands, and nothing will happen. That is because the resistance of your body is high. With dry hands, the resistance of your body, from one hand to the other, is as high as 100,000 ohms. Ohm’s law states, V=IR where V stands for volts, I stands for Current, and R stands for resistance. With a small amount of algebra you can reshape that formula to solve for I, I=V/R. If V=12 and R=100,000, the current that will flow through your body from one hand to the other is 0.00012 Amps, or 0.12 milli-amps. This is a very small amount. It takes over 60 milli-amps to kill you (that was the lowest amount I found anyone claim was dangerous to cause death in this article), and that is 500 times more than what will flow through your body if you touch a car battery with one dry hand on the negative terminal and the other dry hand on the positive terminal. The deal is, is that the voltage is so low, it is not dangerous.
A Note about Accidental Car Battery Shorting
If you shorted out the positive terminal of the battery to the frame , will get a burst of sparks, a lot of heat will be generated, and you will experience molten metal, as if you were running a welder. That is because there are no fuses between you and the battery and all the amps available at the battery are trying to flow through the metal object you just shorted to ground. I’ve done this at least once when tightening the bolt on the battery with a socket and ratchet–somehow I accidentally touched the handle of the socket on the frame, which is the ground of the circuit. That will scare you!?!? Given the high amount of amps available to an automotive battery you need to be careful in that regard. The same thing would happen if you short the two terminals of the battery.
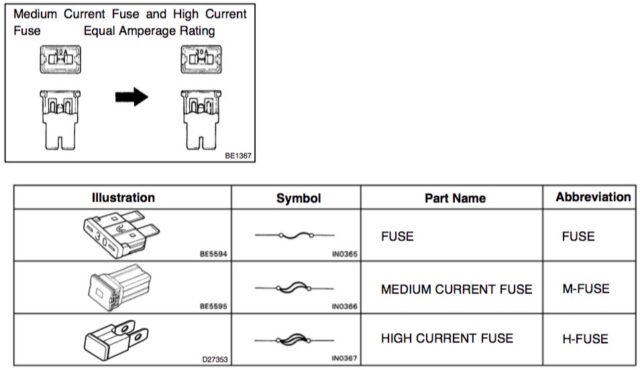
Toyota Sienna Fuse Types
There are four different types of fuses used on the Toyota Sienna, as described in the owner’s manual:
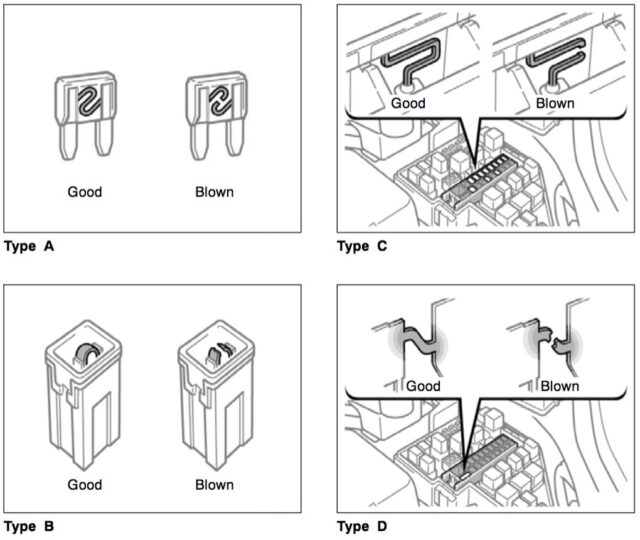
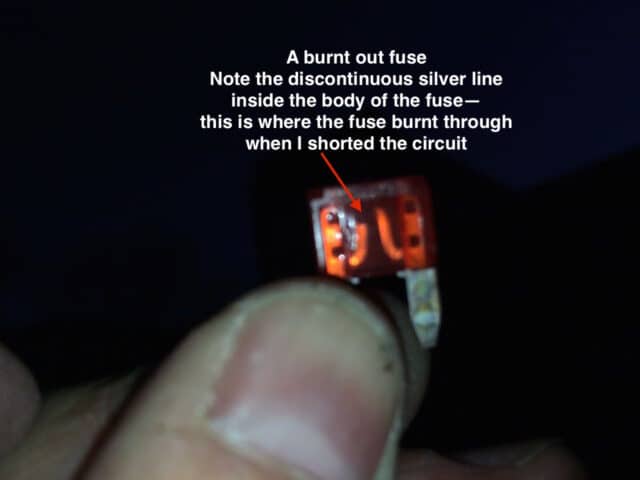
Type A is a blade-type mini fuse. This is the only type I’ve ever dealt with and the most common type of fuse. They have a curved wire inside which burns through when the fuse blows. You must remove the fuse in order to check to see if the fuse is blown. Here is a fuse I accidentally blew when I was installing LED interior lights on my Sienna:
Type B is a medium current fuse, abbreviated by M-FUSE in the shop manual. I have seen these referred to as fusible links as well and they are higher amp fuses.
Type C and D are all part of the fusible link assembly. I think the only reason you would blow one of these is if you have placed a higher amp fuse than prescribed in multiple locations, allowing an overload of one circuit branch, or you have some majorly malfunctioning hardware with a short-circuit. Here’s a picture of these types of fuses:
The shop manual gives these illustrations on fuses:
Spare Fuses
In the two larger fuse boxes you will see fuse sockets that are labeled “Spare” and the amperage of the fuse, for example, fuses 16 through 20 are all spares of different sizes. If you have a blown fuse, you can replace it with a spare of the same amperage:
16. SPARE 15 A (mini size)
17. SPARE 20 A (mini size)
18. SPARE 30 A (mini size)
19. SPARE 30 A (mini size)
20. SPARE 7.5 A (mini size)
If you use a spare fuse you should keep the blown one and purchase a replacement to install in the spare socket for next time.
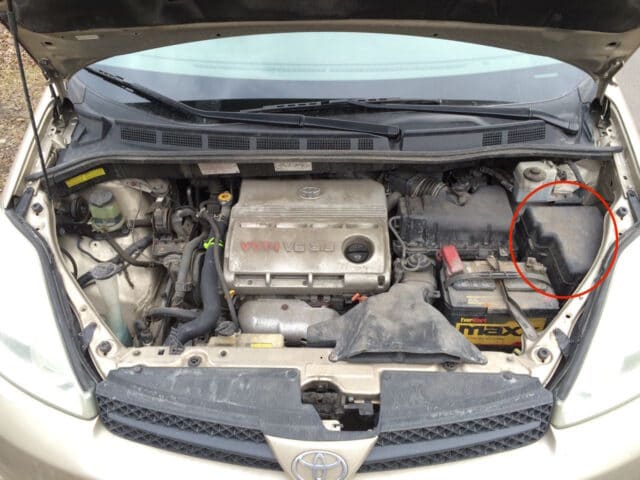
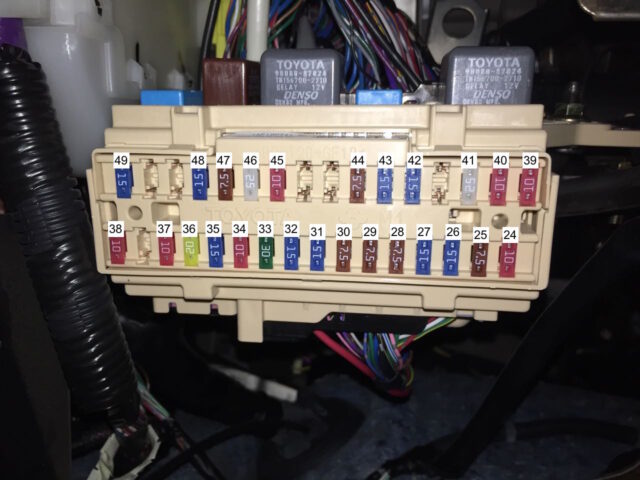
Engine Compartment Fuse Box
Location of Engine Compartment Fuse Box
The engine compartment fuse box is located on the driver’s side, near the battery:
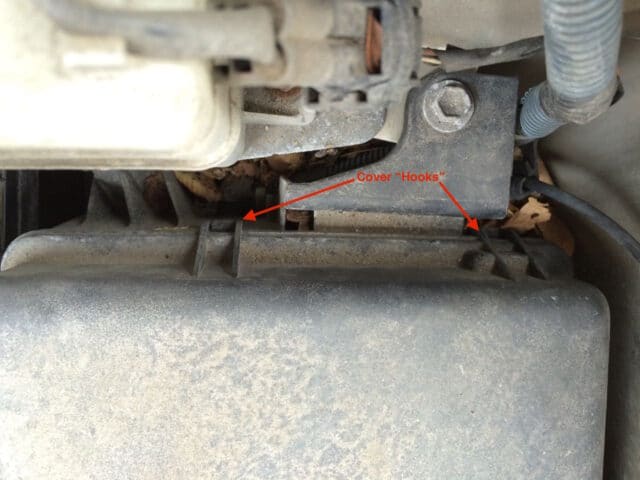
Opening the Engine Compartment Fuse Box
On the front side of the fuse box there is a latch that must be retracted to open the fuse box cover:

On the other side of the fuse box cover there are hooks
Press the tab in on the front and rotate the front edge up and gradually push the cover toward the rear of the vehicle and the cover will release:
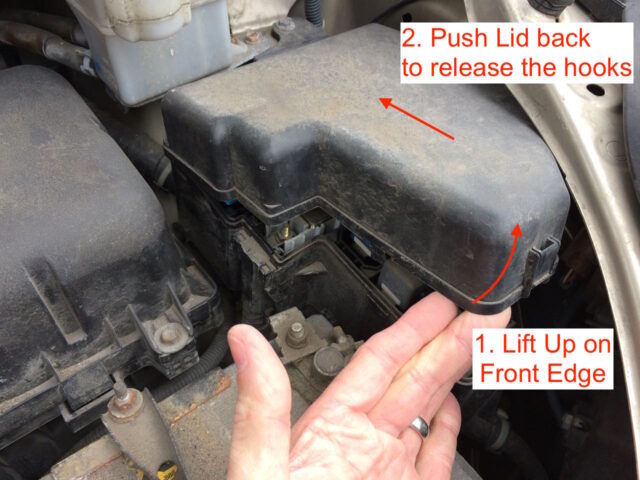
Here the engine compartment fuse box cover is removed:

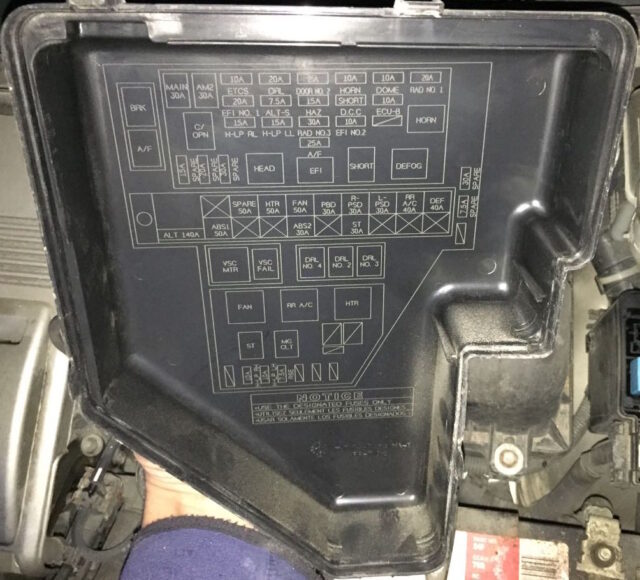
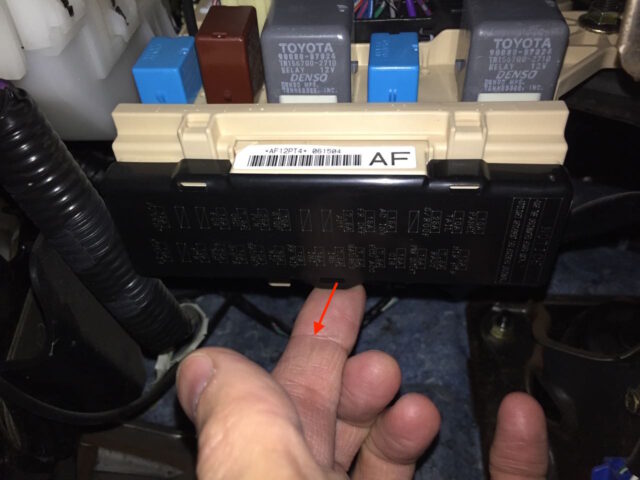
Picture of Engine Compartment Fuse Box
There is a diagram on underneath side of the engine compartment fuse cover for reference and here’s a cleaner version from the owner’s manual. One thing to note is that some of the components are not numbered.
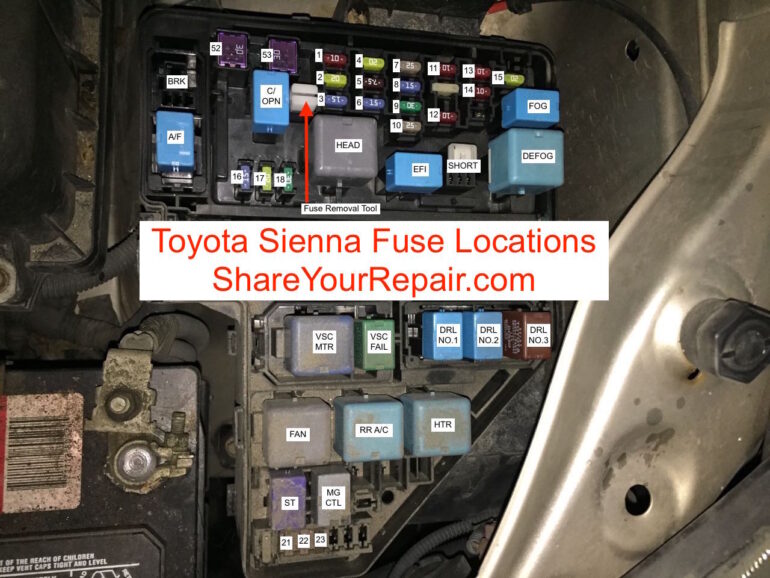
Here’s a picture of the fuses, along with the fuse numbers and relay names, which I added:
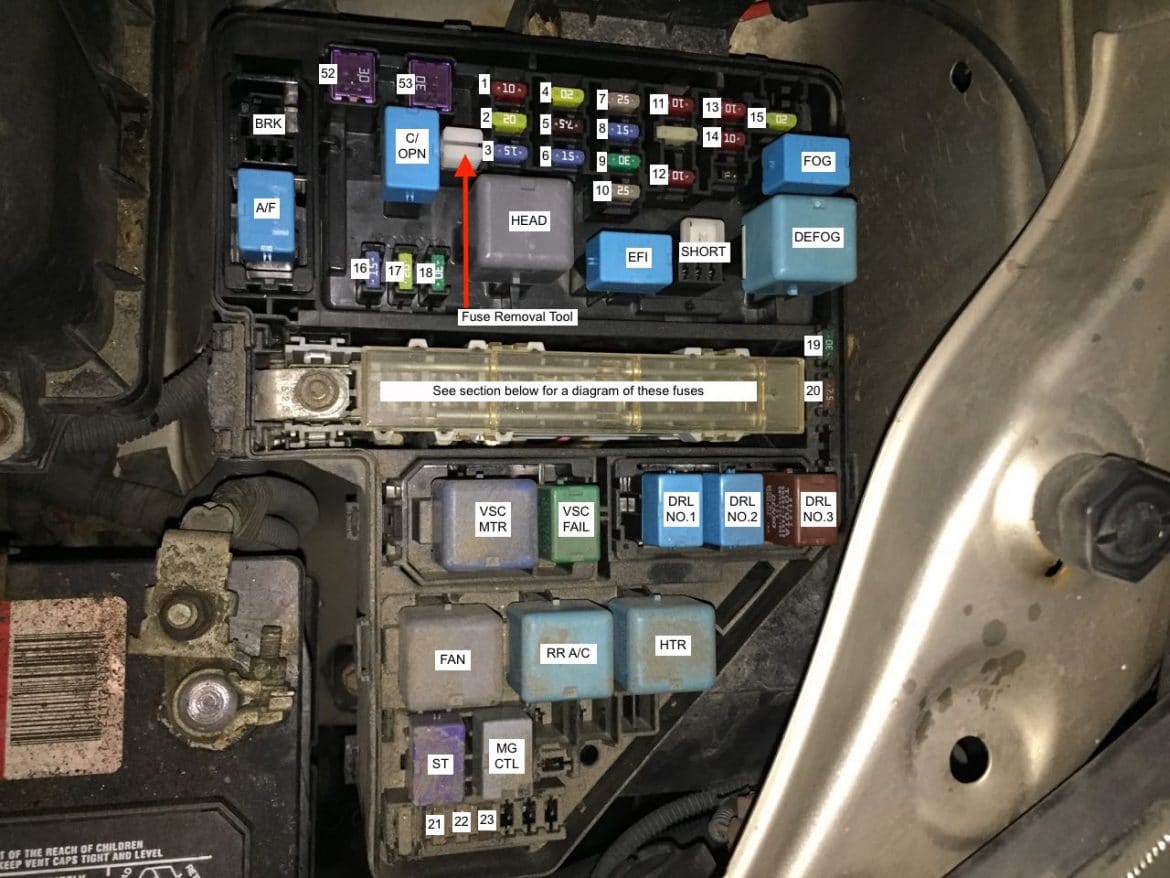
Engine Compartment Relays
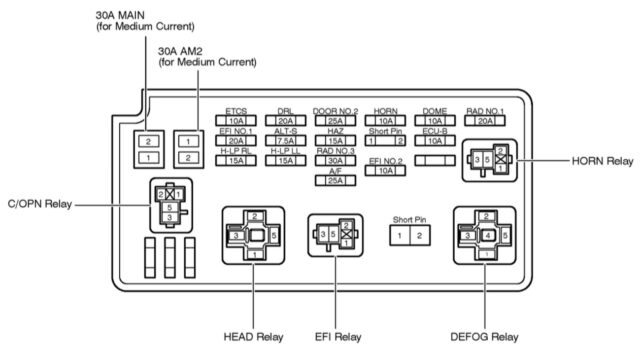
In the picture above of the engine compartment fuse box you will notice that some of the components are not fuses, they are relays. The large purple and blue boxes are relays. A relay is a electrically-controlled switch. Here is a diagram detailing the top half of the above fuse box, including the relay names:
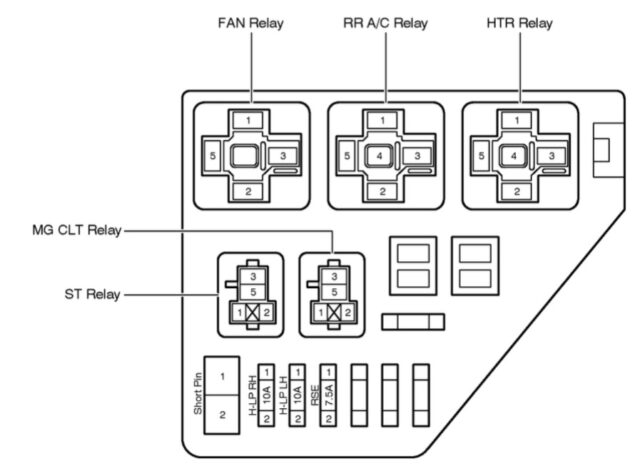
Here is the lower section:
Engine Compartment Fuse Box High Amp Fuse Section
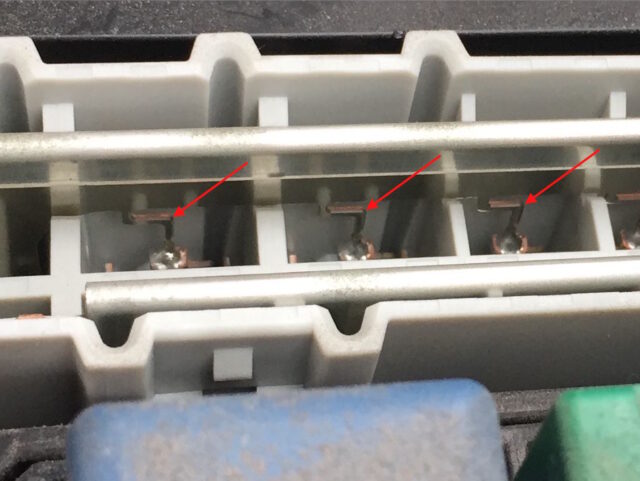
In the middle of the engine compartment fuse box there are two rows of fuses that are covered up by a translucent plastic cover. This entire component is called the junction block or fusible link assembly (part number 8262008020 or826200-8020).
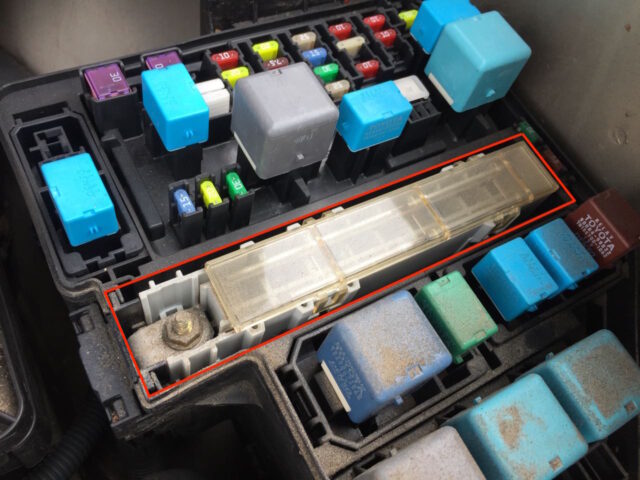
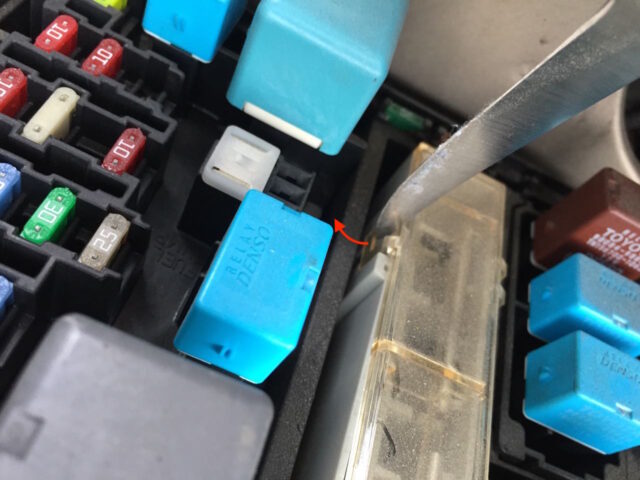
Essentially this is a bar which has fuse wires jutting out from the bottom edge of it. It is a one-piece deal and if you blew one of them you would need to replace the entire fuse bank. You can remove the cover by VERY CAREFULLY prying up the clips of the cover(the clips are fragile I’m sure), one at a time with a sharp-pointed knife, as shown below (but I’ve never had a reason to open it other than for the love of explaining for this article):
Here is the cover removed:
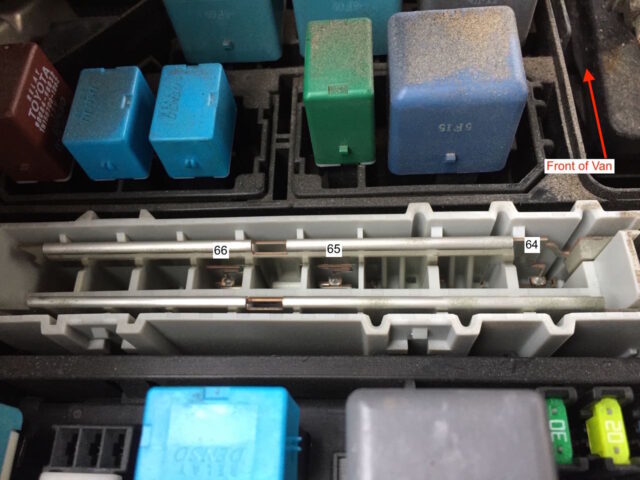
Here’s a close up of what they look like:
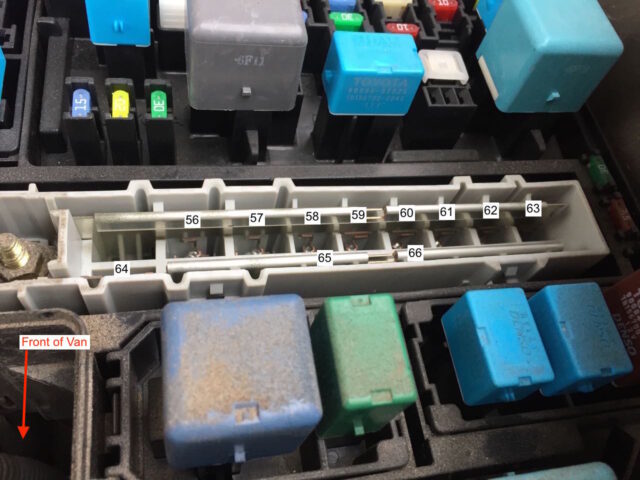
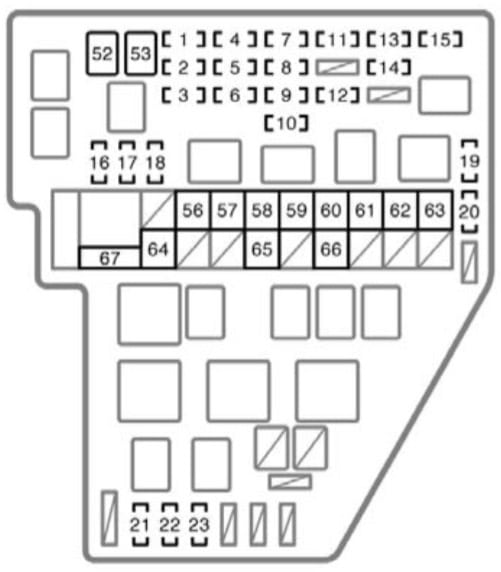
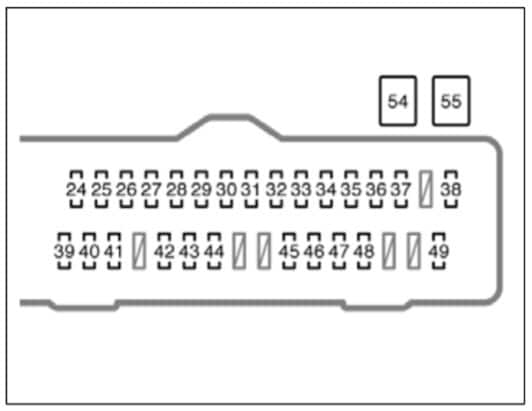
Engine Compartment Fuse Diagram, Numbers, and Descriptions
Below is the diagram of the engine compartment fuse box, followed by a list of the official abbreviations and descriptions:
Fuses 1-23 are mini-type fuses (which are all included in this set):
1. ETCS 10 A – Multiport fuel injection system/sequential multiport fuel injection system
2. EFI NO.1 20 A – Multiport fuel injection system/sequential multiport fuel injection system, “EFI NO.2” fuse
3. H-LP RL 15 A – Right-hand headlight (low beam)
4. DRL 20 A – Daytime running light system, “H-LP RH” and “H-LP LH” fuses
5. ALT-S 7.5 A – Charging system
6. H-LP LL 15 A – Left-hand headlight (low beam), front fog lights
7. DOOR NO.2 25 A – Power door lock system
8. HAZ 15 A – Turn signal lights, emergency flashers
9. RAD NO.3 30 A – Audio System
10. A/F 25 A – A/F sensor
11. HORN 10 A – Horns
12. EFI NO.2 10 A – Multiport fuel injection system/sequential multiport fuel injection system
13. DOME 10 A – Interior lights, personal lights, vanity lights, door courtesy lights, luggage compartment light, ignition switch light, multi-information display
14. ECU-B 10 A – Power sliding door, air conditioning system, power windows, multiplex communication system, meter and gauge, wireless remote control system
15. RAD NO.1 20 A – Audio system, navigation system
16. SPARE 15 A – Spare 15-Amp Fuse
17. SPARE 20 A – Spare 20-Amp Fuse
18. SPARE 30 A – Spare 30-Amp Fuse
19. SPARE 30 A – Spare 30-Amp Fuse
20 SPARE 7.5 A – Spare 7.5-Amp Fuse
21. H-LP RH 10 A – Right-hand headlight
22. H-LP LH 10 A – Left-hand headlight
23. RSE 7.5 A – Rear seat audio system, rear seat entertainment system
Fuses 52-53 are Type B fuses (larger square-shaped):
52. MAIN 30 A – Headlights, daytime running light system, “H-LP RL” and “H-LP LL” fuses, part Number 90982-08280, Amazon.com or Toyota Parts. (this is a Type B fuse)
53. AM2 30 A – “INJ”, “IGN” and “GAUGE2” fuses, part Number 90982-08280, Amazon.com or Toyota Parts. (this is a Type B fuse)
Fuses 56-67 Are All Part of the Fusible Link Assembly
56. SPARE 50A – Spare 50-Amp fuse (part of the fusible link assembly)
57. HTR 50 A – Air conditioning system, “A/C” fuse (part of the fusible link assembly)
58. FAN 50 A – Electric cooling fans (part of the fusible link assembly)
59. PBD 30 A – Power back door (part of the fusible link assembly)
60. R-PSD 30 A – Right side power sliding door (part of the fusible link assembly)
61. L-PSD 30 A – Left side power sliding door (part of the fusible link assembly)
62. RR A/C 40 A – Rear air conditioning system (part of the fusible link assembly)
63. DEF 40 A – Rear window defogger, “MIR HTR” fuse (part of the fusible link assembly)
64. ABS1 50 A – Anti-lock brake system, traction control system, vehicle stability control system (part of the fusible link assembly)
65. ABS2 30 A – Anti-lock brake system, traction control system, vehicle stability control system (part of the fusible link assembly)
66. ST 30 A – Starting system (part of the fusible link assembly)
67. ALT 150 A – Charging system, “RR A/C”, “HTR”, “FAN”, “PBD”, “R-PSD”, L-PSD” and “DEF” fuses (part of the fusible link assembly)
Driver’s Side Instrument Panel Fuse Box
This is also referred to as the “Instrument Panel Junction Block Assy” in the shop manual. There is a small black cover that snaps on top of it. All the fuses in this panel are the mini (blade) type.
Location of Driver’s Side Instrument Panel Fuse Box
It is located above and to the right of the emergency brake pedal:
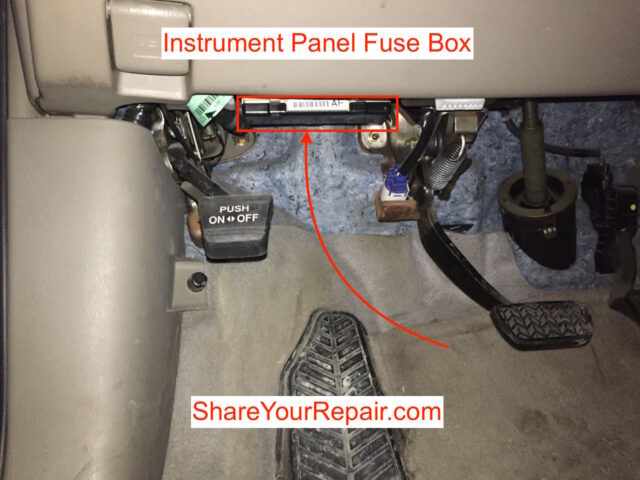
It faces down and has a black cover on it.
Opening Driver’s Side Instrument Panel Fuse Box
To remove the cover grab the tab on the far side and pull it straight down (the view looking almost straight up at the bottom):
Picture of Driver’s Side Instrument Panel Fuse Box
The diagram on the outside of the cover is laid out in the other direction, in portrait layout:
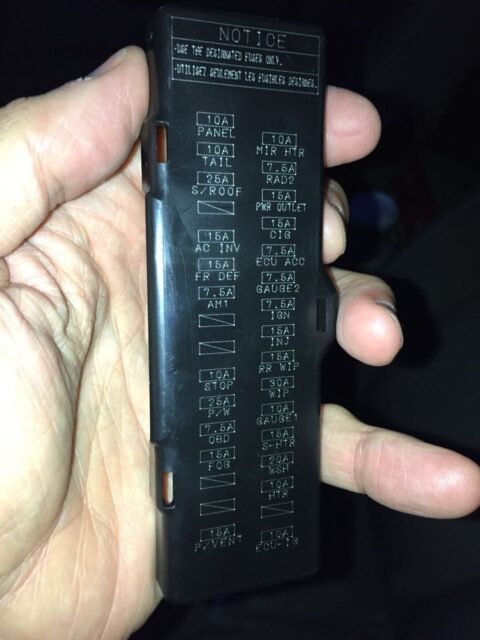
Here are the driver’s side instrument panel fuses:
Driver’s Side Instrument Pane Fuse Box Diagram, Numbers, and Descriptions
Here is the diagram of the driver’s side instrument panel fuse box, followed by a detailed list of the fuse abbreviations and descriptions:
Fuses 24-49 are all mini-type fuses (which are all included in this set) and 54 and 55 are 30-Amp (Type B):
24. MIR HTR 10 A – Outside rear view mirror heaters
25. RAD2 7.5 A – Audio system, navigation system, rear seat audio system, rear seat entertainment system
26. PWR OUTLET 15 A – Power outlets
27. CIG 15 A – Cigarette lighter
28. ECU ACC 7.5 A – Shift lock control system, air conditioning system, power rear view mirror control
29. GAUGE2 7.5 A – Meter and gauge
30. IGN 7.5 A – Multiport fuel injection system/sequential multiport fuel injection system, SRS airbag system, multiplex communication system
31. INJ 15 A – Multiport fuel injection system/sequential multiport fuel injection system
32. RR WIP 15 A – Rear window wiper
33. WIP 30 A – Windshield wiper and rear window wiper
34. GAUGE1 10 A – Back-up lights, turn signal lights, emergency flashers
35. S-HTR 15 A – Seat heaters
36. WSH 20 A – Windshield washer and rear window washer
37. HTR 10 A – Air conditioning system
38. ECU-IG 10 A – Toyota park assist system, rear view monitor system, multiplex communication system, multiport fuel injection system/sequential multiport fuel injection system, anti-lock brake system, traction control system, vehicle stability control system, shift lock control system, dynamic laser cruise control system, seat heaters, power back door, electronic moon roof, multi-information display, auto anti-glare inside rear view mirror, power windows, power outlets (115V)
39. PANEL 10 A – Air conditioning system, seat heaters, audio system, navigation system, power sliding door, power back door, multi-informational display, rear window defogger, emergency flashers, instrument panel lights, steering switch lights
40. TAIL 10 A – Stop/tail lights, license plate lights, parking lights, side marker lights
41. S/ROOF 25 A – Electronic moon roof
42. AC INV 15 A – Power outlets (115V)
43. FR DEF 15 A – Windshield wiper de-icer
44. AM1 7.5 A – Multiport fuel injection system/sequential multiport fuel injection system
45. STOP 10 A – Stop/tail lights, high mounted stoplight, shift lock control system, anti-lock brake system, traction control system, vehicle stability control system, multiport fuel injection system/sequential multiport fuel injection system, multiplex communication system
46. P/W 25 A – Power windows
47. OBD 7.5 A – On-board diagnosis system
48. FOG 15 A – Front fog lights
49. P/VENT 15 A – Power quarter windows
54. P/SEAT 30 A – Power seats, Amazon.com or Toyota Parts. (this is a Type B fuse)
55. PWR 30 A – Power windows, Amazon.com or Toyota Parts. (this is a Type B fuse)
Passenger-Side Instrument Panel Fuse Box
I didn’t even know this one existed until I consulted the shop manual. It’s not technically in a box and it is a bit hidden.
Location of Instrument Panel Fuse Box (driver’s side)
This fuse box is located behind the glove compartment. To get behind the glove compartment, first open the glove compartment. Next, release the catches on each side of the glove compartment box. To release them, press in on the middle of the side of the glove compartment, bowing the side in, to pull the catch away from the opening. Once you have it outside the opening, hold it there with one hand and then release the one on the other side.
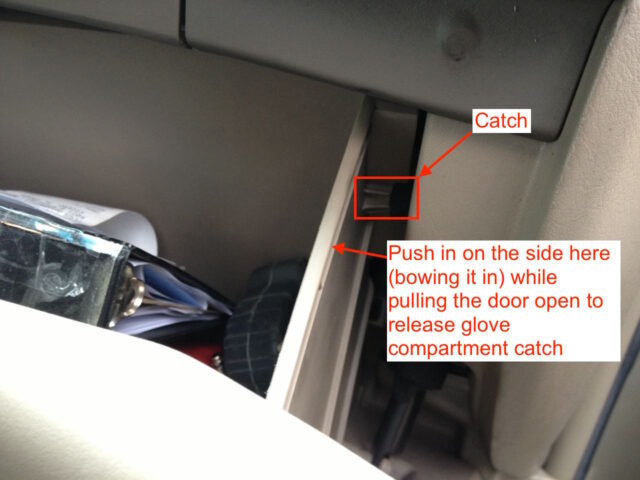
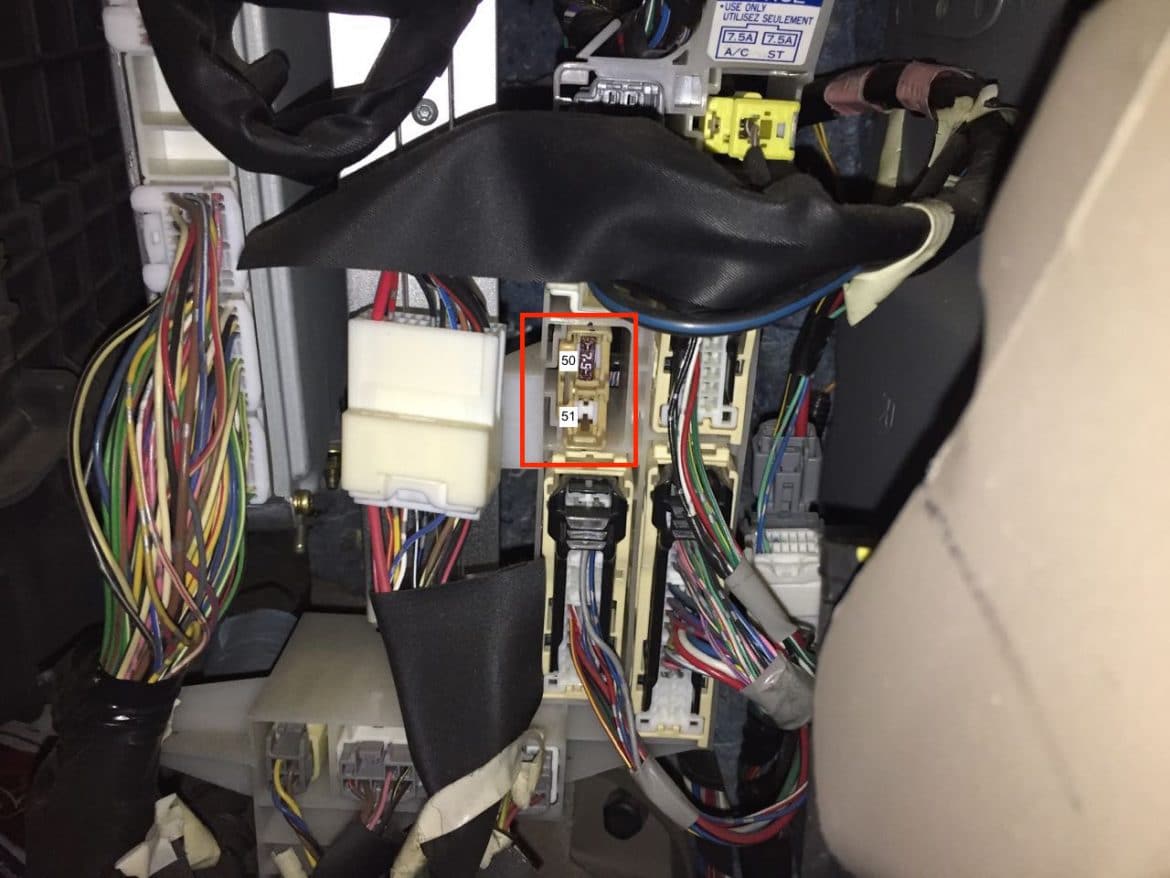
Once you have the glove compartment released, you can find the fuse location as indicated below:

Diagram of Instrument Panel Fuse Box (driver’s side)
There’s not much to this fuse panel as it only has two fuses, and if you do not have a manual air conditioner, the bottom one, 51, will be empty:
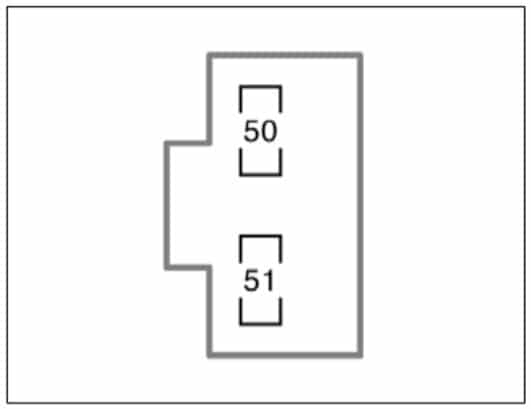
Passenger Side Instrument Panel Fuse Box Numbers and Descriptions
50. ST 7.5 A – Multiport fuel injection system/sequential multiport fuel injection system
51. A/C 7.5 A – Manual air conditioning system
All Toyota Sienna Fuse Numbers, Names, and Abbreviations
- ETCS 10 A – Multiport fuel injection system/sequential multiport fuel injection system
- EFI NO.1 20 A – Multiport fuel injection system/sequential multiport fuel injection system, “EFI NO.2” fuse
- H-LP RL 15 A – Right-hand headlight (low beam)
- DRL 20 A – Daytime running light system, “H-LP RH” and “H-LP LH” fuses
- ALT-S 7.5 A – Charging system
- H-LP LL 15 A – Left-hand headlight (low beam), front fog lights
- DOOR NO.2 25 A – Power door lock system
- HAZ 15 A – Turn signal lights, emergency flashers
- RAD NO.3 30 A – Audio System
- A/F 25 A – A/F sensor
- HORN 10 A – Horns
- EFI NO.2 10 A – Multiport fuel injection system/sequential multiport fuel injection system
- DOME 10 A – Interior lights, personal lights, vanity lights, door courtesy lights, luggage compartment light, ignition switch light, multi-information display
- ECU-B 10 A – Power sliding door, air conditioning system, power windows, multiplex communication system, meter and gauge, wireless remote control system
- RAD NO.1 20 A – Audio system, navigation system
- SPARE 15 A – Spare 15-Amp Fuse
- SPARE 20 A – Spare 20-Amp Fuse
- SPARE 30 A – Spare 30-Amp Fuse
- SPARE 30 A – Spare 30-Amp Fuse
- SPARE 7.5 A – Spare 7.5-Amp Fuse
- H-LP RH 10 A – Right-hand headlight
- H-LP LH 10 A – Left-hand headlight
- RSE 7.5 A – Rear seat audio system, rear seat entertainment system
- MIR HTR 10 A – Outside rear view mirror heaters
- RAD2 7.5 A – Audio system, navigation system, rear seat audio system, rear seat entertainment system
- PWR OUTLET 15 A – Power outlets
- CIG 15 A – Cigarette lighter
- ECU ACC 7.5 A – Shift lock control system, air conditioning system, power rear view mirror control
- GAUGE2 7.5 A – Meter and gauge
- IGN 7.5 A – Multiport fuel injection system/sequential multiport fuel injection system, SRS airbag system, multiplex communication system
- INJ 15 A – Multiport fuel injection system/sequential multiport fuel injection system
- RR WIP 15 A – Rear window wiper
- WIP 30 A – Windshield wiper and rear window wiper
- GAUGE1 10 A – Back-up lights, turn signal lights, emergency flashers
- S-HTR 15 A – Seat heaters
- WSH 20 A – Windshield washer and rear window washer
- HTR 10 A – Air conditioning system
- ECU-IG 10 A – Toyota park assist system, rear view monitor system, multiplex communication system, multiport fuel injection system/sequential multiport fuel injection system, anti-lock brake system, traction control system, vehicle stability control system, shift lock control system, dynamic laser cruise control system, seat heaters, power back door, electronic moon roof, multi-information display, auto anti-glare inside rear view mirror, power windows, power outlets (115V)
- PANEL 10 A – Air conditioning system, seat heaters, audio system, navigation system, power sliding door, power back door, multi-informational display, rear window defogger, emergency flashers, instrument panel lights, steering switch lights
- TAIL 10 A – Stop/tail lights, license plate lights, parking lights, side marker lights
- S/ROOF 25 A – Electronic moon roof
- AC INV 15 A – Power outlets (115V)
- FR DEF 15 A – Windshield wiper de-icer
- AM1 7.5 A – Multiport fuel injection system/sequential multiport fuel injection system
- STOP 10 A – Stop/tail lights, high mounted stoplight, shift lock control system, anti-lock brake system, traction control system, vehicle stability control system, multiport fuel injection system/sequential multiport fuel injection system, multiplex communication system
- P/W 25 A – Power windows
- OBD 7.5 A – On-board diagnosis system
- FOG 15 A – Front fog lights
- P/VENT 15 A – Power quarter windows
- ST 7.5 A – Multiport fuel injection system/sequential multiport fuel injection system
- A/C 7.5 A – Manual air conditioning system
- MAIN 30 A – Headlights, daytime running light system, “H-LP RL” and “H-LP LL” fuses
- AM2 30 A – “INJ”, “IGN” and “GAUGE2” fuses
- P/SEAT 30 A – Power seats
- PWR 30 A – Power windows
- SPARE 50A – Spare 50-Amp fuse (part of the fusible link assembly)
- HTR 50 A – Air conditioning system, “A/C” fuse (part of the fusible link assembly)
- FAN 50 A – Electric cooling fans (part of the fusible link assembly)
- PBD 30 A – Power back door (part of the fusible link assembly)
- R-PSD 30 A – Right side power sliding door (part of the fusible link assembly)
- L-PSD 30 A – Left side power sliding door (part of the fusible link assembly)
- RR A/C 40 A – Rear air conditioning system (part of the fusible link assembly)
- DEF 40 A – Rear window defogger, “MIR HTR” fuse (part of the fusible link assembly)
- ABS1 50 A – Anti-lock brake system, traction control system, vehicle stability control system (part of the fusible link assembly)
- ABS2 30 A – Anti-lock brake system, traction control system, vehicle stability control system (part of the fusible link assembly)
- ST 30 A – Starting system (part of the fusible link assembly)
- ALT 150 A – Charging system, “RR A/C”, “HTR”, “FAN”, “PBD”, “R-PSD”, L-PSD” and “DEF” fuses (part of the fusible link assembly)
Will You Share YOUR Repair?
If this article was helpful for you please share about it in the comments. If you have any tips to add please share them as well, I’d love to hear from you.
Amazon Associate Disclosure: As an Amazon Associate I earn from qualifying purchases. This means if you click on an affiliate link and purchase the item, I will receive an affiliate commission. The price of the item is the same whether it is an affiliate link or not. Regardless, I only recommend products or services I believe will add value to Share Your Repair readers. By using the affiliate links, you are helping support Share Your Repair, and I genuinely appreciate your support.

Hi, why there are multiple fuses of power sliding door, I’m a newbie.
Can you share specifically which fuses you are referring to? I do not have a schematic for this van so what I provide here is about all the information I have.
2008 toyota sienna starting problem, turn key to start position nothing happens, then release key, dash board lights turn off and then 10 seconds later it cranks and starts, or sometimes turn key to start position and nothing happens except dash board light go off and then eventually turn back on, then repeat over and over until i get the top result again when the van starts, is this a relay problem, van has brand new battery, and a new starter from two months ago worked great until now, i tried switching the starter relay R17 but did not resolve the issue, i tried switching the ignition relay R5 but that did not work either, could it be efi or R4 power relay or some other relay?
Louis, that is a complicated problem you’re having. Unfortunately I’m not going to be much help. Intermittent problems are tricky but someone who is familiar with Siennas, their schematics, and can systematically work through the critical components involved should be able to help you.
That is beyond my experience/ability Louis, sorry I can’t help.
Hard starting problem. I’ve had an intermittent starting problem that is now happening just about every time. Starter cranks, it sounds like it’s running, but release the key & it stops. Dealer had it all day, but couldn’t get it to fail when it was intermittent. Now I see something that might be a clue. When key is turned on, dashboard lights up. Turn key to start & dash lights go out and when engine does not start, the dash lights don’t come back on. If engine starts (with a roar) then lights come back on. So I turn off key between tries. Does this point to any relay that controls dashboard lights and maybe something else that prevents ignition to continue? It sounds like it’s getting gas. Thanks for past help. TIA.
This is a great resource. I do have a question. I went to replace a 15A fuse that is in the instrument panel inside the car, with the spare 15A fuse that is in the engine compartment. The one in the engine compartment is a bigger size than the one under the dash (even though they are both 15A). Are the 15As in the engine compartment use the bigger size fuse, and that’s why the spare is a bigger size.
I couldn’t tell you from memory but there are different physical sizes of 15A fuses. You will need to get on in the package no type/size for the one you are replacing.
Hello – Just wondered if you knew which fuse controls the power folding side mirrors function?
I have a 2004 Sienna LE minivan. Both high beam headlights stopped working at the same time and the daytime running lights stopped working at the same time. All fuses look good, I replace the DRL No. 4 relay, replaced the DRL No. 2 relay and replaced the DRL No. 3 relay, I replaced both head light bulbs…..still high beam headlights not working and daytime running lights not working. Any suggestions?
I have a 2004 Toyota Sienna and only my top brake light will work i have replaced the bulbs and the 2 fuses on the driver side fuse box. After I pulled the fuse it somehow locked my shifter in park so I have to push the little button next to the shifter to put it into a ny other gear. Please please help me. Another thing by the brake there is a toggle switch weather its on or off the brakes still don’t work but its connected to the brake plug thingy im so so confused. Please anything would be helpful
April, I’m sorry but I’m not going to be able to help you on this. I would recommend taking it to an auto repair shop.
My question has to do with eliminating emf’s in the vehicle for an electrosensitive person. Obviously we can’t eliminate necessary fuses, but there must be some that can be eliminated. We have a meter that measures these frequencies(Trifield Meter) and there is a ton of radiofrequencies being emitted around the driver’s side steering wheel and dashboard. The vehicle is a 2006 toyota sienna xle. We don’t need navigation or any type of wifi related functions. We don’t think there is bluetooth, but aren’t 100% sure. There was also high readings from the mounted box by rearview mirror that shows the compass and so we manually removed the outer box and disconnected that area. Readings here improved but are still high elsewhere in the vehicle. Are there any fuses we can remove that might help eliminate some of the measurements in other areas? Thank you in advance.
I have a 2005 Sienna, I’m having an issue with the wiper’s intermittent mode not working. Everything else on the wiper switch works. Where is the wiper relay? My local auto store sold me a new relay but they also couldn’t figure it out. I’m also having a hard time determining what the relays are for in driver’s side compartment. Thank you in advance.
my 2009 sienna has no power to the air conditioning control panel….any thoughts
Hi, do you have any info about check engine code “P0051 heated oxygen sensor heater control circuit low bank 2 sensor 1”. I have that on my 08 Sienna 2x and don’t want to necessarily replace the sensor if that is not the problem, but hope it is for an easy fix. I have no experience using a multi meter to check for amps and ohms. If it is the sensor, could I use a generic one with the same plug or does it have to be a specific one for that location if it has certain values to meet? I am going to check the #10 A/F sensor soon in the engine bay fuse compartment to see if that is blown, thanks to your page about this. Thank you in advance!!
Louie, I’m not going to be able to help you with that one. I’d have to google the problem and see what others have done and that’s what I’d encourage you to do.
It appears to me that the fuse diagram numbering for the “Driver’s Side Instrument Pane Fuse Box Diagram, Numbers, and Descriptions” section is backwards. Specifically, the “Driver’s Instrument Panel Fuse Box Picture” appears to be upside down from “Drivers Instrument Panel Fuse Box Diagram”, yet they are numbered as if they have the same orientation. If the fuse number and description list immediately below the diagram is correct, it appears to match the diagram but not the picture, making me think that the numbering on the picture is wrong. Am I not understanding something, or is this an error?
Marc, thanks for pointing that out, you are right–I did have the numbering on my picture backwards. I have corrected the numbering and (hopefully) improved it by moving the fuse numbers up, so you can see the fuse amps as well. Thanks for taking the time to point out that. Let me know if you notice anything else that needs correcting–I’m sure I’ve made other mistakes as well!
Yes, that does point me to the right spot for sure. Many thanks!
I have a 2000 Sienna with a bad Integrated Circuit Relay (or integrated control module) that apparently controls the dome light, seat belt warning light, door locks. The mechanic indicated that the Toyota dealer could not get a new one (COVID-19 has impacted manufacturing of that part), but I believe I can find used ones. Question: Exactly where is the module under the dash and what does it look like? I have the dash and metal shield removed but there is alot of wiring under the steering column area! the part number is 82641-08020.
Mark, this is the best I could find searching online. Let me know if this helps: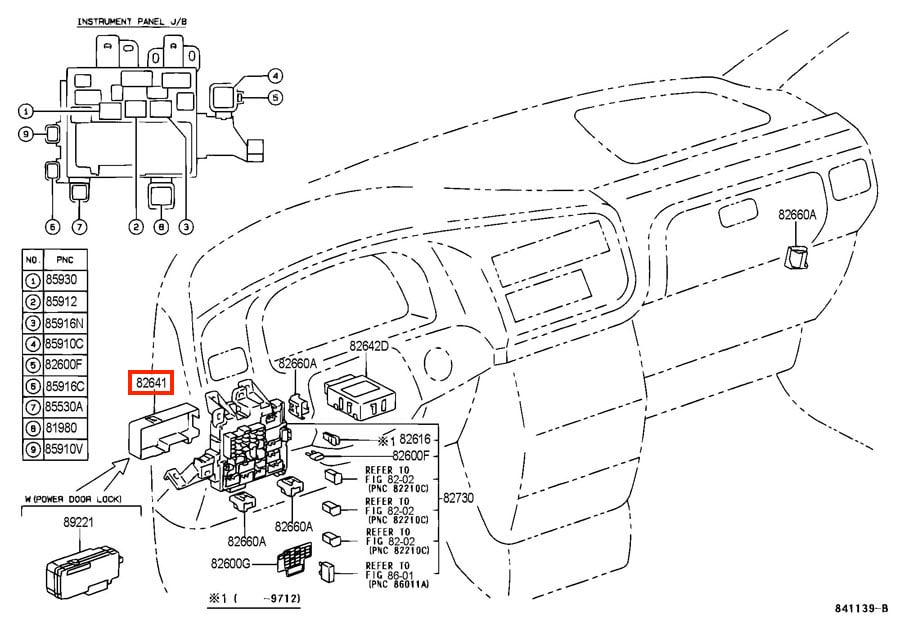
2010 Sienne All functions of the radio work but no sound. Checked fuses in engine compartment and under dash but they all work.
Does you van have the DVD player? You can switch the audio out to wireless headphones. Is your output switched away from your speakers.
Hello, my 2006 Sienna has recently been draining the battery and it appears that the interior lights stay on even when all doors are closed. What is interesting is it is not all interior lights that stay on even when the doors are closed, it is only the rear reading lights in the rear passenger area of the van. When I turn off the interior ligh via the switch on the dash, all lights turn off as expected.
Thanks for the question Tom. Are you aware that those dome lights have an integrated push-button built into the lens that will keep them on? That’s the first thing I would check.
Help! 2007 Sienna LE. Several years ago I had failed “ignition” relay. It seems to be happening again, but I can’t find it in any diagrams. It looks like one of the two large grey cubes on top of Driver’s Instrument Panel Fuse Box Picture. Can you help?
Here’s the diagram, it is the far right cube up on top, IG1: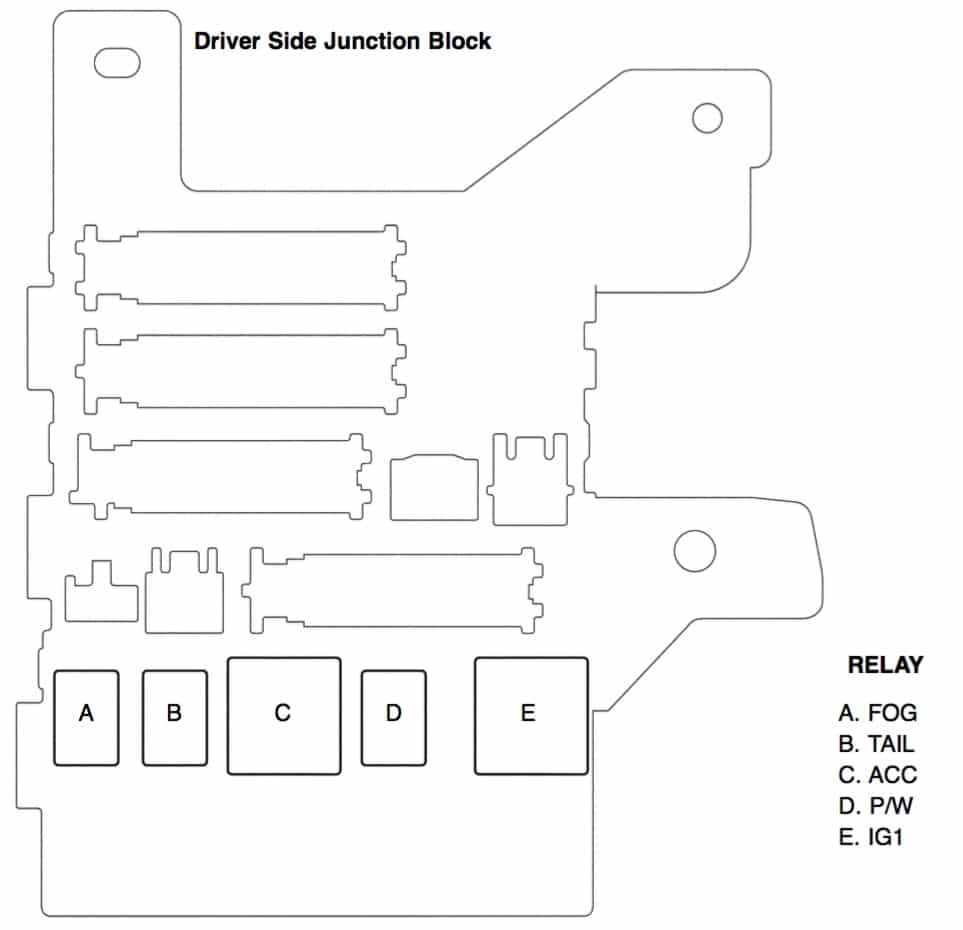
Dear Electrical System Adviser,
My Sienna 2006 van developed electrical drain current through the Fuse #14 in Engine compartment. The User manual, page 502, describes circuits to the ECU-B, 10 Amp. I am puzzled why there is a leak of 0.450 A for first 4-6 seconds and after this time the current is reduced to 0.220-0.210 A, even all accessories supposed to be off and the ignition key switch is also off and the Key removed. This relatively small electrical leak is causing significant Battery discharge when the vehicle is not in use every day. After my diagnostic test of other fuses in the same compartment, only this #14 fuse circuit indicates the leak. When the fuse is removed from the circuit, the electrical leak=ZERO, measured across empty fuse terminals. The same ZERO current is measured between the Ground cable clamp and the Negative Battery Post. Obviously the Battery Plus cable is connected to the Plus Battery Post.
Final question. Is the ECU system supposed to be somehow “live” when the Ignition Key is OFF ? Thanks for your advice and help, Paul P.
any one knows where ac compressor clutch relay located in 2002 Sienna?
****update**** We figured out the engine cooling fan control module is bad. We’re going to have to give in and order one from toyota. trying to wire the cooling fans to an interrupter switch, my husband’s drill slipped and drilled into the brake booster. After having gotten my sienna out of the shop, it was time to figure out why, after the mechanic installed the fusible link assembly, the airbag, the outside temperature display, and the blower motor for the heat and a/c weren’t working at all. It was ONE 10a fuse that was located under the dashboard….ONE 10 amp fuse powered the a/c and heater blower motor, the outside temperature display, AND the airbag!! Simply amazing.
Now I have to go through this website and see what all is on here….Can’t thank you enough for this page, it has helped us tremendously! Once we replace the engine cooling fan control module, I can use the a/c again w/o putting a strain on the cooling system. I’m just happy I’ll have heat for winter!
Just wanted to say thank you for putting up this article…I found it *somehow* when I was googling something with fuses. My husband was frustrated because no one was telling him what fuse or how to get to it. I thought I would try google one more time when I hit upon this url.
My ’05 sienna le was overheating last summer, when idling. (of course a/c was on). This summer I realized I couldn’t use my a/c while idling, or stuck in heavy traffic and crawling…the van would begin to overheat and the a/c would blow out warmer and warmer air. My husband went out to look at the van back in April. He discovered the radiator was bad/leaking, previous owner put stop leak in it, and last month (june) he replaced the radiator. I could then use the a/c as long as I turned it off at red lights or crawling in heavy traffic. I could use the a/c over 30mph. We discovered the cooling fans were coming on. He hooked up the cooling fan relay, it worked, we replaced some sort of ect(?) sensor, so we knew that worked, fans still wouldn’t come on. (but they work, he tested them). Come to find out its a part called the engine cooling fan control module that doesn’t work. So after receiving the wrong part in the mail, and several other issues with it, he decided to hook up the cooling fans to a toggle switch.
After spending 8 hours on my feet in shoes with no support, and getting sunburnt, because I wanted to lend him another pair of hands if he needed, and to be a go-for for him, my feet are killing me, and I’m burnt. Finally got the cooling fans hooked up to the battery and the toggle switch so I can turn them on and off manually…..turned on the a/c and NOTHING!!!! He and I both were ready to cry!! (him from pain, me from shear frustration). Anyhow, he knew it was a fuse, and looking it up online and calling places, nobody wanted to tell him what fuse was where and how to reach it/fix it. So I gave google just one more try. After clicking on the link for this site….oh my gosh. I handed my chromebook to him and he got a second wind. and the link you put for that fuse link thingamajiggy, I read the reviews for amazon…my husband just ran to the auto parts store to see if they happen to have one in stock, otherwise, we’ll order it via your link.
He was removing relays out of the fuse box, and sticking red and black wired into the “holes” trying to figure out how to wire up the switch and make the cooling fans work. the big relay next to the one for ‘fan’….there was a spark. I’m not sure if that’s what blew the fuse link thingy, but he knew it was something he did.
thank you for reading my book, and thank you for posting this article somewhere I could find it….it has given him hope of fixing my van again!
It’s people like you that has allowed him to save us THOUSANDS of dollars over the years by doing vehicle repairs himself.
Thank you for sharing Lysa. I hope you get your AC working again.
I will give that a try John. I did have someone pull the handle while I messed with the latch already but nothing happened. I didn’t have the button for the light pressed in so it may not have registered as the door being closed. I’ll try it again with the information you gave and see what happens. Thanks again!
Thanks for the reply John! I think you are right and don’t believe it’s a fuse problem but just needed to hear it from an expert first. I have tried moving the latch with a screwdriver and it appears to be in the right position. Before this problem occurred I was cleaning out the latch with a screwdriver and the latch motor activated as if it thought the screwdriver was the metal bar in the door jam. Since then it has been stuck and the motor won’t activate again. I have used a screwdriver to move the door latch in every way I can but still nothing. I have even unplugged the battery hoping it would reset the motor and that didn’t work either. I am at a loss and think I will have to pull off the door panel and see what I can find. If you can think of anything I should check let me know. Appreciate the information!
The background information of how this came about is real important information Kevin. I would use your screwdriver to simulate the door opening and have someone pull on the latch. You may need to push in the button which activates the light and tells the van the door is closed, and then pull the door latch to see if you can open that latch. Then it will be ready to close when you close it. It may take another person to help you pull this off.
Hi, I have a 2007 Sienna and the drivers door will not shut all the way. It isn’t a power sliding door but it has an electric latch that engages to pull the door shut when you close it. Is fuse 61 connected to that or is that just for the power sliding door? I can’t get the latch to engage anymore so the door will not shut all the way and it flies open when I am driving down the road. Any help would be great! Thank you!
I do not think it is on the fuseable link–that is only for higher-amp stuff like the motor that closes the door. I also don’t believe you are facing a fuse issue. If the other door pulls in fine I don’t think it will be a fuse. I haven’t studied this feature of the Sienna so all I can share is my intuition… I would focus on the door side of where that motor pulls the door shut. The door-close actuator could be bad but I haven’t heard of that through my site and haven’t personally experienced it. I would check to see if there is a plastic piece in the closed position that keeps that latch from inserting into the door. If so, I would use a screwdriver and try to toggle it open so it can close. I’ve had this happen on regular car doors, where the latch will be in the closed position while the door is open and therefore you cannot shut it. My Sienna is actually in the shop today for an air conditioner issue so I can’t go out and look at my van at the moment.
2007 sienna a/c is not working. tried to recharge but it is not taking the charge. checked the fuses and they are good.
did i miss a fuse. cant tell if the compressor is working
I wouldn’t say I’m real experienced with AC but if you have your hood open, the van running, you’ll hear the AC clutch kick in when someone turns on the AC. We had AC issues once and it was that we had an engine block coolant leak and it was running a little warmer than it should and wouldn’t let the AC come on. I had to take it to a dealer to get that diagnosed. Sorry I can’t be more help.
Yes, just the switch which was inadvertently toggled. Thanks again!
Thanks so much! How can I donate to your website?
Well thank you Warren, was it just the switch? To donate to Share Your Repair… On the desktop version of my site there is a donate link on the bottom of the right column, on the mobile version it is all the way at the bottom. Or you can just click here:
Hi. Both side power doors stopped opening automatically, but I can still open them manually. How likely is it that fuses 60 and 61 have blown simultaneously to explain this loss of power?
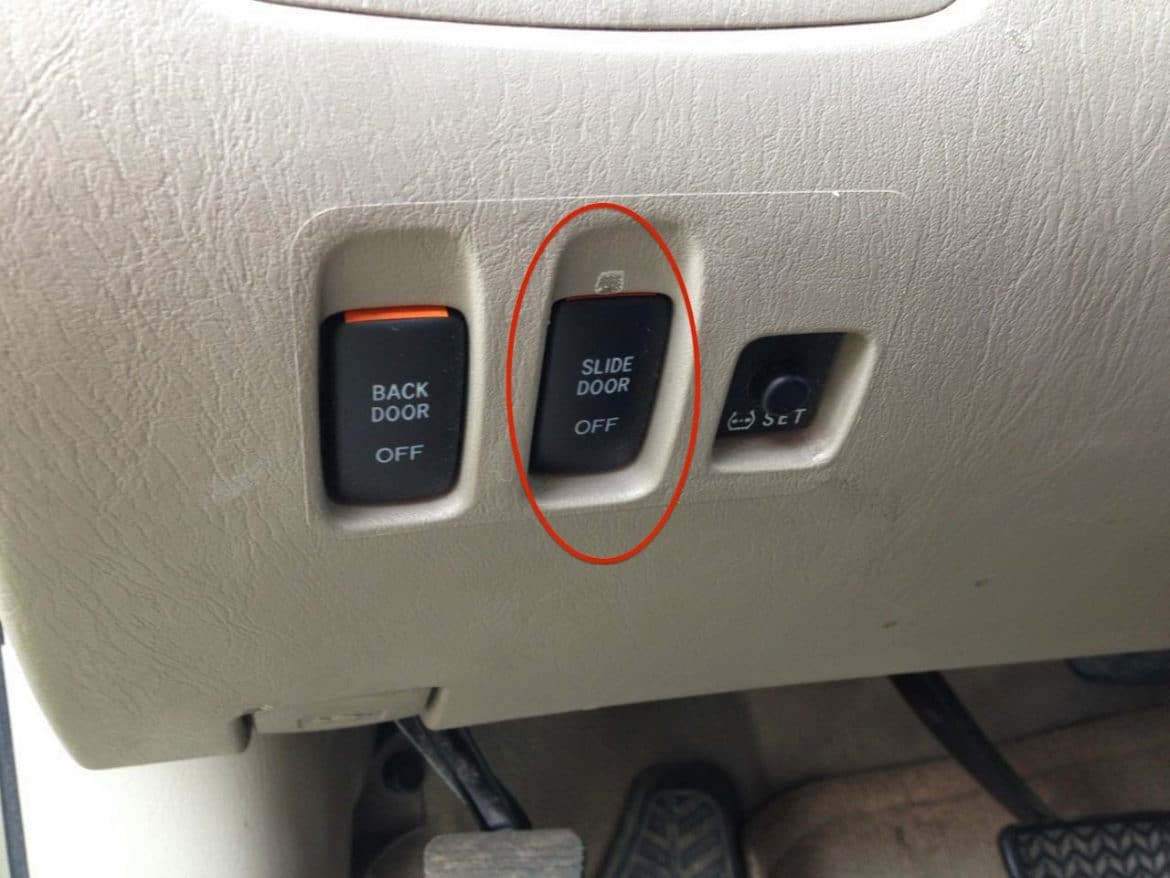
Warren, I’ve never heard of anyone actually finding that blown fuses were the problem with their sliding doors. Have you verified that the sliding door switch is not in the off position? It is by the driver’s left knee and it should be popped out so that the orange top edge can be seen. Below is the button in the OFF position:
Hello , I have a 2012 Sienna minivan and the third brake light has stopped working , the light works with 12 vdc but no power measured to the wires on the van . I checked the fuses and found no issues and all my other lights work including the brake lights down in the tail lights , is there another fuse somewhere or a relay for the third brake light above the rear hatch ? any suggestions welcome.
Thanks for the question Rick. I’ve studied that top light on my van and noticed it is an LED bulb strip. If it works when you apply 12 volts to it locally then you have some kind of wiring problem somewhere in-between. If your brake lights work you could possibly splice into them as a possible repair option. It’s hard to proposed what to do without looking at it personally and even with that I don’t claim to be that experienced in troubleshooting Sienna electrical issues. Let us all know if you figure it out.
My anti-theft light keeps flashing. I’ve tryed pulling off both battery cables for ten mins. still flashing.
Tryed the different suggested fixes.no luck.This is a 2006 sienna toyota van.
I’m trying to determine how to fix a parasitic draw. I have narrowed it down to the ECU B 10 A fuse. I’ve read that it could be the ECU ACC/IG1 relays. How do I determine if this is the case? If I remove them both should the draw be gone?
If you disconnect each one, one at a time, and see if the drain goes away, then you will have narrowed it down. Here’s a block diagram of those circuits on the Fusible Link Block:

help me please , my car is toyota sienna 2009, i want to know where is fuse (
54. p/seat 30 A- Power seats.)
Nice job, congratulations.
My forward windshield washer is no working and they are not blocked up. Your text talks about the rear wiper and washer, I cannot see anything about the forward washer??
Wayne, the forward windshield wiper is simply referred to as “windshield wiper” on #33:
33. WIP 30 A – Windshield wiper and rear window wiper
Have you checked that?
Thanks for the suggestions I started to check my connections and found the smaller wire that runs to the positive terminal was broken so I checked with my multimeter again it still showed power going through the system even with the broken wire, I stripped it back a little and made contact and that fixed the problem so I just have to repair that and all should in working order again. Thanks a million you saved me some time and money.
Glad you were able to diagnose the problem and get your van working again. Good Job Armando! Thanks for letting us all know what you needed to do to fix it.
Hi I was woundering if anyone had any solutions to my problem for a 2004 Toyota Sienna XLE. That is I have a battery I just replaced its at the moment reading 12.3V and yet I have no power anywhere in the vehicle, I’ve checked all my fuses under the hood, the steering wheel and the passenger side. None are blown and I’ve also checked for continuity all good there, I don’t know how to check relays so what I did with them is poped off the case and visually checked for signs of damage and have not found any so far. I also checked the long fusable link both visually and with the meter nothing is blown or broken. I checked to see that I have power from the battery to the long fusable link an I do I did this by placing one end of my meter to the positive terminal and then checking the long fusable link I get voltage to it and through it as well so it’s not burnt out unless I check it wrong any help would be greatly appreciated
Armando, thanks for the question. I would start from the battery and work your way out. The first thing you must do is verify that the battery cables are making good contact with the battery’s posts. Then follow the battery cables to the fuseable link box and check the voltage on both sides of the fuses. Systematically you need to work your way away from the battery to find the problem. If you had power in your car before changing the battery, it most likely has to do with the battery cables. Did you by any chance hook up the battery backwards?
Hi, John.
The Toyota service department just called me. I was told that the remote control fob just needed a new battery. Well, that was nice. Before I took the car in for service, I had put 3 separate new batteries in the fob, for testing, and nothing worked. And, yes, I had the right polarity for the batteries. All I can think is that there was a problem with the battery contacts. In any respect, I’m a happy boy and I’m going back in, shortly, to pick up our van. John, thanks for being there for us and for all your fans. Blessings. Mike
Hey, that’s good news Mike! I’m glad you were able to get your remote working again. Thanks for checking back in and sharing how things turned out.
Hi, John. My wireless remote control fob ceased working. I’ve changed its battery and have checked fuse 14. (ECU-B 10 A). The fuse was OK. When I attempted to reprogram the remote control for my 2004 Toyota Sienna, the van refused to respond and to confirm the re-programming (ie., the driver-side door lock did not switch on and off to acknowledge that the van was ready to reprogram the remote). Is there a relay switch that I need to check now? My remote control problem (it ceased working) started immediately after our Toyota Dealer replaced our entire dashboard, which was under a recall notice. Can you help? Thanks and Blessings. Mike
Mike, thanks for the question. If I were in your shoes I’d go back to the dealer and tell them they rendered your remote inoperable and try to get them to fix it for you (free of charge of course). Since they did something quite significant like replace the dash, there’s a good chance there’s a connection there. Other than re-trying my steps for programming it that is all I can suggest at this point. Let me know how it goes and how you resolve this.
Thanks for the help John, I really appreciate it. It makes sense it should work, but no such luck. I will keep digging. This post has been filed away for further use, it is great information. Thanks again!
Hi, this is great information, really appreciate it. I notice several systems are mentioned on several fuses, and was wondering how that works. I am trying to disable the moon/sun roof (long story for the reason), but if I remove fuse 41 it still works. Same for the seat heaters. But I see that both are listed on #38 and #39 along with other seemingly important systems, so I am reluctant to remove those. Help??
I believe that 38 is the control of the moon roof, note that the title is the “ECU-IG.” I believe ECU stands for Electronic Control Unit. The fuse goes to the device that controls those components but not the actual power than runs them. I would think that 41 would be the correct fuse. I’m sorry I cannot be more help. I tried to put together as much information as possible but it was not necessarily from first hand experience but gathering the information I could find from the shop manuals, etc.
Hello John,
Thank you for the write-up. This is great information.
I too am in need of the relay information. I was at Pep Boys replacing the battery when a tech reversed the polarity during install. There were many problems with the car afterwards but all are ‘fixed’ but the ABS, the VSC, and the Brake lights in the dashboard.
I was told by local mechanic, who used the OBD scanner, that the ABS relay is bad. My Sienna is 2004 XLE and I have BRK relay. Would you happen to know the part number, or the relay number, for the BRK relay?
The current relay in the fuse box is part number “90084-98032”. Is this a BRK relay? I have suspicion that the tech installed a “90084-98032” after frying my BRK relay.
Thank you in advance,
Michael
Michael, I’m sorry to hear that happen. Unless you signed a waiver to not hold Pep Boys accountable for messing your van up I would strongly encourage you to pursue them to have them pay to have a Toyota Dealer repair your van. They caused the damage and they should be responsible to get it repaired. Have you pushed for that? I’m reaching out to my dealer contact for a part number for that brake relay and I’ll get back to you.
I replaced my battery but had it opposite way connected and burned some fuses and I did replaced some under the hood, the gas pedal didn’t had no affect at all when pressing it till I replace some fuses… now still on my dash board I see check engine light on, break light on, abs light on… and the radio does not work, the ac/heat does not work.. what’s the problem now? Please help thanks!!
Norman, I’m sorry to hear about that. You surely blew some fuses and still could have possibly destroyed some of the van’s electronics. You want to be careful if you run it as some very essential components may not work, for example the electric cooling fans on the radiator, if their fuses are still blown. You are going to need to systematically check all the fuses, including the fuseable links, to see what you did when you hooked up the battery backwards. I would probably recommend taking it in to a dealer if you feel this is over your head as you don’t want to do more damage to your vehicle.
Thanks for this info. Could you provide more detail on where fuses 54 and 55 are?
This list is not exhaustive. No mention of what those relays by the driver’s side instrument panel fuse box are for.
Robert, thanks for taking the time to leave a comment. I hadn’t intended to catalog the relays in this article, only the fuses, but I’d like to have those other relays documented for my own use as well. I’ll see if I can track down information on them.
where is the fuse for the seat auto positioning buttons 1 & 2 and the set button on the drivers door?
Gary, thanks for the question. The positioning buttons won’t have fuses of their own. The power seat fuse is #54. P/SEAT 30 A – Power seats. There will be a computer that the position buttons feed into, which keeps the locations in memory. Can you first describe the issue you are having and then we can troubleshoot to narrow down the root cause?
what fuse is for power adjusting outside mirrors?
Have you checked fuse 28? I’m pretty sure Toyota refers to the side mirrors as “rear view mirrors” and the auto dimming rear view mirror fuse is #38 so 28 cannot be that one. Also, you can see that the side-view mirrors are referred to as rear view in the description of #24: “Outside rear view mirror heaters”
28. ECU ACC 7.5 A – Shift lock control system, air conditioning system, power rear view mirror control
so one of my power outlets on dash did not work (left side), checked the fuse #27 and it was good. There was no fuse #26. Then I proceeded to pull every blue 15A fuse until #48 which was bad. Moved #27 to #48 now both power outlets work. So where exactly is my cigarette lighter? May be I do not need fuse #27?
The cigarette lighter is not the same as the two 12V power outlets on the front of the middle console. The cigarette lighter may be an option on the Sienna and you do not have that option. I don’t recall seeing an ashtray in our van. I’ll have to double-check that but that’s my first thoughts.
Great Information!!! My question is …is changing the #58 50A Fan fuse in the fusible fuse box something I can do myself or should I just have a mechanic do it?
Carla, if you blew that fuse, replacing it will most likely result in you blowing the very same fuse again if you do not fix the problem. I would take it to a Toyota Dealer and see what they say.