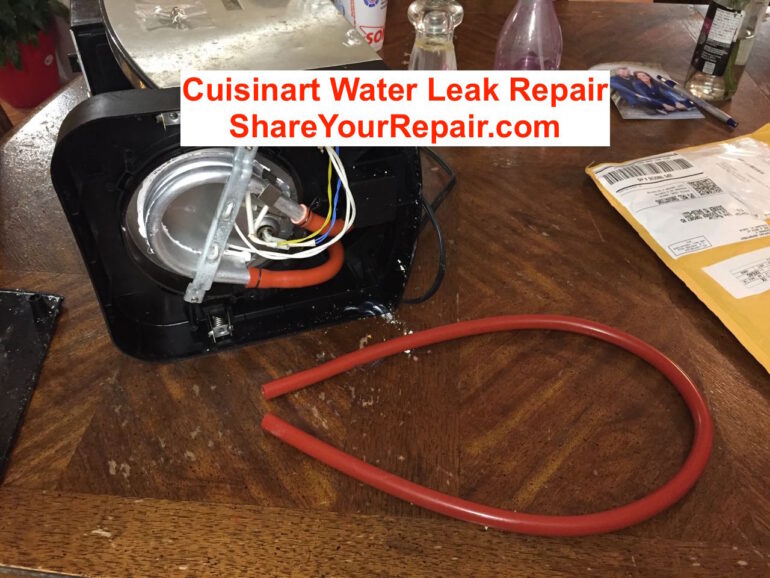
You’ve come to the right place for your Cuisinart water leak repair–Follow along to replace the cracked water hoses. The internal hoses connecting the heating element to the water tank get brittle and crack over time. When the coffee maker attempts to pump the water, it leaks out the crack. I have figured out how to get past the safety torx screws and replace these cracked hoses so you can breathe new life into your otherwise good Cuisinart Coffee Maker. Originally I had a hard time finding replacement hoses. I wrote an article on how to re-use the shorter hose. I would recommend replacing the hoses but you can read the article where I re-use the shorter hose: Repair a Leaking Cuisinart Coffee Maker.
Cuisinart Water Leak Repair – Replace Cracked Cuisinart Water Hoses
Equipment:
- Cuisinart DCC-2600 Brew Central 14-Cup Programmable Coffeemaker with Glass Carafe (now replaced by the DCC-2650 model)
Tools Needed:
- Needle nose pliers (for removing the hose clamp)
- CR-VT10 Security Torx Driver (get it as a set or individual tool) (must have a thin shaft to fit down into the recessed hole)
- Size 3 flat precision screwdriver (this can be used to remove the security torx screws)
Repair Parts:
Optional Cuisinart DCC-2600 Supplies:
- Charcoal Water Filters for Cuisinart Coffee Makers
- Cuisinart GTF Gold Tone Filter
- Cone Coffee Filters
Repair Instructions:
Step 1: Unplug the coffee maker.
We are going to open it up so you definitely do not want it plugged in as you could be shocked.
Step 2: Empty any water out of the tank.
BTW: you should remove the carafe and set it aside first. To empty the water from the tank I just turned mine upside down over the sink.
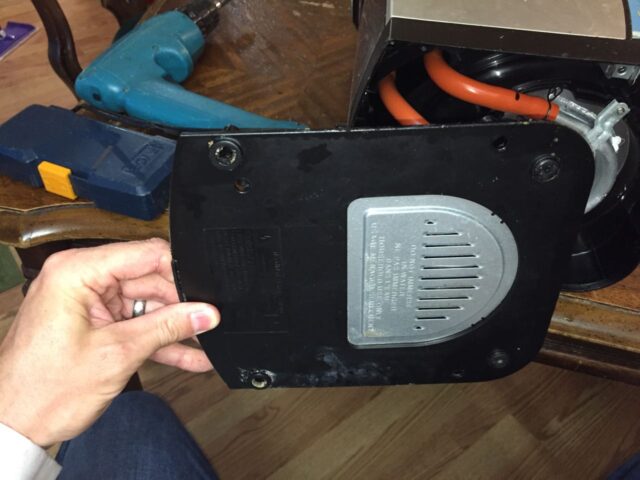
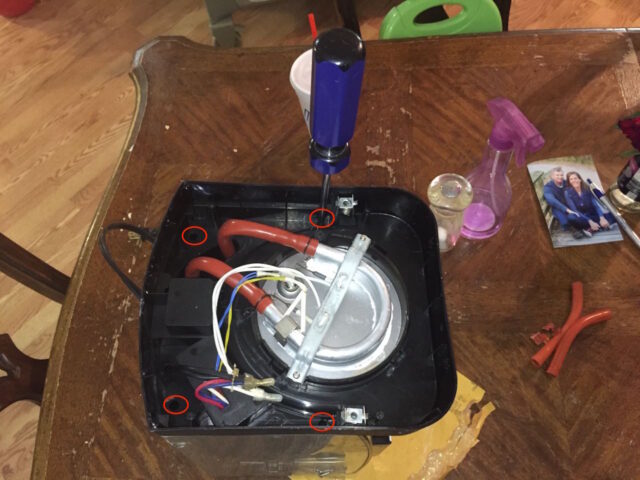
Step 3: Lay the coffee maker on its back so you can access the screws on the bottom.
We want to remove the bottom plate. The screws are in recessed holes located as indicated below. You do not need to remove any of the rubber feet to access the screws, btw.
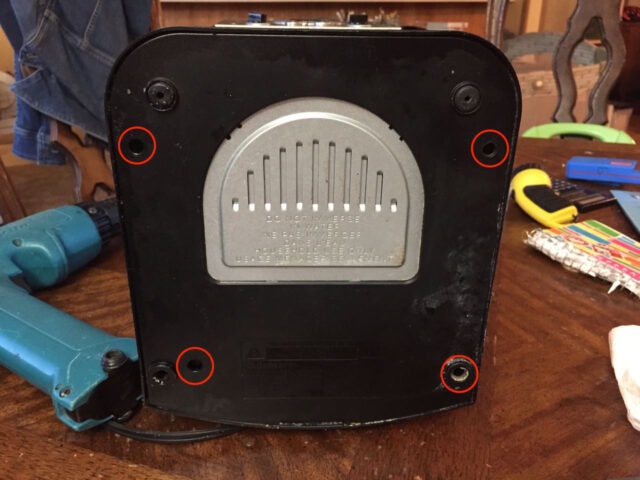
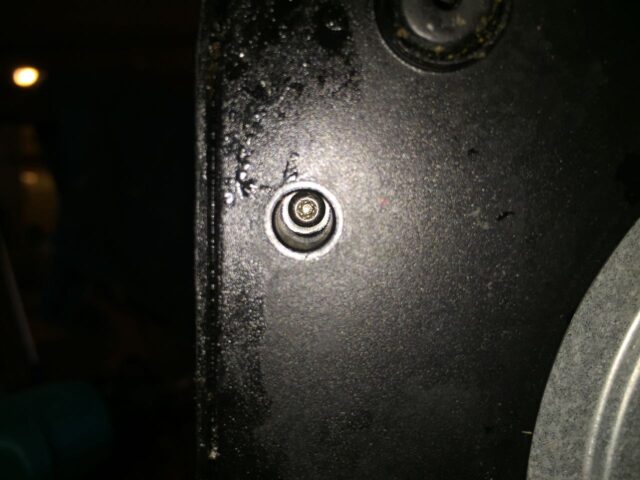
Step 4: Remove the 4 bottom screws.
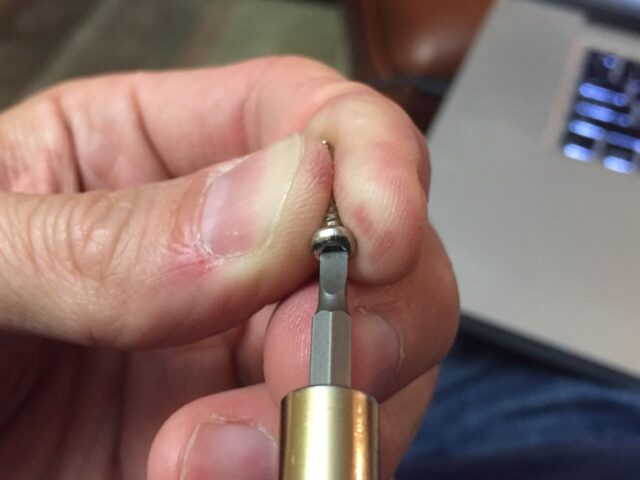
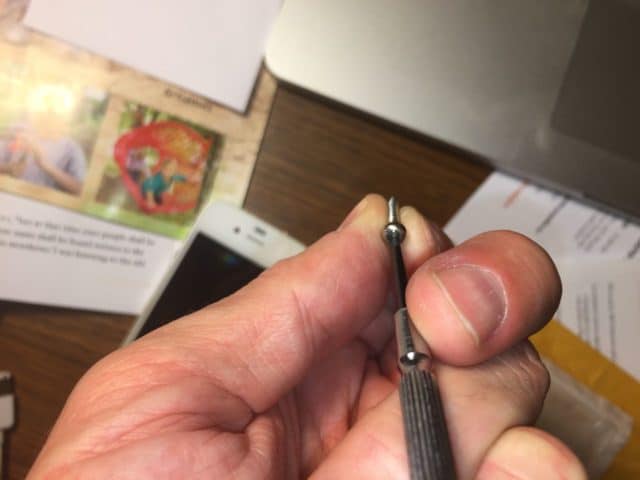
These screws are security Torx-10 headed screws. This means they are Torx-10 with an additional pin that sticks up in the middle of the screw head. Here you can see a close-up of the screw head:
The bit tip for these screws looks like this, a torx with a hole in the middle:
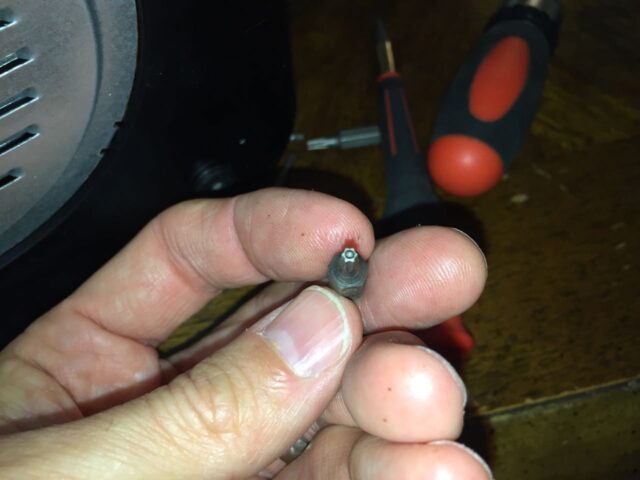
Unfortunately, the hole in the case is too small to use a bit tip like the one pictured above, as it won’t fit deep enough into the narrow-diameter hole. Lucky for us, you can use a 3mm precision flat-tip screwdriver bit instead, which barely fits down into the corners of the star shape:
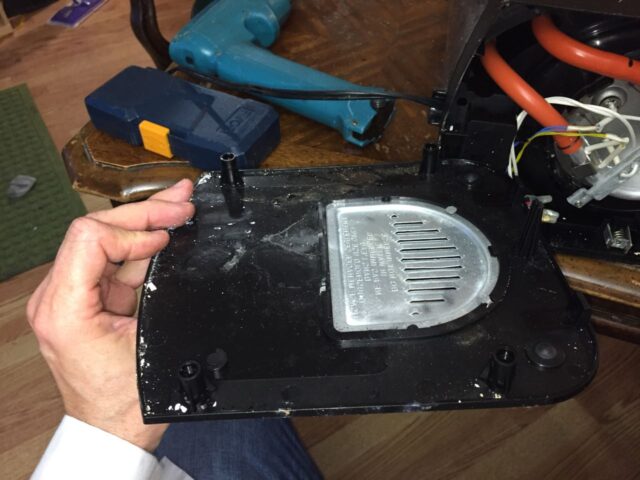
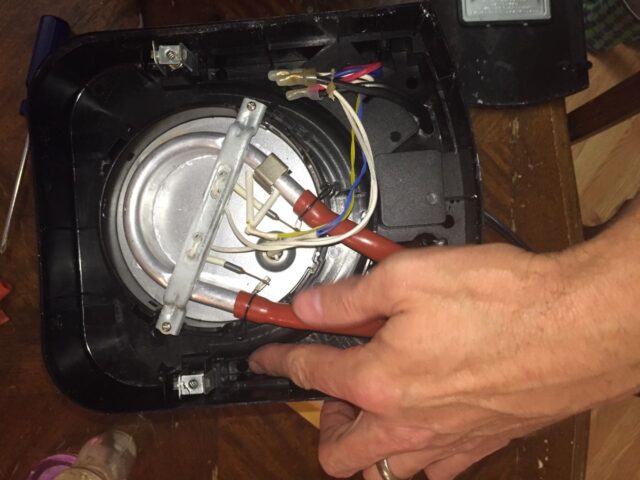
I also discovered that you can alternatively use a smaller flat-tip screwdriver bit, which will slip past the security post and sink down into the head. Once you remove the four screws, you may need to slip a flat-head screwdriver up into the seam to get the bottom out. Here the lower cover has been removed:
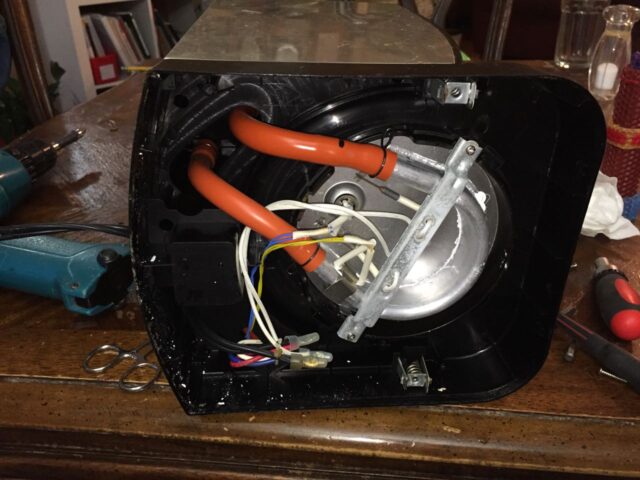
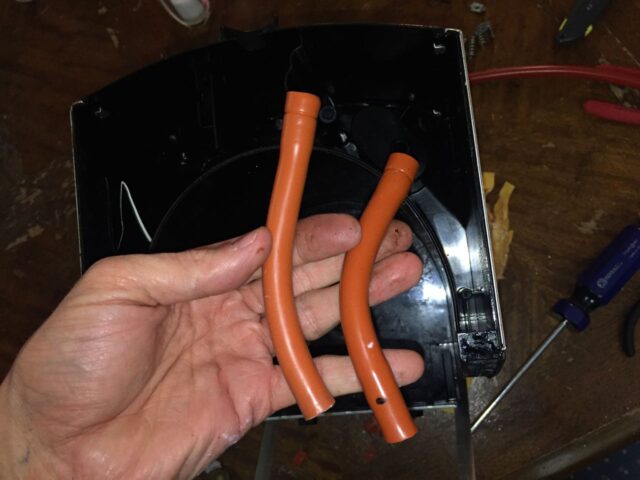
Below is what it looks like inside. These coffee makers are a great study in lean engineering. There is only one heating element for both the water going into the grounds and for the carafe, and the pump is nothing but essentially a ball check valve:
Below is a great video that explains how these coffee makers work. If you don’t already know, it will be helpful for knowing how to reassemble it:
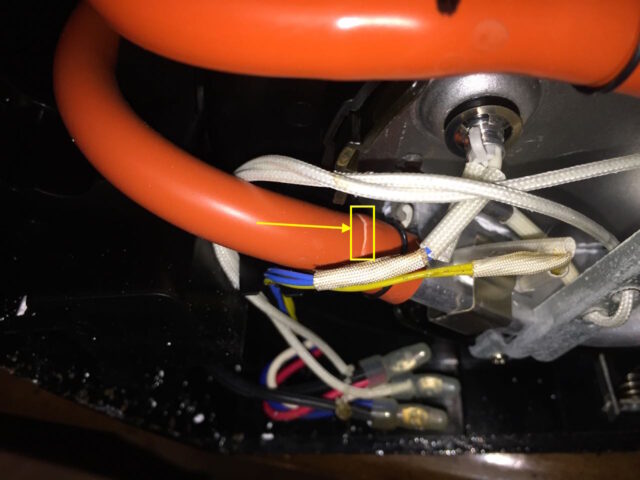
Step 5: Find the coffee maker leak location.
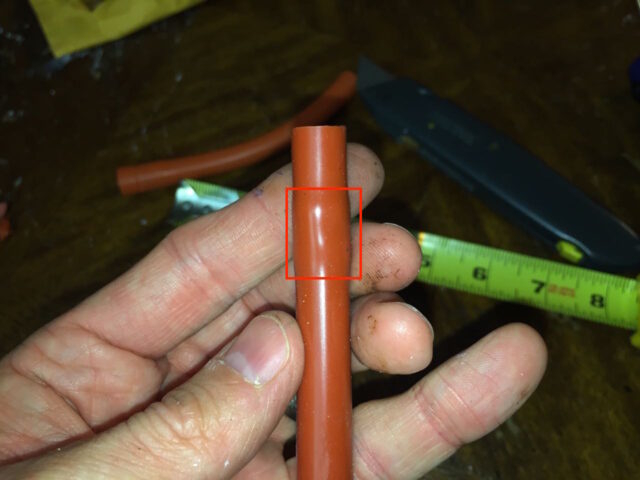
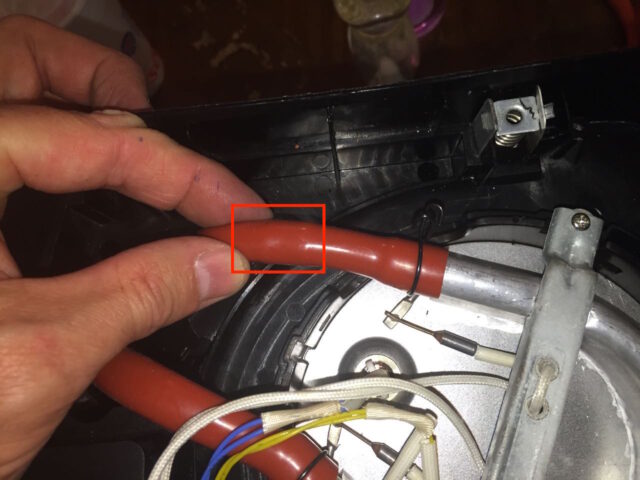
This isn’t required, but I always want to know that I’ve figured out the root cause of the problem so I know I’m actually fixing the problem. Once you have the bottom cover off you can search for the leak. I’ve heard of people discovering a leak in the aluminum heating element as well as the rubber tubing. Quickly I was able to see a light-colored line on the top side of one of the hoses, just above where it connects to the heating element:
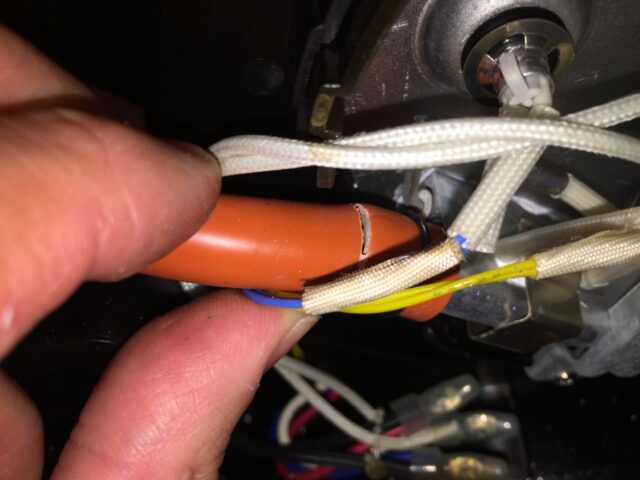
With a little pressure on the hose you can definitely see that it is cracked all the way through–definitely the root cause of this leaking Cuisinart coffee maker:
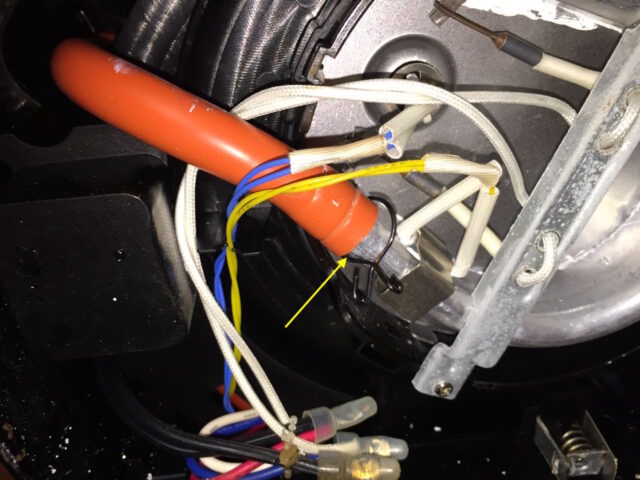
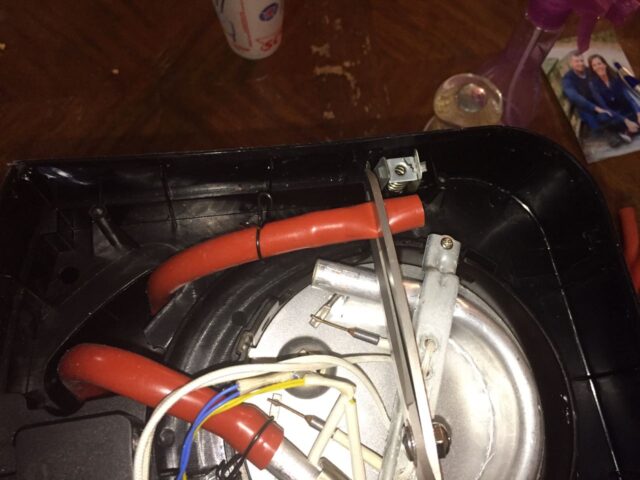
Step 6: Remove the wire hose clamps.
Squeeze the hose clamps and push them back on the heating elements, as seen below. Repeat this for both hoses–you should replace both hoses while you are at it because the non-leaking hose is destined to have the same problem and if you are going to go to all the work to replace one, it’s not much more work to replace the other.
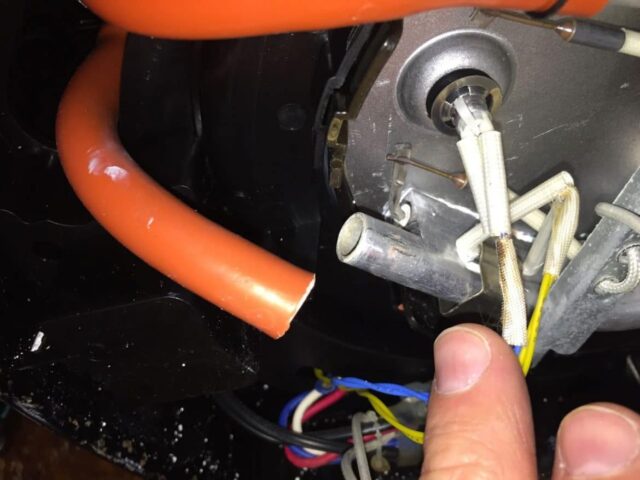
Step 7: Remove the hoses from the heating elements.
If yours cracked just at the end of the heating element connection you can likely just bend the hose and it will break off. Alternatively you could cut it off with a box cutter. Regardless, we need to get these old hoses off the heating element pipes:

I measured the heating element pipe at 0.447, which would be the stretched inner diameter of the rubber hose:
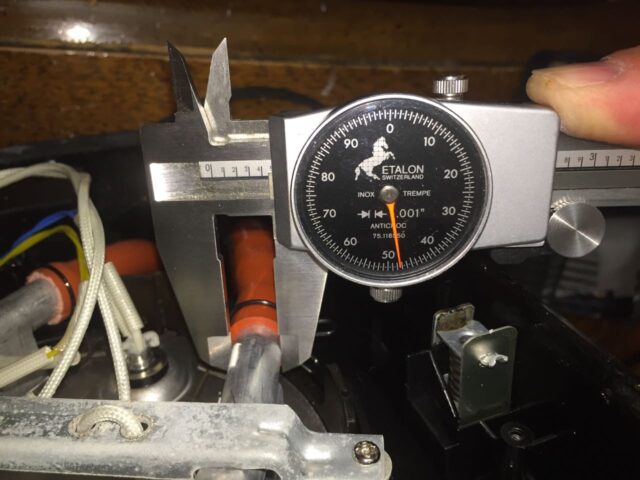
I estimate that the replacement hose should have an ID of approximately 7/16″ = 0.4375 or 11 mm. I found that the hoses I have listed above in the parts section, at 8mm inner diameter, work fine.
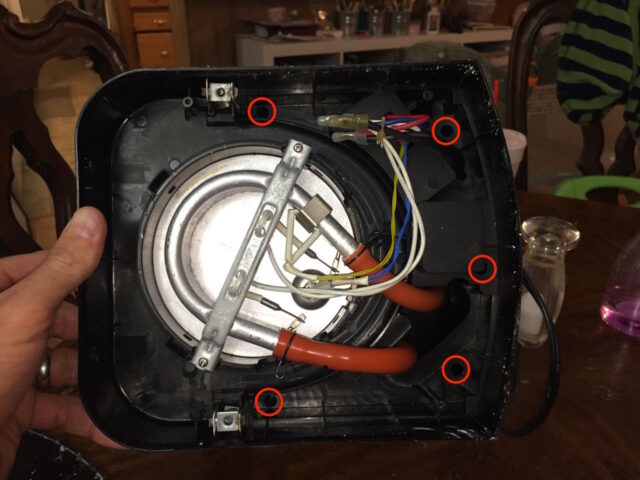
Step 8: Remove the Lower (Inner) Case Screws
In order to remove the other end of the hoses (and reinstall the new ones), on the bottom end of the tank, you need to disassemble the coffee maker. Remove the 5 Phillips-head screws in the following locations. The picture below is actually from when I had (temporarily) repaired the hoses, which I wrote about in this article: Repair a Leaking Cuisinart Coffee Maker
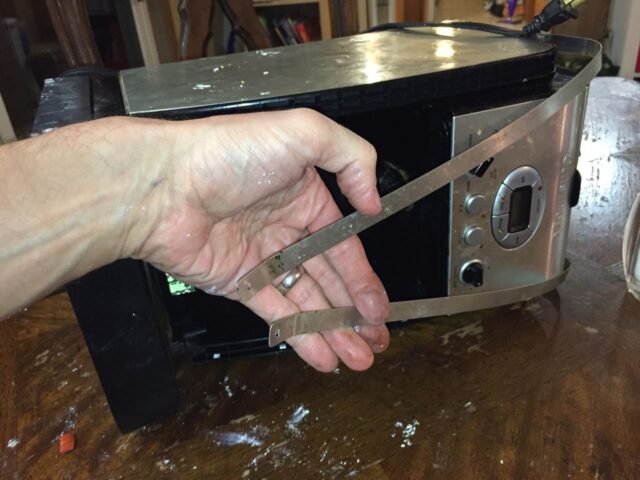
Step 9: Disconnect the ends of the stainless steel bands.
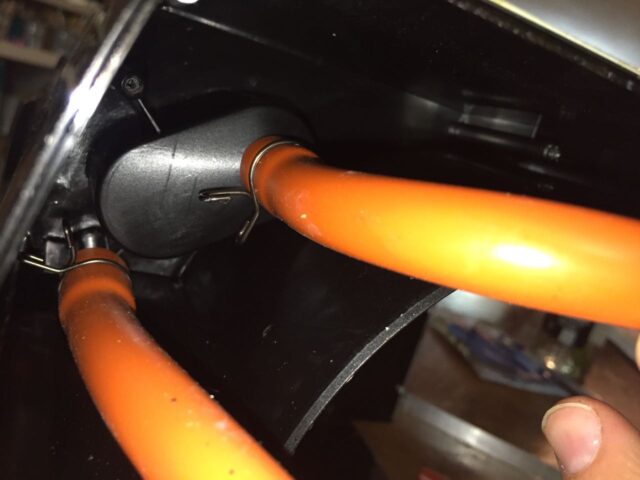
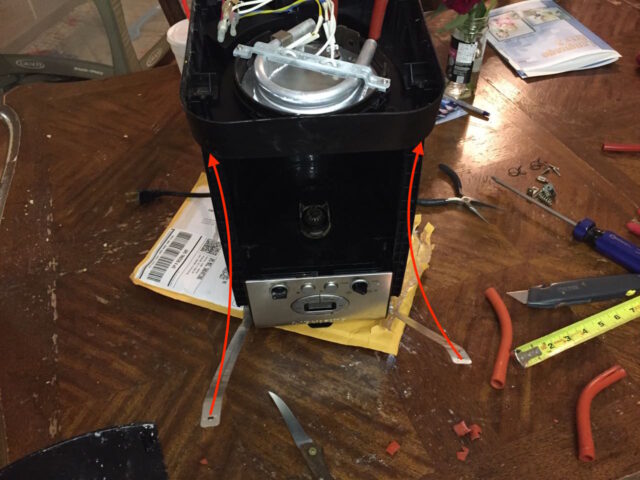
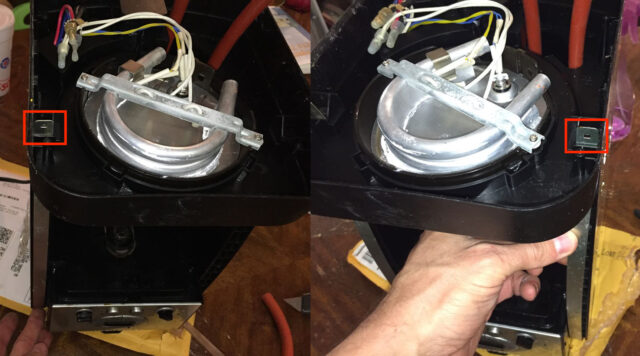
Removing the screws in the previous step will not allow you to disassemble the coffee maker as it is also held together by the two narrow stainless steel bands running along the outer edge of the coffee maker:
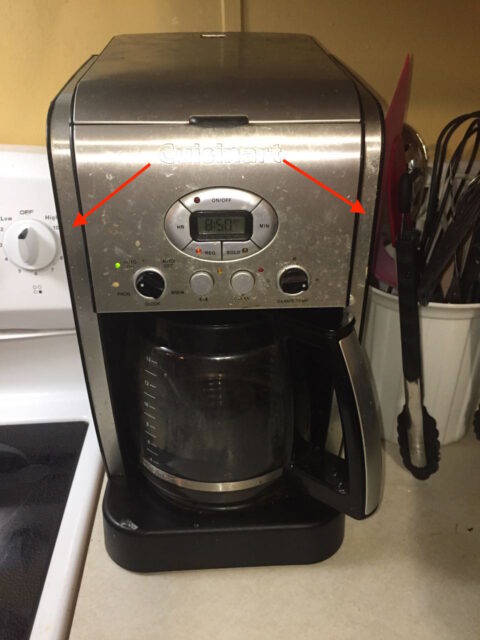
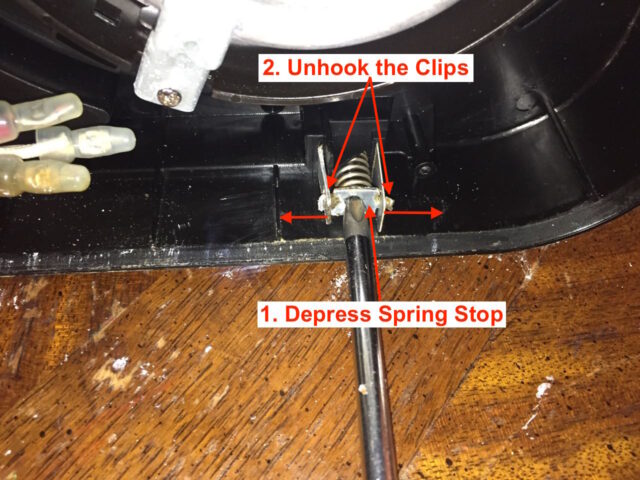
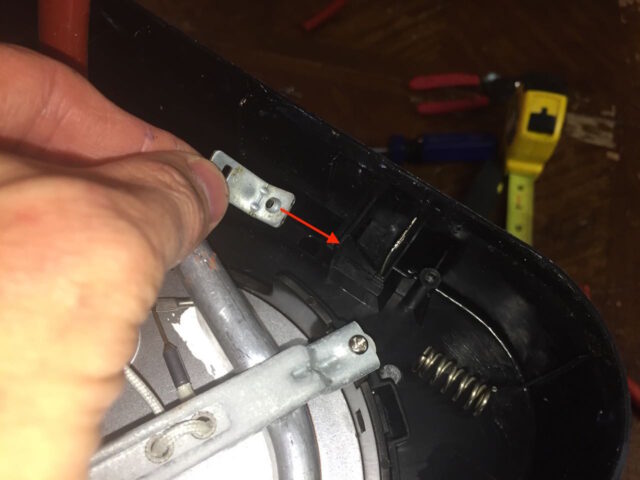
The metal strips that run along the front of the coffee maker are actually more than just for looks–they hold the coffee maker together. They wrapped around the coffee maker and a spring holds them tight. I guess the temperature changes in the coffee maker posed a challenge to using adhesives to hold the stainless steel trim so they had to use springs to keep them tight. There are two metal clips that hold the bands tight. They are diagrammed below:

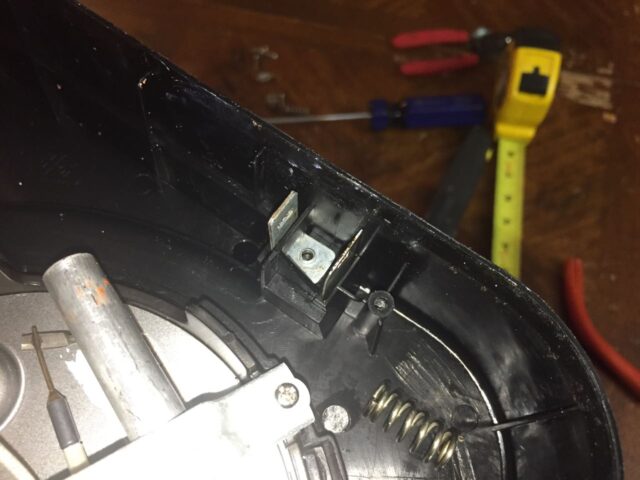
To disconnect the spring clips, press in the “spring stop” (I just made up the names for the parts, btw) and then unhook the clips from the sides of the spring stop to release the spring.
Keep track of the parts:

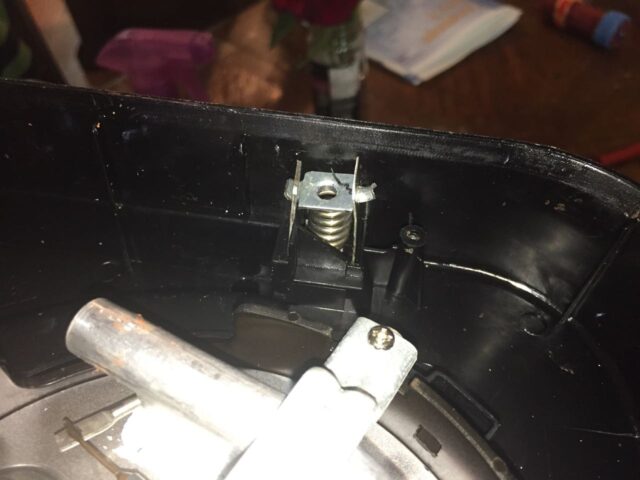
Step 10: Pull out the stainless steel strips.
Once you disconnect the spring clips you can pull the stainless steel bands up and out of the base of the coffee maker. Here’s what you’ll have when you pull them out:
Step 11: Separate the top from the base.
Caution: there is a wiring harness that must be released before you can completely separate the top of the coffee maker from the base, so be careful not to force it.
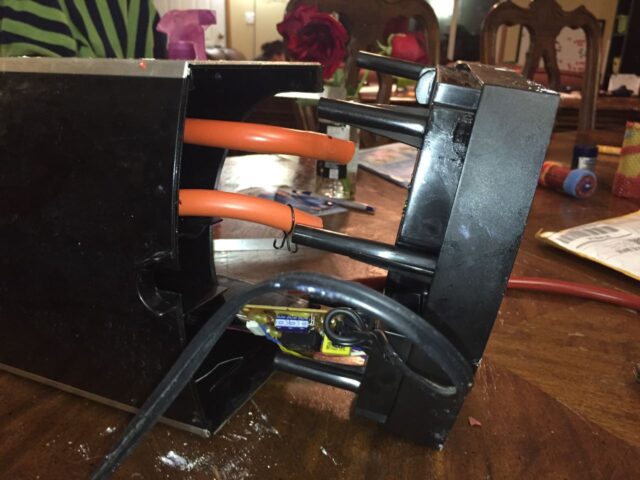
Pull the base away from the top of the coffee maker, looking for the wiring that connects the two:
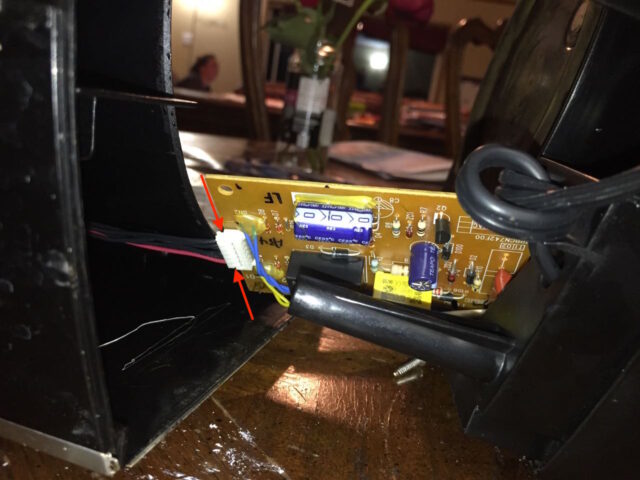
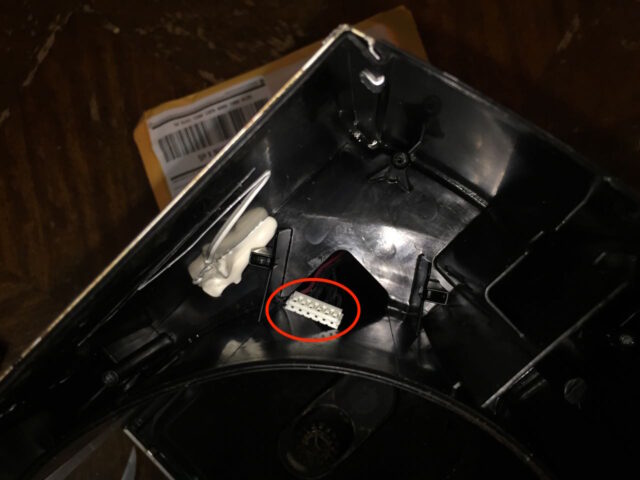
Pull the electrical connector out of its socket on the circuit board. There are “catches” on each side of the connector you can place a small flat screw driver into to pry it out:
After you disconnect the electrical connector you will be able to remove the top:
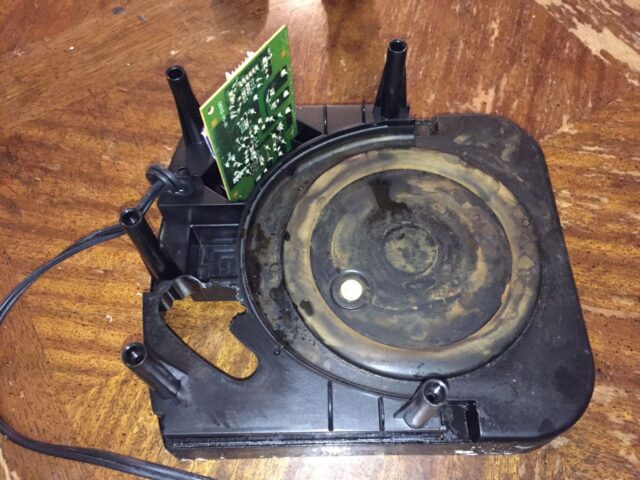
Note that in the image above you can see the modification I made in trimming the base so I could reconnect the shortened hose from before I received the replacement hoses and had just reconnected the old hose the first time I repaired this coffee maker.
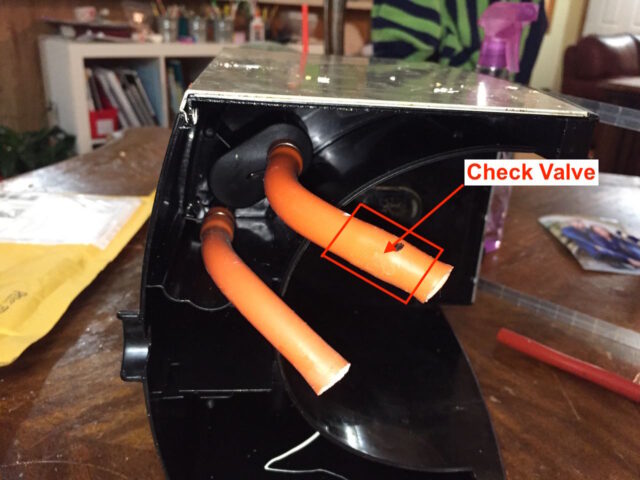
Step 12: Take note of the check valve location.
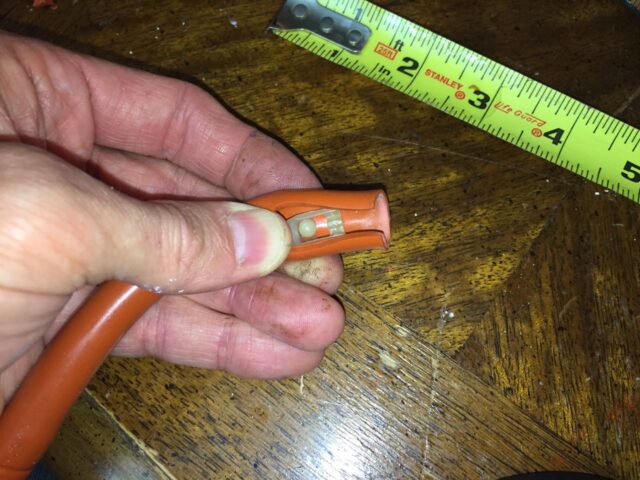
As described in the video link I embedded earlier, this coffee maker’s “pump” is simply a check valve. That check valve is in-line inside one of the hoses that we are going to be replacing so we need to take note of its orientation, which hose it is located on, and the location of the valve, so we can reinstall it in the new hose. You can locate the check valve by looking for the “bulge” in the hose, where the bulge will be solid because of the check valve inside. I marked it with a Sharpie marker:
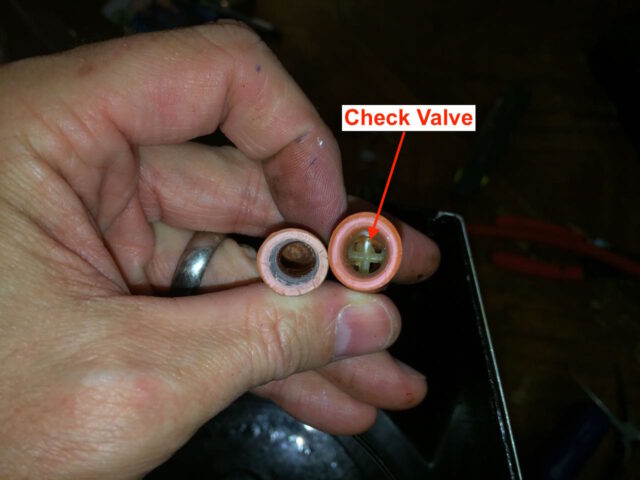
If you look into the ends of the hoses you will be able to see the check valve:
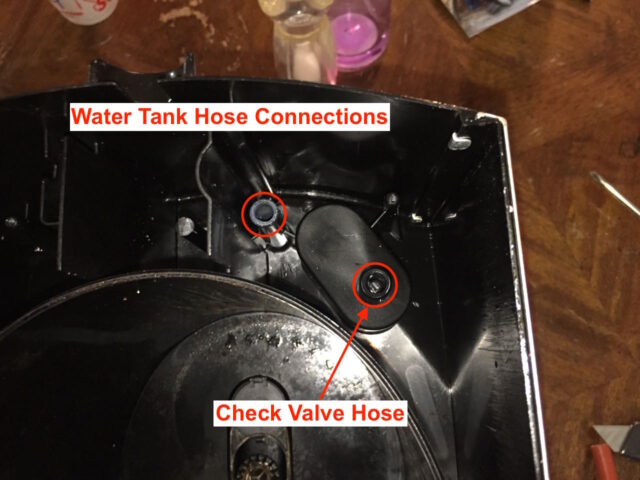
Step 13: Disconnect the hoses from the tank.
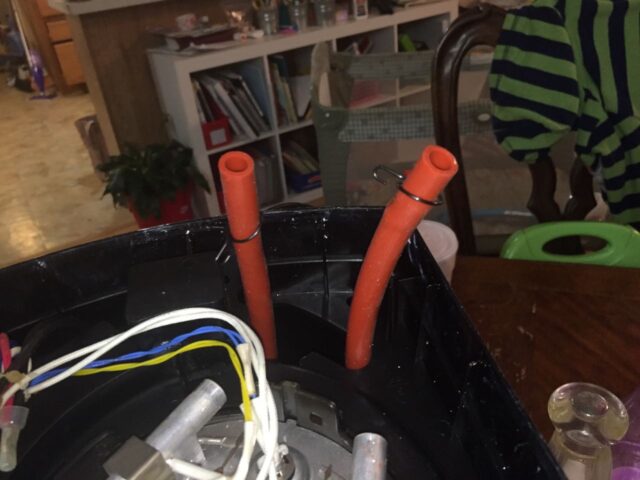
Locate the hoses sticking down and out of the top portion of the top of the coffee maker:
Use a needle-nose pliers to remove the hose clamps and remove the hoses:
Pull the hoses off, if you can, or you may need to cut them off. I was able to get them off:
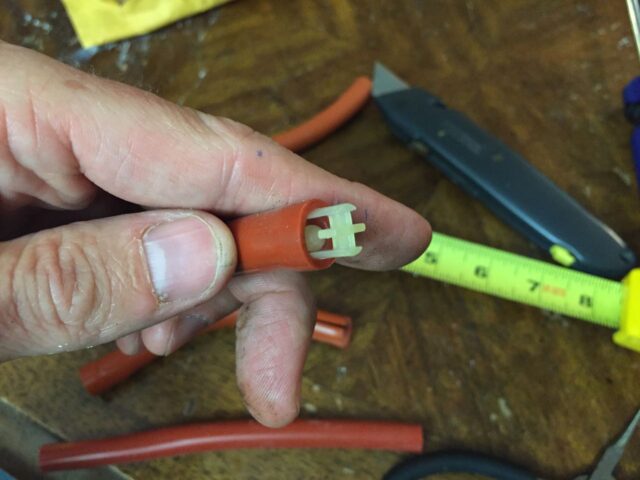
Step 14: Remove the Check Valve
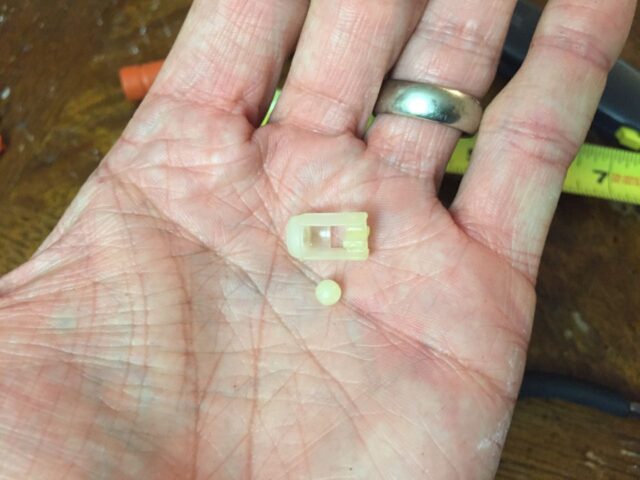
Perform this step carefully as you do not want to lose the check valve ball as it is needed for assembly. Carefully slit the hose in the area where the check valve is located, taking not of the valve’s orientation and the ball, which will become loose when you open it up:
Here is the check valve removed:
Step 15: Cut your new hoses to length.
If you ordered the hoses I link to at the top of this article, you can get both hoses out of the one. Cut both hoses 6 1/2 inches long:
Step 16: Install the check valve into one of the hoses.
I used some water to lubricate the check valve before starting to insert it. Partially insert it and then place the ball inside and then push the valve in the remainder of the way:
I don’t think the exact placement is critical–I inserted the valve about a half-inch into the hose. Here the valve is fully inserted:
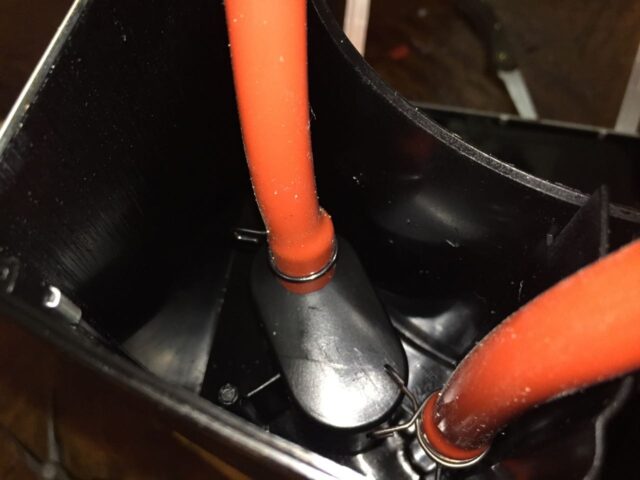
Step 17: Install the hoses on the water tank.
Slip the spring clamps on the two hoses and then install them on the water tank. For the check-valve hose, connect the opposite end to the water tank as the check valve should be at the bottom near the heating element:
Slide the spring clamps into place, half way between the end of the tank connection and the bottom of the tank:
Step 18: Reassemble the top of the coffee maker on the base.
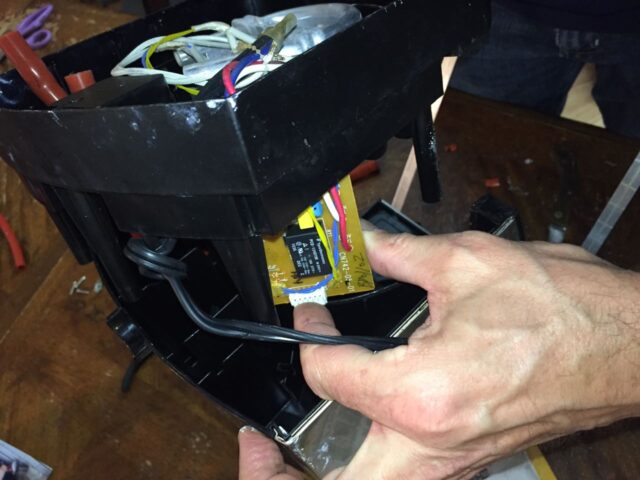
Reunite the electrical connector with the circuit board sticking up from the base and reconnect the connector. The connector will only fit together in the correct orientation:
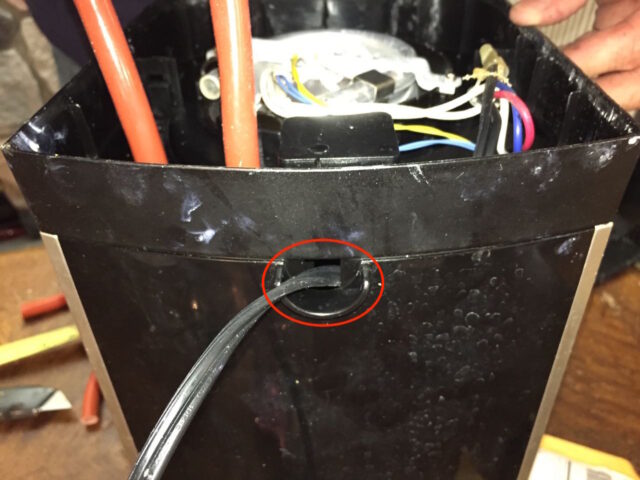
Once you have the connector reinstalled, you can put the two halves fully together. Make sure the power cord comes out the notch in the back:
Step 19: Re-Thread the Stainless Steel Strips Through the Base
Insert the stainless steel strips into their slots in the base:
You should then have this:
Step 20: Reinstall the Springs and Clips
Now that the stainless steel strips are reinserted into the base we can reinstall the spring clips that hold them together. Install them in the following order:
Step 20a: Insert the L-Bracket:
Insert the L-bracket with the round hole end going into the slot:
Here the L-bracket is reinstalled:
Step 20b: Insert the spring.
Insert the spring between the L-bracket and the end of the stainless steel strip as seen below:

Step 20c: Reinstall the spring stop.
This was a tricky part of this assembly. Hopefully the lessons I learned will help you. To reinstall the spring stop: hook the spring stop on the L-bracket, take up all the slack in the stainless steel strip so that all of it sticks out the bottom, press down on the spring stop as seen below, and place the end of the stainless steel strip over the hook on the spring stop:

Then hook the stainless steel strip on the spring stop:
Repeat this process for the other side.
Step 21: Reinstall the hoses on the heating element.
Insert the spring clamps on the new hoses as seen below:
Wet the connections to aid in the hose installation. I think I probably put some of my own spit on it to be honest, since it’s my own coffee maker 😉 I pushed the hoses on about a half-inch. Then install the spring clamps half way between the end of the heater element and the hose end:
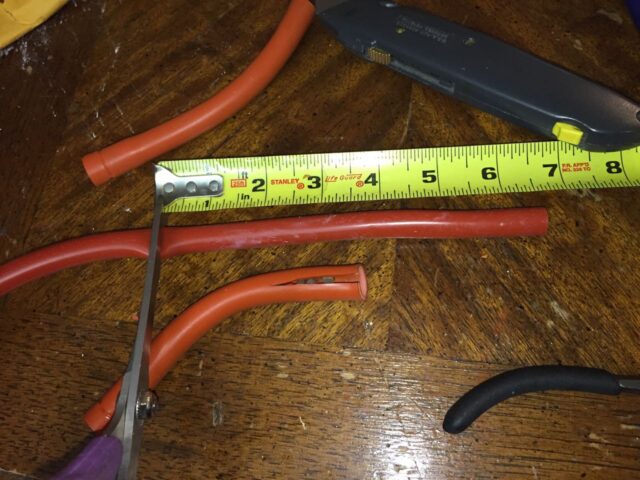
I actually found one of the two hoses to be just slightly too long so I disconnected it, trimmed it, and then reconnected it. Most of all you want to make sure they are not kinked or too long. This was the one I trimmed and how much I trimmed off of it:
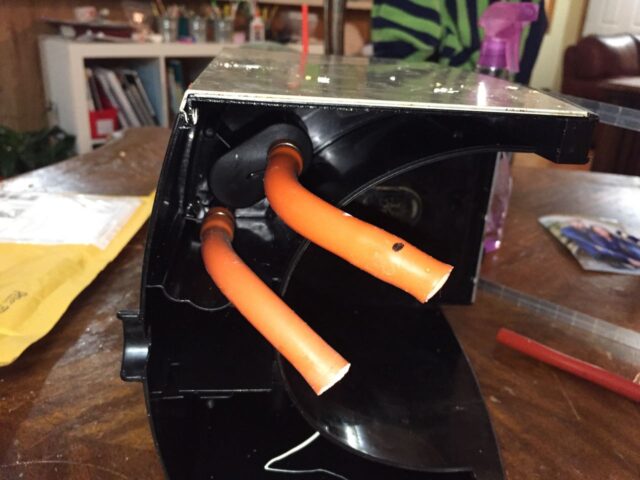
Check Valve Location Double-Checking:
Just to verify, your check valve should be in the general vicinity as seen below on this top hose:
Step 22: Reinstall the lower (inner) base screws.
They are located as indicated below:
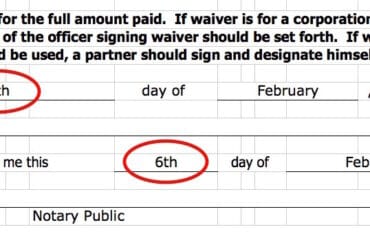
Step 23: Reinstall the bottom cover and outer base screws.
Here’s where the screws go:
A trick to reinstalling them is to insert your precision screwdriver into the head first and then guide it into the hole and tighten:
Now you’re done. You’ve breathed years of additional life into your coffee maker for around five bucks!!
Amazon Associate Disclosure: As an Amazon Associate I earn from qualifying purchases. This means if you click on an affiliate link and purchase the item, I will receive an affiliate commission. The price of the item is the same whether it is an affiliate link or not. Regardless, I only recommend products or services I believe will add value to Share Your Repair readers. By using the affiliate links, you are helping support Share Your Repair, and I genuinely appreciate your support.
Have a DCC3200 machine. Can’t get the screws to release.\and back out. Any suggestions?
I don’t own that appliance so I don’t know what kind of screw head that model has. If it is a T10 security torx then you’ll need to buy one or use a size 3 flat screwdriver which will fit down into the head.
I replaced mine with springs from Home Depot https://www.homedepot.ca/product/sioux-chief-5-8-inch-od-hose-clamp-easy-2-pack-/1001002302
The check valve at amazon it not available. Can I use the maker without the check valve?
You should reuse the original check valve. The check valve is critical to the functioning of the coffee maker and it will not function without it. It is what makes the water transfer from the water reservoir to the grounds, acting as the pump as the water is heated and expands, the check-valve forces it to go the direction you want it to go.
Hi, I think my only problem is my clips were rusted out and not holding the tube tight enough to prevent leaking. Any idea where I can get replacement claps? Thanks for the help.
Wynt, if you have a lot of corrosion down there I question whether any other type of clamp will help. The metal tube needs to be smooth where the hose fits on. I don’t see where they sell wire hose clamps as they are really cheap but these spring-type hose clamps should work for you.
Unfortunately, after a few months, the J-B Weld Steel Reinforced Epoxy started to separate from the aluminum tubing and about a tablespoon of water would leak for every pot brewed. Surfing the web, I discovered you can braze aluminum as the aluminum brazing rod melts at a much lower temp than the tubing. Found rods at Canadian Tire (https://www.canadiantire.ca/en/pdp/aluminum-solder-rods-2-pk-0580046p.html#srp ) but unfortunately, I don’t have the use of 2 good hands to make the repair. For now, will have to put up with the coffee maker on a baking pan to capture the leak.
Time to get a new coffee maker!
Hello-
Thank you for the great tutorial. Do I need to purchase 2′ of hose to be safe?
Thank you
Stik
I cut my hoses 6 1/2” in length. I’d say you need enough for two 6 1/2” pieces.
Hello, great tutorial! However everywhere I check the hoses are discontinued. Any ideas?? Hate to buy a new coffee maker just because I cannot replace the hoses.
I would look for hoses of the same dimension as I give above along with being high temperature rated. I’ve heard that (home) brewery supply stores carry hoses like that.
After putting everything together and using the coffee maker for a few days, I noticed water again on the counter. Turns out there was also a pin-hole leak in the aluminum tube that formed a drop every few seconds. Fortunately I had some J-B Weld Steel Reinforced Epoxy on hand that fixed that leak. (It can withstand temperatures up to 550°F when fully cured).
Good work Michael, it’s like life sometimes, you plug one leak and another one develops. Thanks for sharing how you patched the leak—that may help other people with the same issue.
Hi John,
Great tutorial. I would suggest to stress in bold letters, that there is no kink in the hose when installed. With regards to the check valve, once installed into the tubing, blow into each end of the tubing to verify which direction there is free
flow.. That is the direction the tubing should be installed from the water tank to the heater.
This is my second go-around fixing a leak on my Cuisinart DCC1100 coffee maker after the first fix lasted 10 years and both times it was near the wire spring clamp, Since they tend to cut into the tubing, this time I replaced them with springs from Home Depot https://www.homedepot.ca/product/sioux-chief-5-8-inch-od-hose-clamp-easy-2-pack-/1001002302 Locating a local source of the high temperature silicon tubing was proving a problem until someone suggested beer and brewing supply companies. Near Vancouver, BC, I found what I needed at http://ecom.bosagrape.com/cart.php?target=product&product_id=20065
Thanks for the feedback Michael. I can add a warning to verify the hoses are not kinked and I like the practical step of verifying the orientation of the check-valve by blowing in the tube—good idea!! Thanks for taking the time to share!
Thanks Fixed my Cuisinart DCC 1200 leaking hose in about 25 minutes. I was able to replace my existing ball valve. Sure wish we could find in tube ball valves.Thanks again for great video.
John, you did an excellent job on this tutorial! Thank you very much. I am about to start my repair and will follow up with further comment upon completion.
Phil, thank you for the feedback. You can do this repair if you keep track of everything and are persistent. The toughest part is reassembling the spring clips at the end that hold the stainless steel bands together. I wasn’t able to do it on the first or second try but if you stick to it you can do it. Be careful to not shoot you spring across the room and lose it. Let me know if you have any questions. It’s been a couple years since I did this repair and our Cuisinart is still pumping out coffee just fine. I”ll probably do the repair again if these hoses go out, just because I can 😉
where can I get a replacement check valve?? mine was “lost” when I was replacing the hose. thanks if you can help.
I don’t know where you can get a OEM replacement for your Cuisinart and you must make sure to orient it in the correct direction or the coffee maker will not work. You can get a different style of check valve here on amazon.com but you’ll need to cut your hoses as it doesn’t go inside the hose. You also need to verify that it works for the diameter of hose you are using.
I am stuck at reassembling the springs. Ugh, will keep trying, Thanks for the tutorial.
Michael, that is a tricky part and I don’t know that I can give you any tips other than try hooking one side and compress the spring down and move the strip onto the end of the spring stop. I did it by myself but it was tedious and I didn’t get it on the first try for sure. If you had someone who could help, that may help–someone who could push the end of the band onto the spring stop while you are compressing it. Hand in there and keep trying, you can get it.
The new tubing doesn’t look as durable as the old tubing. Seems like it wants to kink in the radius. does it have thinner walls ?
Also, the temperature rating is not given for the new tubing at the sales page.
I was careful not to kink it–you will need to play around with the tubing length to make sure it does not kink. As for the temperature rating–you’ll need to verify that with the seller but I know the dimensions I give you are correct and worked for my coffee maker.