Hardware:
- Any Bible (this doesn’t work quite as well with hard-covered Bibles though)
Tools:
- Fine permanent felt-tipped marker (preferably black)
- Pencil
- Eraser
- Ruler

 |
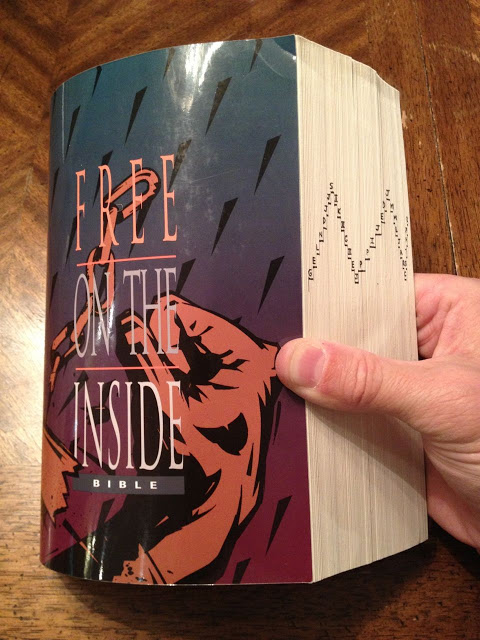
| A factory indexed Bible |
If you study the Bible you may find yourself spending a lot of time trying to find the place in the Bible you are looking for (or looking to the index so you can find the page number). They sell Bibles that have this built into them (see picture to the right) but you may not want to buy a new one just for this feature. A long time ago someone figured out how to mark the edge of the pages so you can quickly flip to a book. I originally heard it called “Laddering your Bible” but it doesn’t look like a ladder at all, more like stairs. I recently heard it referred to as “Indexing the Edge of Your Bible” and that name makes sense. Regardless of what you call it, it’s been very useful to me and I’ve indexed the edge of all the Bibles I read. I’m going to show you how to do it. One thing to note is that this tool doesn’t help you with the order of the books (or which books are in the New Testament and which are in the Old Testament) so if you don’t know the general order of the books then this tool may not help so much.
Step 1: Group the books. The books of the Bible vary greatly in length so we have to find a way to break them up into groups groups that are about the same number of pages (and physical thickness). Therefore, we’ll have enough room on the edge to write an abbreviation for the book/group name. We can’t break them up evenly without grouping too many New Testament books together but they can be grouped in a way that makes sense. You don’t have to reinvent the wheel because someone has already done it for you (and for me, for that matter). Below is a list of the books of the Bible (in chronological order), grouped so that the group is thick enough to work for this project. The first column is the abbreviation we are going to use for the group. If you are Catholic then this list is missing the Apocrypha. Read this tutorial and then you can figure out how to add them in yourself.


Step 2: Plot out your index. We are going to make a stair-step index based on the number of groups we broke them up into. Unfortunately it turns out to be 34 books/groups (as listed in the tables above), which doesn’t divide evenly by anything but 2 and 17 and that doesn’t help us make things perfectly uniform. Below is what I decided on for my Bibles (but you can play around with it and do it however you want). Click here for a Microsoft Word file that will allow you to plan your own pattern based on mine.
 |
| An example stair-step index Note: the vertical line to the left of the G (for Genesis) could go up instead of down if you wanted |
Step 3: Pick your dimensions. We are going to have 8 vertical lines of the same length and we want all of that to be around where your thumb will naturally be when you grasp your Bible like this:
 |
| This Bible is indexed already but shows about where your thumb will be when you grab it in the middle |
Now you aren’t going to want to make each of the 8 stacked vertical lines an inch long because you’ll take up the entire edge of your Bible. For me, I chose to make them 5 mm a piece (because the ruler I had on hand that had the smallest fractions was my metric ruler). That means from top to bottom my index will run 4 cm which will work good.
 |
| 5 mm stair “riser” (for all of you construction people out there) |
Step 4: Mark the start of the books/groups in pencil (the vertical lines). Start with Genesis and make a thin (vertical) rectangle on the far (outside) edge of the first page. You’ll have to decide whether you want to mark the left page or the right page when you open up the book. The book may start on the right page. In my case I always marked the left page (even if it was the last page of the previous book–this is personal preference based on which thumb I use to find the page and therefore how the Bible opens up when you open it to the marked page). We are making it a rectangle because we want it to stand out when you curl the Bible, making the edge flare out like this:
 |
| An indexed Bible being “curled” so you can see the index clearly |
Side note: When you bend a book this way you maximize the amount of book “edge” surface area you see and we’ll use that to our advantage. This especially helps when indexing thinner Bibles like this one:
 |
| The left picture shows the Bible as it would look on the shelf where on the right the same Bible is curled up, revealing the index clearly |
You’ll have to pick where you want to mark the first book/group, Genesis (as the very bottom of the 4-cm range of “steps” in my case). Here is what it looked like to mark Genesis (ignore the white sheet of paper stuck in-between the pages–I’ll explain that in a bit):
 |
| Genesis page edge marked in pencil |
 |
| The edge of Genesis marked and the first page of Exodus marked |
Step 6: Repeat this stair-step process working your way UP your Bible for the following books/groups of books:
- Genesis
- Exodus
- Leviticus
- Numbers
- Deuteronomy
- Joshua
- Judges, Ruth
- 1 Samuel
Step 7: Repeat the stair-step process working your way DOWN your Bible for the following books/groups of books:
- 2 Samuel
- 1 Kings
- 2 Kings
- 1 Chronicles
- 2 Chronicles
- Ezra, Nehemiah, Ester
- Job
NOTE: The rectangle you make for the beginning of 2 Samuel (shown in the picture below as the last page of 1 Samuel), will be drawn below the dash you made when you went from 1 Samuel to 2 Samuel. When you draw the line along the edge of the pages from 2 Samuel to 1 Chronicles, draw the line along the bottom edge of 2 Samuel’s first-page rectangle as shown blow and then mark the first page of 1 Chronicles.
 |
| Transferring the index to the next book, 2 Samuel |
- Psalms
- Proverbs, Ecclesiastes, Song of Solomon
- Isaiah
- Jeremiah, Lamentations
- Ezekiel,
- Daniel, Hosea
- Joel, Amos, Obadiah, Jonah, Micah, Nahum, Habakkuk, Zephaniah, Haggai, Zechariah, Malachi
At Job you were at the bottom of the stair. When you draw the line along the edge of the pages from Psalms to Proverbs, draw it along the top edge of Psalm’s rectangle as shown below (note: Psalms starts on the last page of Job in this Bible).

After you get done marking the edge of the pages from Psalm to Proverbs this is what it should look like at this point:

At the jumbo group of minor prophets of “Joel, Amos, Obadiah, Jonah, Micah, Nahum, Habakkuk, Zephaniah, Haggai, Zechariah, Malachi” you will be at the “top” of our stair-steps. When you draw the line along the edge of the pages from this group to Matthew, draw it along the bottom edge of this group’s first-page rectangle as shown below and then mark the first page of Matthew. Note that although the picture shows Hosea, it is the very last page of Hosea, which in this Bible happens to be the back of the first page of Joel, which is the first book of the group we are starting here.
 |
| The last page of Hosea which is also the first physical page of Joel |
Step 9: Repeat the stair-step process working your way DOWN your Bible for the following books/groups of books:
- Matthew
- Mark
- Luke
- John
- Acts
- Romans
- 1 Corinthians, 2 Corinthians
Step 10: Repeat the stair-step process working your way UP your Bible for the remainder of the books/groups of books:
- Galatians, Ephesians, Philippians, Colossians
- 1 Thessalonians, 2 Thessalonians, 1 Timothy, 2 Timothy, Titus, Philemon
- Hebrews, James
- 1 Peter, 2 Peter, 1 John, 2 John, 3 John, Jude
- Revelation
At this point this is what the edge of your Bible should look like:

Don’t worry if some of the lines aren’t quite straight–we can straighten them out when you make them permanent with the marker. Do make sure that everything is even. Now is the time to erase and make corrections!
Step 11: Color in the 1st-page rectangles you made. Now we are going to color in the rectangles you penciled in. The reason you are coloring them in is because you want that first page to stick out when you curl the book showing the very edge of the pages. You’ll want to use a fine point permanent marker of some kind. Because Bible pages are thin you’ll want to use something thick underneath to keep the ink from bleeding into the next page. I used an envelop in this example:

Colored in:

I also colored in the back side of all the pages as well so that I can curl the Bible either way and still see this marker clearly:
 |
| On the left is when I’ve only colored in the other side of the page, on the right, I’ve colored both sides in. |
Again, don’t forget to slip a piece of thick paper under the page when you use the marker on it or it will bleed through multiple pages and you’ll botch things up.
Step 12: Draw the horizontal lines on the edges of the page between books. You’ll want to slip a think sheet of paper between the pages after the first page of the next book/group of books so your line doesn’t go any further than you want (by bleeding through or just going over). Make sure to hold the top and bottom of the Bible square, otherwise you will get a crooked line. You should just be following the pencil lines from before but sometimes those were crooked for me and I corrected them when I wrote over them with the marker.


Step 13: Write in the one-letter abbreviations for each book/group of books in pencil.
You’ll want to curl up the bible quite a bit and hold the edges of the pages tight together to do this:

You’ll write the book’s/group of book’s one-letter initial over the horizontal line of that group. Refer back to my table to get the letter assigned to the group and double check you are doing it correctly because it’s hard to erase the pencil (but possible though). You’ll discover that you need to write “with the grain” on any horizontal part of the letter to avoid catching the pencil tip on the pages.

Some of the groups will not be thick enough to write the whole letter on top of the horizontal line but that is ok, simply move the letter out farther, so it sticks out like I did below on the M for Mark. This will become more important when you get to the last half of the New Testament.

You can also grab a smaller section at a time (versus the entire book) once you get a ways into it:

Step 14: Use marker to write in the letters you penciled in. Once you’ve pencilled them all in and are satisfied with what you’ve got, you can fill them in with marker. Make sure you have the Bible curled up when you do this so you have the most room to write. This is what you’ll have when you are done:

You’ll want to curl the Bible the other direction and fill the letters in again, otherwise it looks like this, where the lines and letters aren’t so dark:

After you went over all the lines in marker with it curled the other direction everything will look nice and dark:

This Bible is thick enough that it even looks good when the Bible is not curled up:

Step 15: Let the marker dry and then erase any excess pencil markings. Make sure the marker is dry before you try erasing because you’ll smear the marker around.
Step 16: Test it out. Turn to Proverbs:
 |
| Quickly flip to where you want to go with your edge-indexed Bible. |
Done! Now you’ll be more efficient in your time of finding your way around the Bible. If you only have a couple minutes to show someone a couple passages you’ll be quicker at finding them.
Other Resources:
- The Navigators page on How to Index the Edge of Your Bible (not very detailed though)
Amazon Associate Disclosure: As an Amazon Associate I earn from qualifying purchases. This means if you click on an affiliate link and purchase the item, I will receive an affiliate commission. The price of the item is the same whether it is an affiliate link or not. Regardless, I only recommend products or services I believe will add value to Share Your Repair readers. By using the affiliate links, you are helping support Share Your Repair, and I genuinely appreciate your support.
I marked my Bible on this way that you explained and it is so good and I can quick find Bible book what I want to read .
Thanks on this post 🤗👍
what did you use to cut the index and where did you get it .THANK YOU
I don’t understand. I didn’t cut anything.