I recently installed five Ecobee EB-EMSSi-01 (business grade) wireless thermostats at my office and really like being able to control my thermostat via the web and the ability to see the history of when the furnace ran, the outdoor temperature, the temperature inside, all on top of the programmed schedule. I decided to get the lower-priced EB-SmartSi-01 model for my house. The EB-EMSSI-10 has pretty much the same features except it has hardware connections for remote temperature sensors. Of the five furnaces I installed these thermostats on there were three different wiring schemes so it was a great learning experience and I was happy to apply what I learned on my own house.
How to Wire an Ecobee EB-SmartSi-01 Thermostat to a Carrier 58PAV Furnace
Hardware
- Ecobee EB-SmartSi-01
Wireless Smart Thermostat - Carrier Model 58PAV090 Gas Furnace
- Honeywell Thermostat Model T8112D1021 (old thermostat)

 |
| The original wiring to my Honeywell Thermostat Model T8112D1021 |
 |
| Carrier 58PAV Gas Furnace |

 |
| Here I have drawn a red box around the control board |
I ran my extra wire along the existing thermostat wire, in the hole in the side…
 |
| The gray wire is my new common wire that will power my Ecobee |
There may be something connected to the Common terminal already (in my case our humidifier is wired to the common already). You should be able to connect your new thermostat common wire in addition to what is already there. Once you have this end tied up, reinstall the covers and go back to the thermostat end.Make sure you take good notes as to how your current thermostat is wired. I always take a picture as well. Wiring the Ecobee in this case was really straight forward as far as the abbreviations compare. Here is how it works out:

I’ll leave the mounting of the physical mounting of the thermostat to you (I used the two wall anchors they provided with the thermostat). Here’s what the base plate looks like all wired up:
 |
| Ecobee EB-SmartSi-01 mounting plate all wired up |
Once you have it all wired up, push the wires back into the hole as much as you can because there isn’t a lot of extra room. Snap on the thermostat and hopefully, if you have it wired up correctly, it will boot right up:
 |
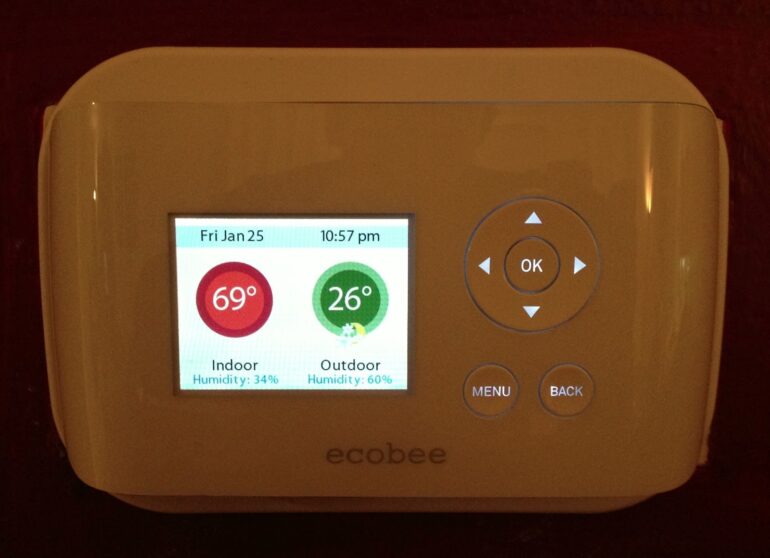
| Ecobee EB-SmartSi-01 booting up |
The first thing you’ll want to do is connect it to your wireless network.
Connecting the Ecobee to your wireless network:
- Press Menu button
- Scroll down to settings and press OK
- Scroll down to Wifi and press OK
- Scroll down to your wireless network and press OK
- Enter your password and wait for it to connect and register
- Go to the ecobee.com website and create an account and follow their instructions.
Changing the thermostat to 2-stage (if applicable):
- Press the menu button until you see “Main” at the top of the screen
- Scroll down to “Settings” and press the center OK button
- Scroll down to “Installation Settings” and press OK
- Press OK to select the top item, “Equipment”
- Scroll down to “Furnace” and press OK
- Scroll down to “Heat Stages” and press OK
- Scroll down to “2 Stages” and press OK
- Repeat steps 1-5 and then pick AC instead to change the cooling stage #
If you have electric heat follow these steps to change it from gas to electric. I guess the main difference is the timing when the fan runs in regard to when the heating elements heat up.
Changing the thermostat to electric heat (or boiler):
- Press the menu button until you see “Main” at the top of the screen
- Scroll down to “Settings” and press the center OK button
- Scroll down to “Installation Settings” and press OK
- Press OK to select the top item, “Equipment”
- Scroll down to “Furnace” and press OK
- Select “Furnace Type” and press OK
- Scroll down to Electric (or Boiler) and press OK
Enjoy your wireless “smart” thermostat.
My Other Thermostat Posts:
Amazon Associate Disclosure: As an Amazon Associate I earn from qualifying purchases. This means if you click on an affiliate link and purchase the item, I will receive an affiliate commission. The price of the item is the same whether it is an affiliate link or not. Regardless, I only recommend products or services I believe will add value to Share Your Repair readers. By using the affiliate links, you are helping support Share Your Repair, and I genuinely appreciate your support.