I take apart a lot of broken electronics because I like to learn how things work and one thing that I usually keep from those tear-downs are the fans I find inside. I don’t alway find a use for them but if you can’t power them then you really won’t use them. Here’s a tutorial on how to power them.
How to Power a Scavenged Fan with a Used Wall Plug
Hardware:
- Scavenged cooling fan from projection-screen tv
- Power adapter saved from some random appliance that quit on me
Parts Needed:
Tools Needed:
- Wire Stripper
- Multimeter
(so you can determine the positive and negative wires of the power supply)
- Heat Gun
- Soldering Iron
Step 1: Find a fan.
There will always be at least one in a computer. In this example I found this mini squirrel cage fan in a projection screen tv I scavenged out of the trash.
Step 2: Determine the power requirements of your scavenged fan.
You’ll need to look for the label on the fan so you know what its power requirements are. Here’s the label of this one:
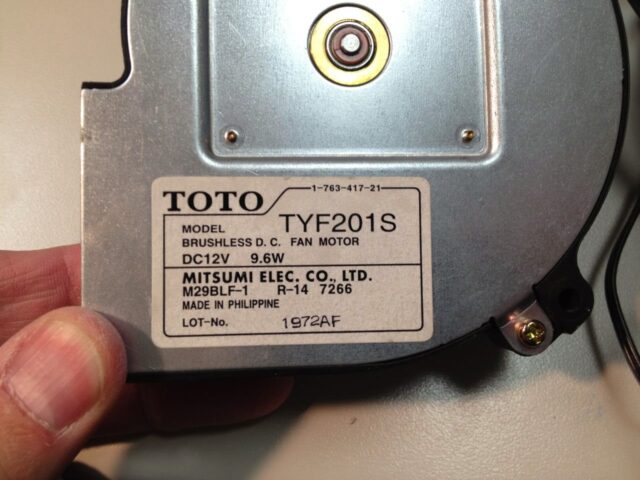 |
| Toto Model TYF20S 12V CD Brushless Fan Mitsumi M29BLF-1 |
The important information on this label is the voltage and the power rating. The fan above is a DC (direct current) fan that runs at 12V and is rated 9.6W. We are going to need to do a little math here to calculate the maximum current this fan requires. 9.6W is the power rating of this fan, 9.6 Watts. Power = Current x Voltage. So using a little algebra can solve for the current, Current = Power/Voltage = 9.6/12 = .8 Amps (or 800 mA). We need a power supply that is 12 volts DC and supplies at least 800mA. Another example of a fan’s specs would be this one:
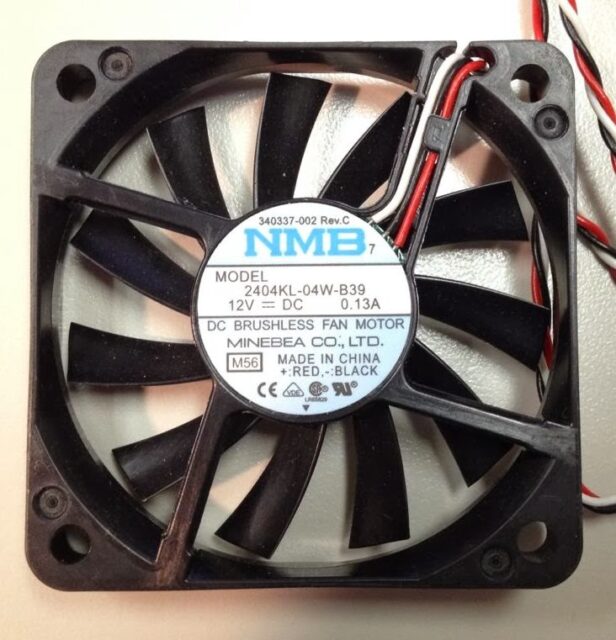 |
| NMB model 2404KL-04W-B39 DC 12V Fan |
In the case of the fan pictured above, it is a 12 Volt DC fan that requires .13 Amps of current (or 130mA). Almost all fans you find in electronics will be either 12V DC or 6V DC.
A Quick Analogy on Voltage and Current
I’m going to give a quick plumbing analogy to explain how voltage and current work. If this motor was powered by water supplied by a pipe, the voltage would be the pressure of the water that needs to be in the pipe supplying the water to it. Higher voltage means that the pressure needs to be higher. The current is the diameter of the pipe or how much water the pipe can supply at a time. If you have high pressure but a tiny pipe you can’t move much water. The same goes with a motor that has a high current requirement–it would need a big pipe to be able to feed it the volume of water it needs.
Step 3: Chose an adequate power supply.
Whenever I come across a power supply I usually throw it in a box in my workshop for later use. When a baby monitor quits working I keep the power supply because usually that is not the part that breaks and the power supply can be used for stuff like this.
When picking a transformer you MUST match the voltage, you MUST match whether it is AC or DC, but the current rating doesn’t need to match–it should be equal to or greater than the current requirement of whatever you are connecting it to. It won’t hurt if it is rated at a higher current–it just might be a bigger transformer than necessary for your application.
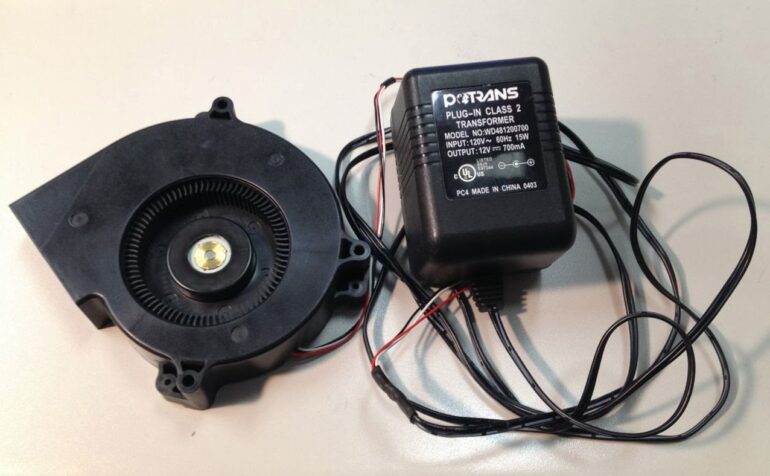
Below is the power supply I chose for this project of the first fan I pictured above, the Toto squirrel cage fan from the projection screen TV:
| PTrans Plug-in Class 2 12V DC Transformer Model No WD481200700 |
The important information on this label is the output voltage and current. In this case the output voltage is 12 volts and the output current is 700 milliamps. It doesn’t say in words that the output voltage is DC, it shows it in the symbol–the solid line with the dotted line below it signifies DC:
 |
| DC Symbol |
If it was an AC (alternating current) output it would be the sinusoidal wave symbol like the input has:
 |
| AC Symbol |
So this has 12 Volt DC output, check. This power supply is rated at 700mA. Our fan is rated at a max pull of 800mA, which is slightly higher, but I’m going to use it anyway. It should be fine and I’m not going to use this fan for long periods of time where it is having to work hard so it should be ok.
Another tidbit of information they give you via a symbol on the power supply is this:
| Transformer Connector Diagram |
This symbol above is a diagram telling you about the connector on the other end of the cord of the power supply:
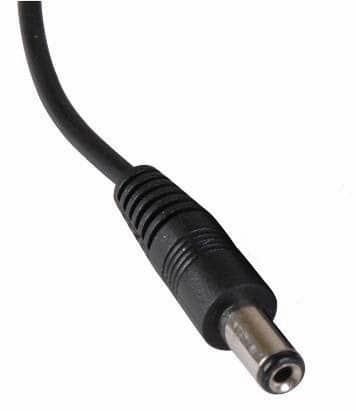 |
| Transformer connector |
The symbol is telling you that the “inside” of the connector is the positive connection and the outside of the connector is the negative connection. This is handy for checking the appliance you are about to plug it into, to make sure the appliance wants the positive on the inside. Typically the positive is on the inside though.
Step 4: Cut the connectors off the fan wire and the transformer cord.
You most likely need to cut off the transformer’s connector if it has one because your fan won’t have a female connector to match and the same goes for the fan. Make sure the transformer isn’t plugged in when you cut off the connector! You’ll also need to cut off the connector from the fan’s cord. Use a wire stripper to take off some of the insulation so you can connect the wires.
Step 5: Determine the polarity of the wires.
The fan will almost certainly have at least a red and black wire coming out of it. In my case it also had a white wire (or it may have a yellow instead of a white). This third wire is most likely a feedback wire where the fan reports back its RPMs and this wire will not be used in our application. My transformer’s cable actually had a white dashed line that happened to indicate the positive wire but I wouldn’t trust that. If you set your multimeter to DC Voltage and put one lead on one wire and the other lead on the other and you get a positive voltage then you know that the red lead of your multimeter is on the positive wire of the transformer–if you get a negative voltage then your negative (black) lead is on the positive wire of the transformer.
Step 6: Connect the transformer to the fan.
You must connect the positive wire from the transformer to the positive wire on the fan–the red wire. The black wire on the fan will connect to the other wire on the transformer. If you are going to use it much I suggest soldering them together or using small wire nuts, otherwise the wires will easily pull apart. I also slipped some heat shrink tubing on first and then soldered the wires and then applied heat for a neat-looking and long-lasting connection:
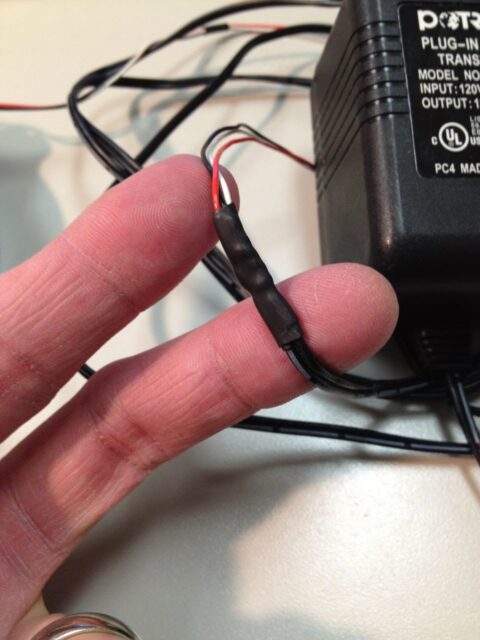 |
| My transformer connected to the fan–soldered and heat shrinked |
I use this fan to cool my kids food–no more getting light headed from blowing on their food. Be careful, in this case the fan is powerful enough to blow rice off their plate 🙂
Amazon Associate Disclosure: As an Amazon Associate I earn from qualifying purchases. This means if you click on an affiliate link and purchase the item, I will receive an affiliate commission. The price of the item is the same whether it is an affiliate link or not. Regardless, I only recommend products or services I believe will add value to Share Your Repair readers. By using the affiliate links, you are helping support Share Your Repair, and I genuinely appreciate your support.