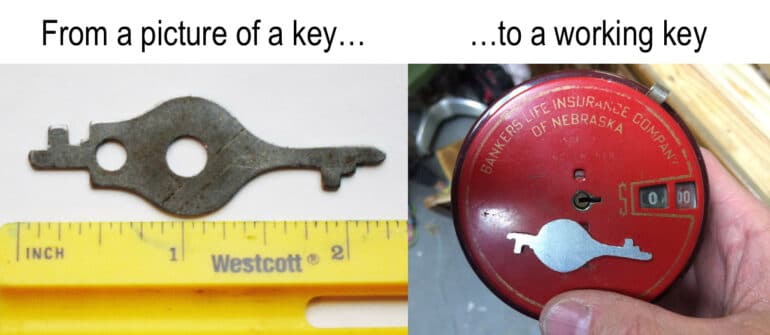
How to Make a Key From a Picture-How to Make an Add o Bank Key
Hardware:
- ADD o BANK
with missing key
Parts Needed:
- Piece of scrap metal (preferably steel) around .045″ thick (i.e. less than 1/16″ thick)
- Double-sided adhesive (I love my 3M Adhesive Transfer Tape 468MP
)
- Reproduction Add-o-Bank Key on Amazon (but what fun would that be to just buy it!?!?)
Tools Needed:
- Caliper (I love my Brown & Sharpe (ETALON) 75.116550 Black Dial 0-6″ Caliper
, but it is not required, but since I took my NIMS class I think in thousandths and wouldn’t use anything else)
- Dremel Tool
(A VERY handy tool that I use often)
- Dremel Reinforced Cutting Wheels/Disks
(make sure to get the “reinforced” ones because the other ones are brittle and break very easily)
- Hand Files (for touching up the key)
Just buy the key
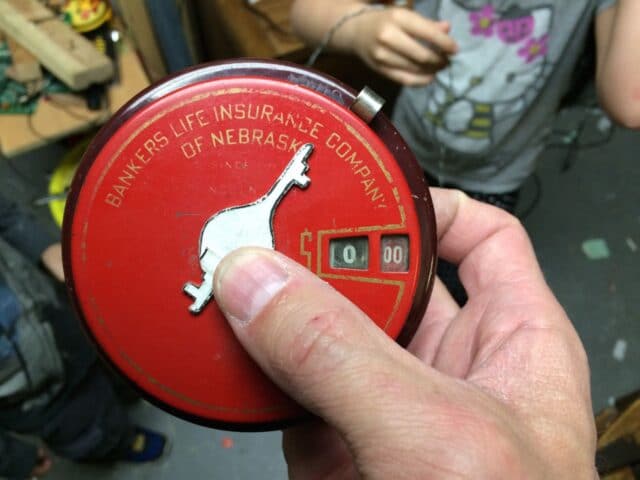
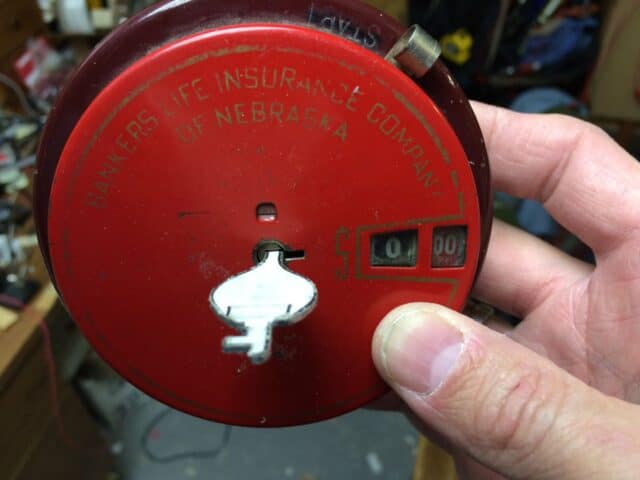
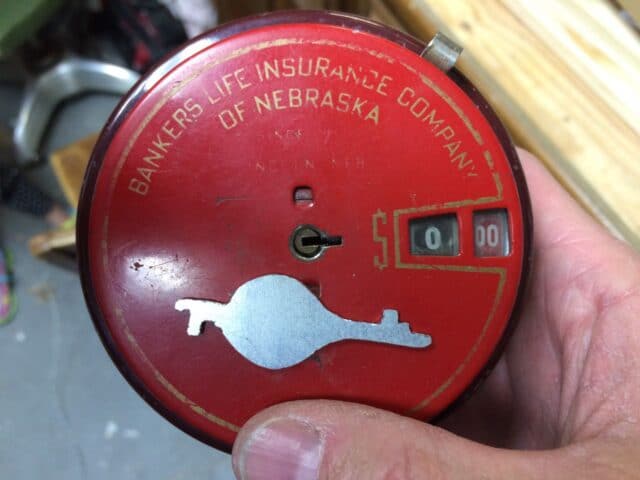
Front of the bank says: Bankers Life Insurance Company of Nebraska:
 |
| How to Make a Key From a Picture for an Add-o-Bank |
Top of bank says: Bankers Life Insurance Company of Nebraska
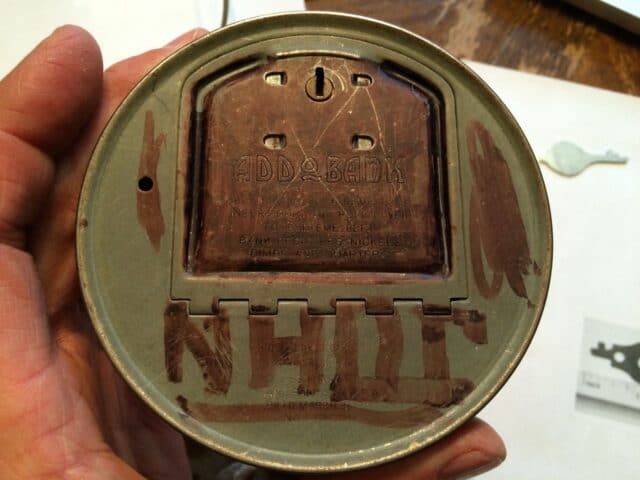 |
| Bottom of Add o Bank |
The bottom of the Add o Bank, on the door, says:
Place lever at extreme right
Insert coin and pull lever to extreme left
Bank Registers Nickels dimes and Quarters
Here’s a close-up:
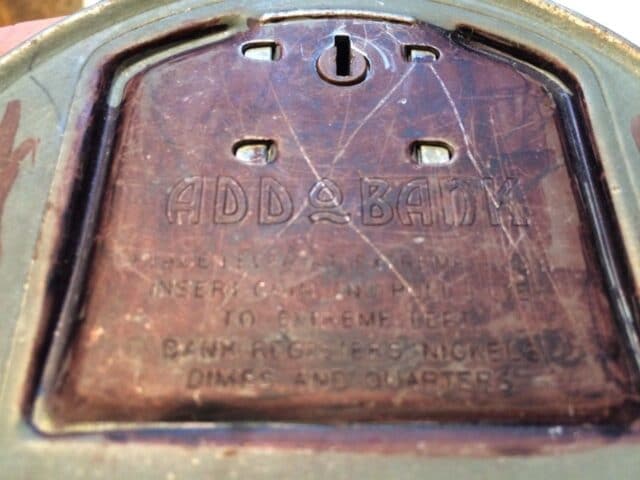 |
| Close up of Add o Bank Bottom Door |
Step 1: Find a picture of the key with something you can use for scale (the key itself can be used as scale too).
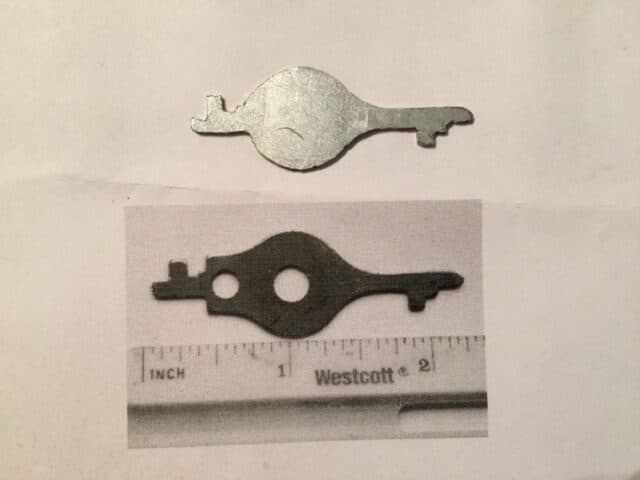
I found the following picture of the actual key on a (now non-existent) locksmithing forum, with a ruler as scale in the foreground:
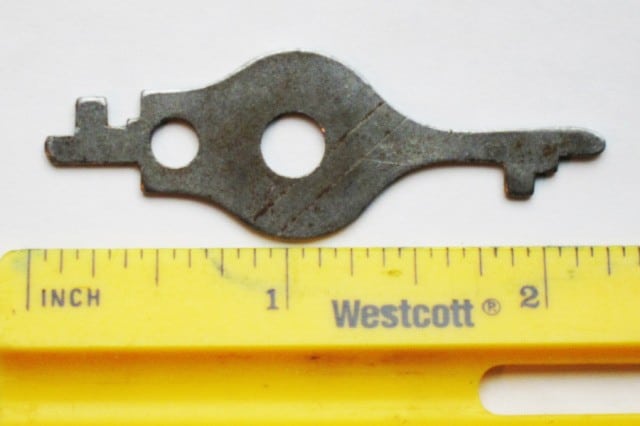 |
| Add o Bank Key with Ruler for Scale |
I also found this picture of the instructions and a key on Ebay but the picture was skewed (I corrected it some):
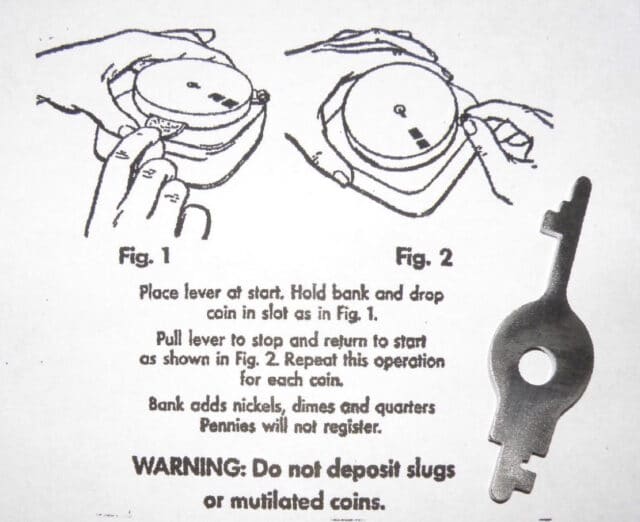 |
| Add-o-Bank Instructions and key from Ebay |
Before starting my key image search I figured I would be required to use the width of the key as the scale (since I could measure the keyhole on the bank itself). Lucky for me this one has a scale on it–you couldn’t ask for a better picture! I actually found out from someone’s description in the locksmith forum that the key is 55 mm long, so we could use that too.
Step 2: Print the picture at 100% and measure something in the picture.
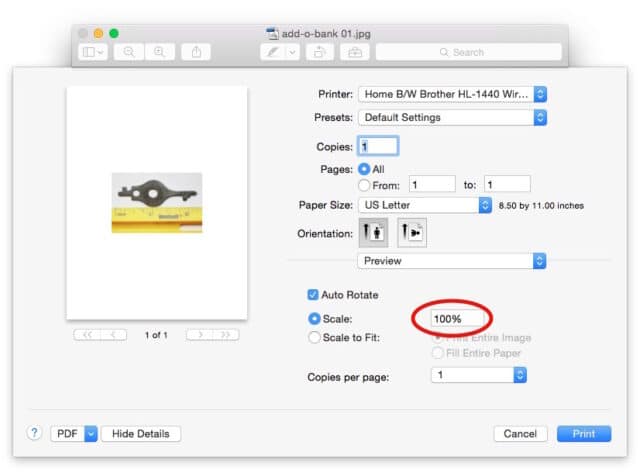 |
| Printing the picture at 100% |
Once you have it on paper measure something you know the size of in real life that is in the picture. In my case I get to measure the ruler:
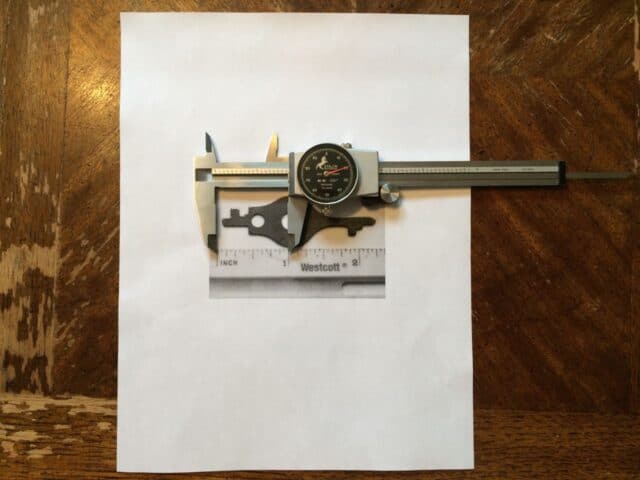 |
| Measuring the image to determine the scale |
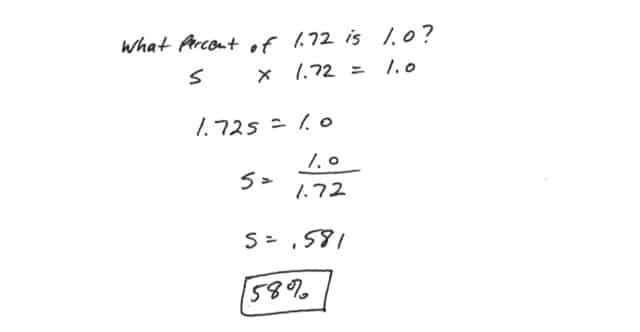
One inch on the ruler measured 1.72 inches on the picture.
Step 3: Calculate the scale adjustment you need to make to print the object at life-size.
My goal is to print the picture at real-life scale so I can use the picture of the key to trace the shape on the metal I intend to cut the key out of. My picture is of a scale of 1 to 1.72 but we want it to be 1:1. Here are my handwritten notes on solving this:
 |
| Using the ruler length to solve for the scale |
We need to print the picture at 58% to get the key to be life size.
Note: if the ruler had not been in the picture I still could have solved the problem. I read on a locksmithing forum post that the key was 55 mm long. 55mm is equivalent to 2.165 inches. The key measures 3.710″ in my original printout:
 |
| Measuring the length of the key in the printed picture |
Here’s how you would solve for the percentage scale in that scenario:
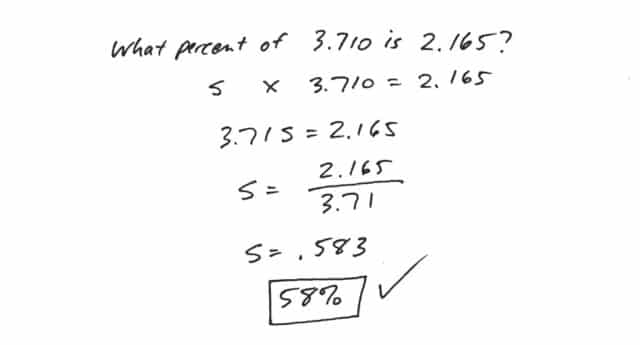 |
| Using the key length to determine the scale |
Both methods check out within a few tenths of a percentage, which is going to be plenty accurate in this situation!
An alternative way of solving this, is by using a ratio, and will get you where you want to go and if ratios are easier for you to think of, do it this way. In this case I had created a different template, I printed it and then measured it when printed at 100% and the key was 4.380 inches long on the paper. In real life I want it to be 2.165 inches long. So the ratio goes as follows and is solved below, 3.380 is to 100 (percent) as 2.165 is to what? The answer is 49.43% If I reprint this picture at 49% the key will be real close to 2.165 inches long.
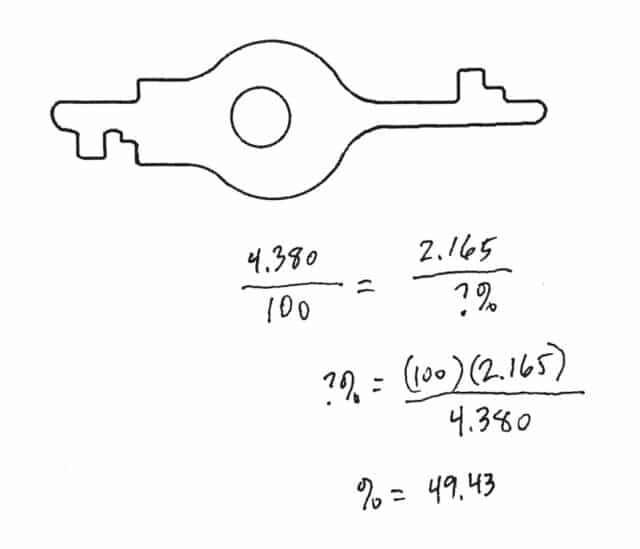 |
| Solving for the scale using a ratio |
Step 4: Print the picture at the correct scale.
For me (the first time I did this) it was 58%. I opened the picture in Apple Preview and opened up the print dialog window (command-P or File > Print) to see this:
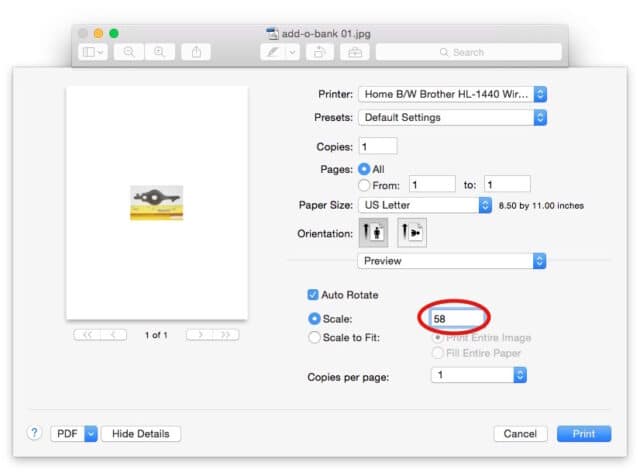 |
| Printing the picture at 58% for real-life scale |
The print dialog is most likely set to “Scale to Fit:” so you should click on the “Scale:” radio button and type in the correct percentage. Then print the picture again.
Step 5: Check the scale on the newly printed image.
Now that I’ve scaled the image to 58%, if my math is correct, one inch on the ruler should measure one inch on the picture. Here I am checking it:
 |
| Checking the re-scaled picture to see if one inch is really one inch–Check! |
It worked perfectly the first time, which was a relief. I love it when math helps me solve a real life problem–math works!
Step 6: Create a pattern in Photoshop.
This step is optional. I could have just used the photograph but because there was glare on the top edge (looks white) and a shadow on the bottom edge in the picture (looks dark) I actually imported the original picture into Photoshop, created a new layer, and traced what I believed was the outline of the key.
 |
| Tracing the outline of the key while zoomed in on the picture |
This is what I ended up with:
 |
| Tracing over the key in Photoshop |
And then with the background turned off:
 |
| Key pattern |
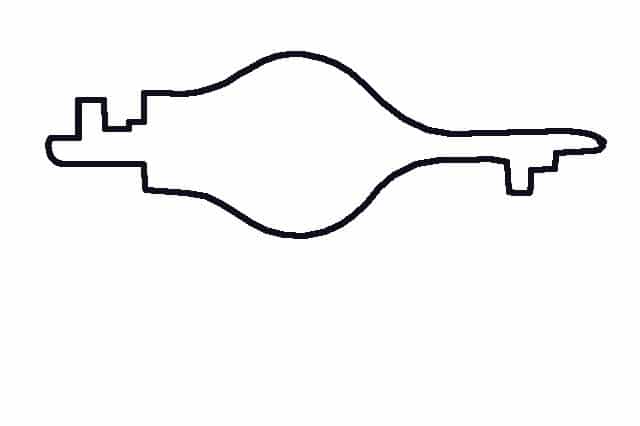
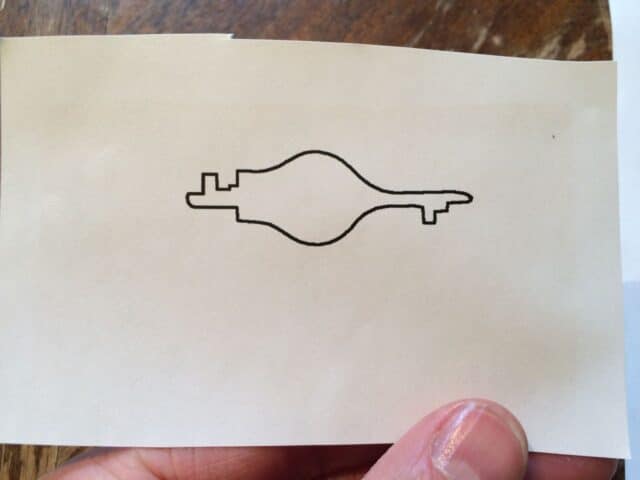
Here’s another (more accurate) version I made a few days after writing this post. It has a thinner line and includes the hole. You can use this yourself to make a key, simply scale it so that it prints at 2.165 inches long.
 |
| Another version of my key template with a thinner line |
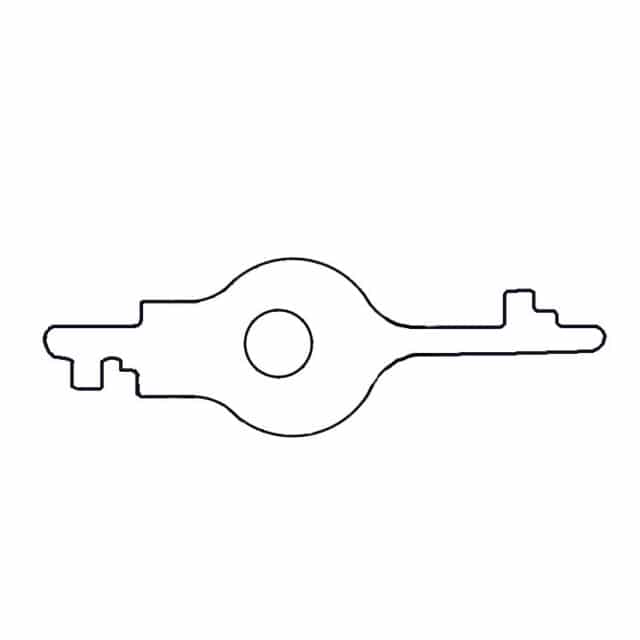
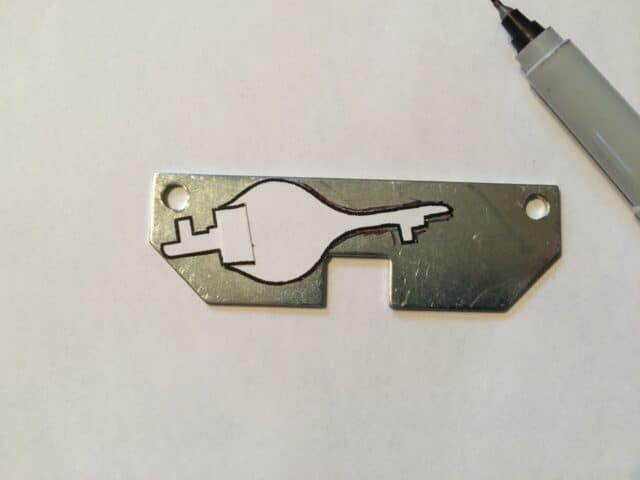
Step 7: Print out the pattern (at whatever percentage to give you a 1:1 scale) and put double-sided adhesive on the back.
Here I’ve printed out the pattern:
 |
| Key Pattern |
Leave the backing on the double-sided adhesive (if you have something like that) so you can cut and not worry about the adhesive sticking to the scissors:
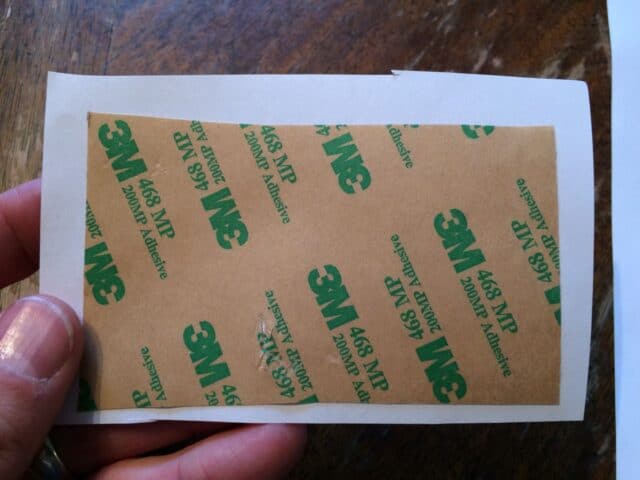 |
| Adhesive on the back |
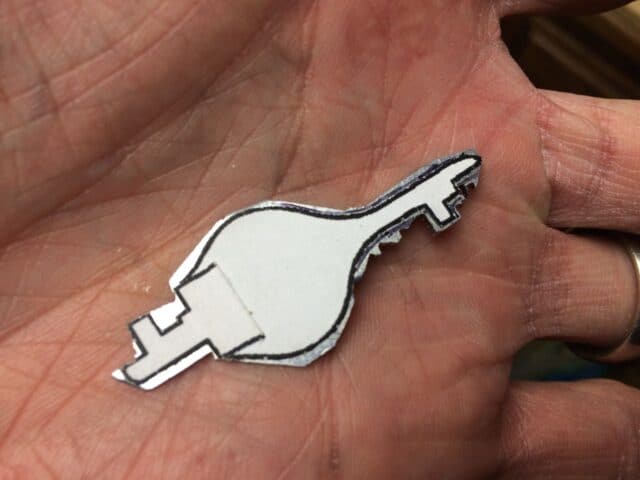
Step 8: Cut out the key pattern.
The way I drew the pattern was that the black is included as part of the key:
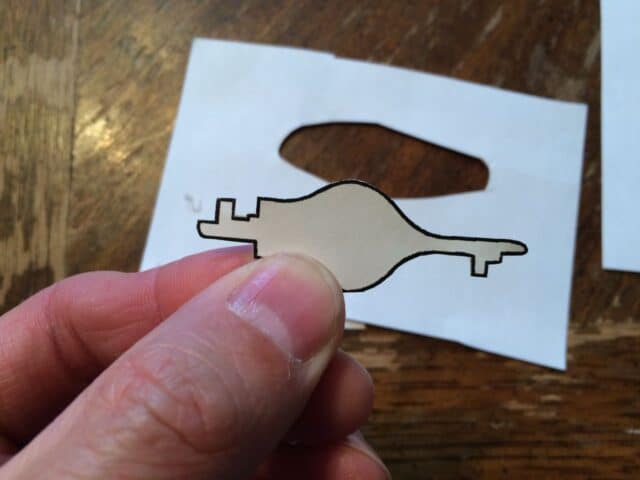 |
| Key pattern cut out and with adhesive on the back |
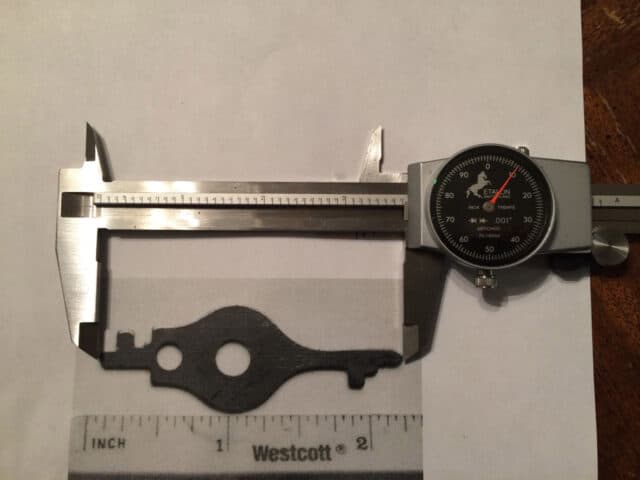
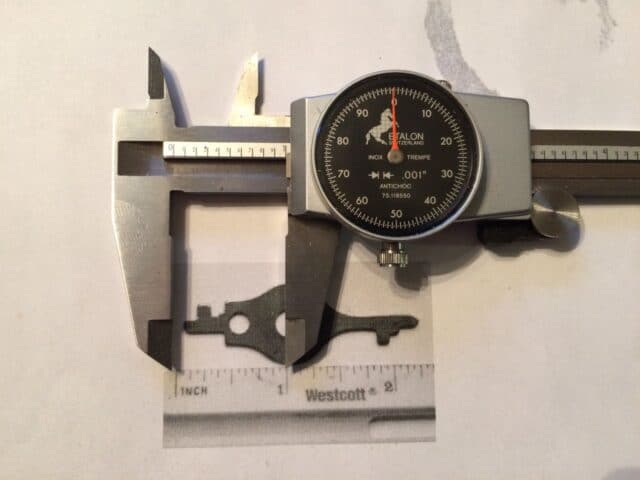
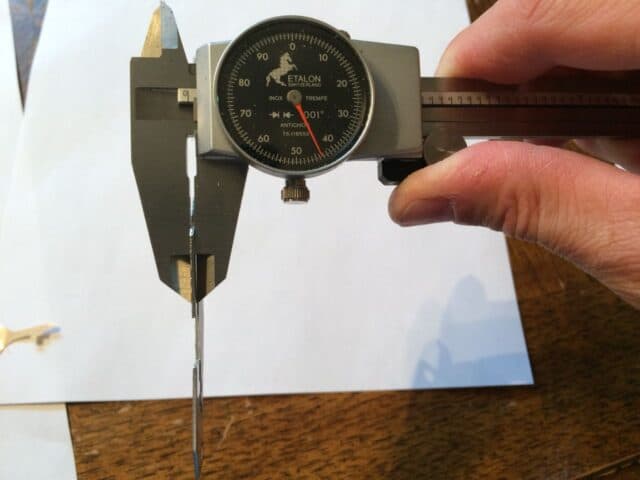
Step 9: Find a piece of scrap metal that is the right thickness. You want a key that is thin enough to fit in the key hole but not too thin so it bends. The key slot on this bank is around .060″:
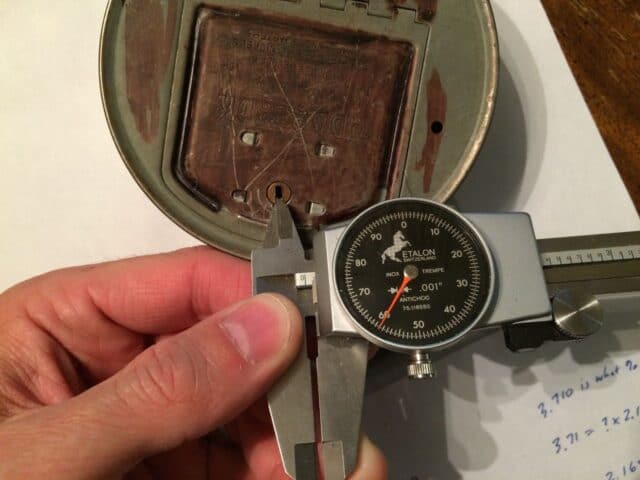 |
| The key hole width is around 60 thousandths |
I had a piece of scrap I had laying around was about .045″ so I thought that would be perfect:
 |
| A key 45 thousandths thick will be perfect |
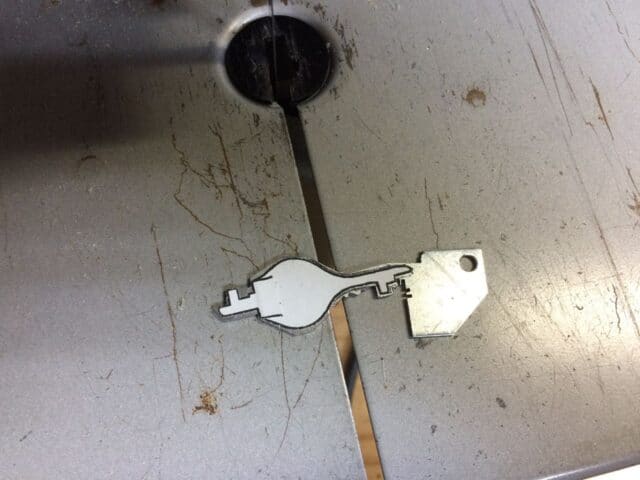
Step 10: Stick your pattern on the scrap metal.
In my case the piece I found was not quite big enough to fit the whole key on it. The only real important parts of the key are the two ends, so I cut my pattern in half and compressed my key. I felt this was a trial run anyway so I just wanted to test out my method. This is what it looked like:
 |
| My “compressed” key pattern on the metal I was going to cut the key from |
Step 11: Rough-cut out your key on a bandsaw.
You could rough cut it with a hack saw but that would be a lot of work, but hey, if that’s all you have then you could do it. I’d put the piece of metal in a vice if you do use a hack saw (save your blood). I am using my newly acquired Black and Decker Model 9422 Band Saw I have written about here:
How to Find Blades for a Black and Decker Model 9422 Band Saw
One thing I noticed when cutting this metal is my 14 tooth/inch blade “grabs” quite a bit when cutting. I picked the 14 tooth/inch because it was the most versatile blade and I could cut metal and wood with it but it wasn’t the greatest for this but it did work. Here’s how it went from me:
 |
| Rough-cutting the key pattern on a bandsaw |
 |
| Rough cut key cut on band saw |
Step 12: Grind the key to size with a Dremel tool and reinforced cutting wheel.
I actually mounted my Dremel in a clamp so I could hold the key (with gloves on–it will get hot) and propped up a 2×6 that I clamped into place to give me a “tool rest” to lean into as I held the key:
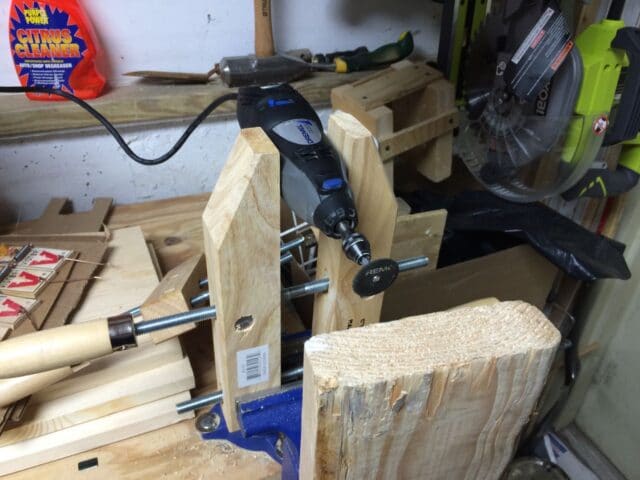 |
| Dremel locked in clamp in vice |
I worked on one end of the key first, the more simple end made for the door of the bank and it worked on the first try:
 |
| Testing out the door key–success! |
I used a small hand file to touch up the key. I have a set of them just like this set here.
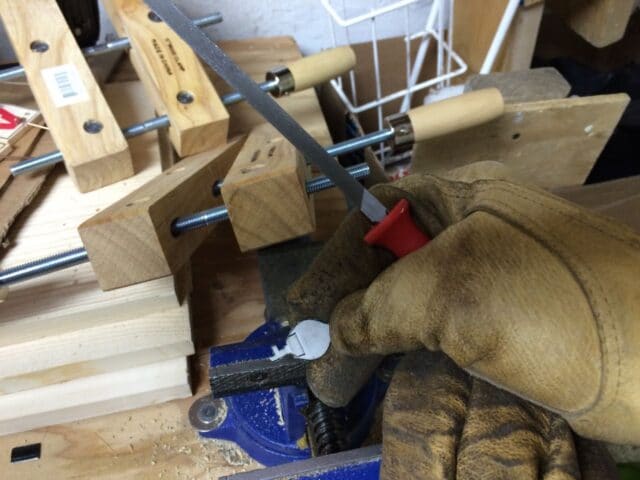 |
| Using a file to touch up the key |
Here I am testing out the key that resets the numbers:
 |
| Testing out the reset key–successful again! |
When you turn the reset key it should first turn the dollars until the cents equal 5 times the dollar amount and then the cents should turn too, and then keep turning until it gets to what would be $20 and it will go back to zero. If you keep turning it and the cents don’t change push the key down into the hole as you turn it and it will fall down into the slot that chances the cents. I actually (later) found a picture of the original instructions:
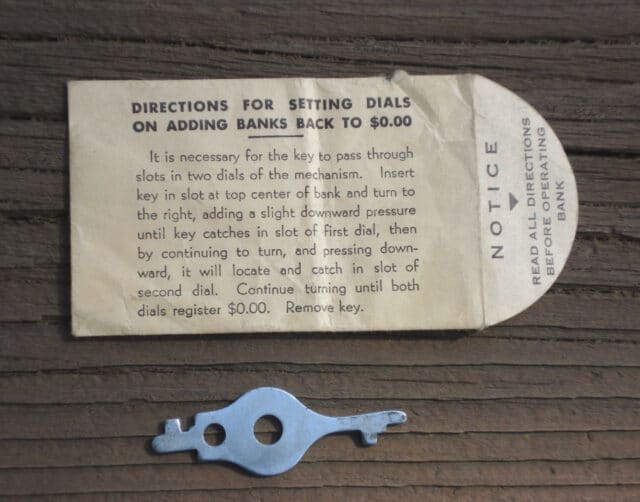 |
| Add-o-Bank Original Reset to $0.00 Instructions |
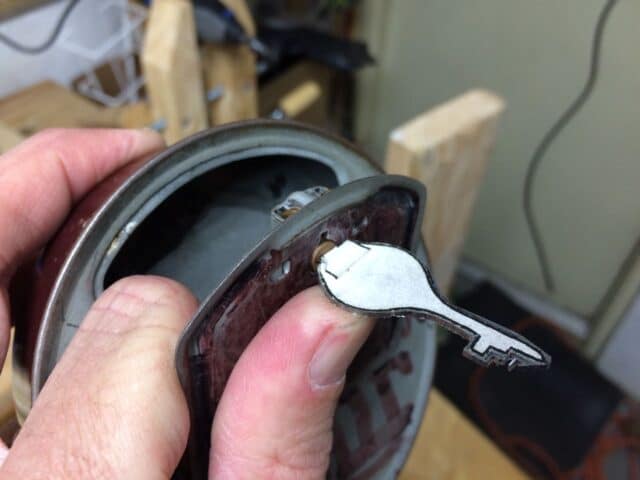
Step 13: Peel off your template.
You don’t want the paper wearing off and coming off inside the bank lock. And below is the final product, a successfully cut key made from a photo (with the photo below it). Note that the key is shorter because I had to “scrunch” my key together to get it to fit on the piece of scrap sheet metal I had on hand.
 |
| The key I made sitting on the print-out of the key picture |
Here I am demonstrating how to reset the display, using my freshly cut key:
The tolerances on this lock are not all that high so the key doesn’t have to be exact at all and I have one “notch” out of the key that was caused by my bandsaw biting into the material, but it works just fine.
 |
| The hand-made key and the bank |
Amazon Associate Disclosure: As an Amazon Associate I earn from qualifying purchases. This means if you click on an affiliate link and purchase the item, I will receive an affiliate commission. The price of the item is the same whether it is an affiliate link or not. Regardless, I only recommend products or services I believe will add value to Share Your Repair readers. By using the affiliate links, you are helping support Share Your Repair, and I genuinely appreciate your support.
Excellent presentation, I found a Fidelity Federal Savings Add O Bank in a thrift store in Owensboro, Kentucky today that seems to have coins in it. I will give making a new key a try. I’m really curious as to what may be inside.
Thanks for taking the time to share Jeff. If you want to get into the bank real fast, a large paperclip with the end bend in an L shape will get you in there in a hurry–there’s just a little switch to push out of the way and that’s it. That is if you can’t wait to make your own real key 🙂 Happy treasure hunting!