We scan A LOT of files to pdf at my work and we’ve always used the Brother MFC-8950DWT’s feature of emailing pdfs to you in order to get the scanned file. We all then must check our email, download the file locally on our computer, and then save it to the network. I wanted to shorten that process and save directly to the network. I had tried this is the past without success so finally I called Brother support and they were no help at all. So I tackled this problem once more on my own and finally figured it out. Here’s how to save files directly to your Windows Domain network drive from you Brother MFC-8950DWT…
How to Configure Brother MFC-8950DWT to Save to Windows Network Drive on a Domain
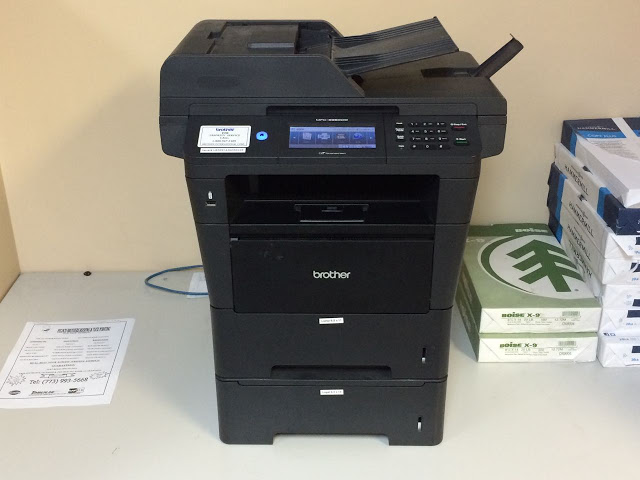
Hardware:
Relevant Supplies:
Step 1: In your web browser enter the IP address of your networked Brother MFC-8950DWT.
It will be something like 192.XXX.X.XXX. If you don’t know the IP address of your Brother you can look it up on the Brother printer by the following: Tap the Menu icon at the lower right corner of the screen:
| Tap on “Menu” |
Tap “Print Reports” the menu list:
 |
| Tap on “Print Reports” |
Tap on “User Settings:
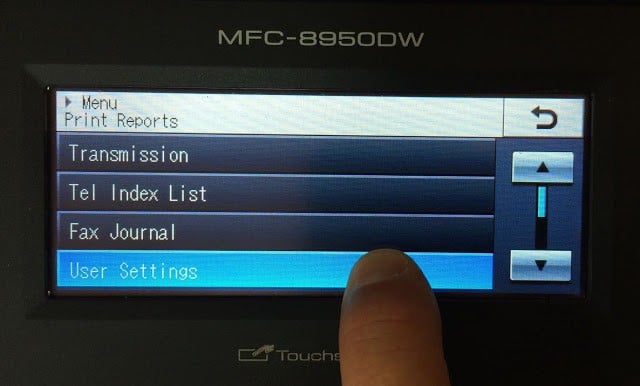 |
| Tap on “User Settings” in the Print Reports Menu |
You will then be asked to press the start button. This is the physical rubber start button to the right of the touch display.
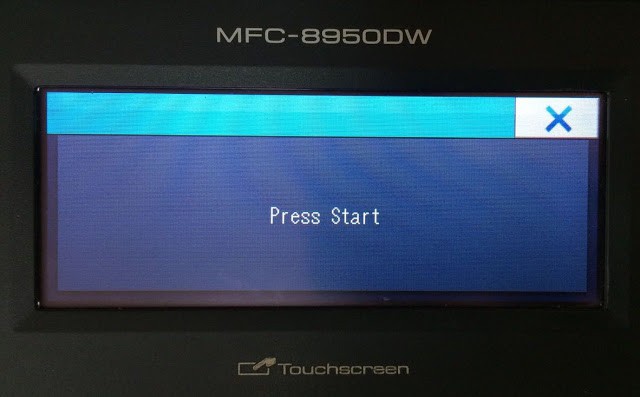 |
| Press Start to Print the User Report |
Our printer printed 4 pages out and the IP address will be on page 3:
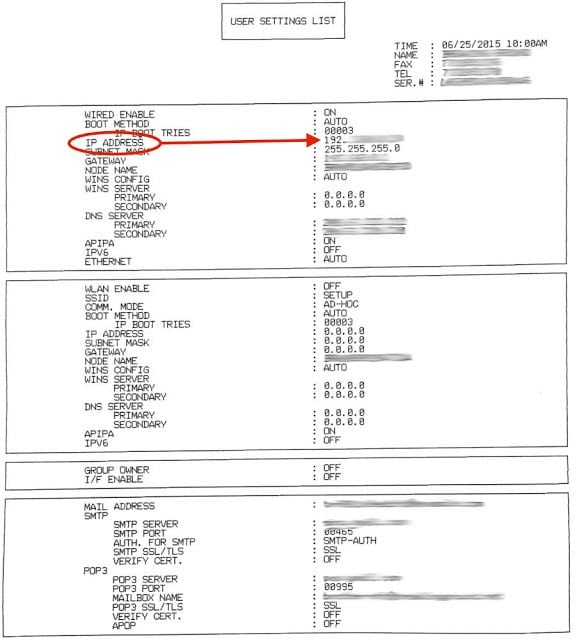 |
| User Report Page 3 Shows the IP address of the Brother MFC-8950DWT |
Enter the IP address in the address box of your browser:
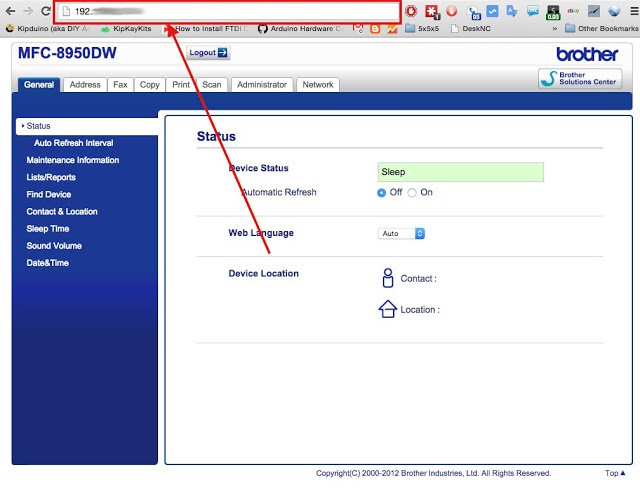 |
| Browsing to your Brother MFC-8950DWT to set up saving directly to the network |
Step 2: Log into your printer with your administrator password.
The Login box is at the very top of the screen:
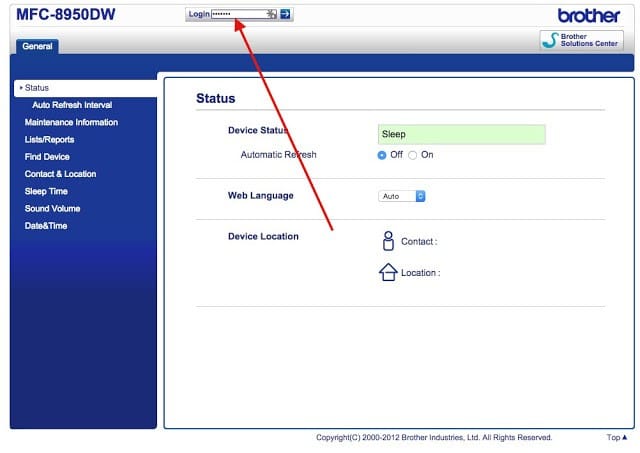 |
| You must log in as administrator to change these settings |
Step 3: Click on the Scan tab.
Once you have logged in this tab will appear at the top:
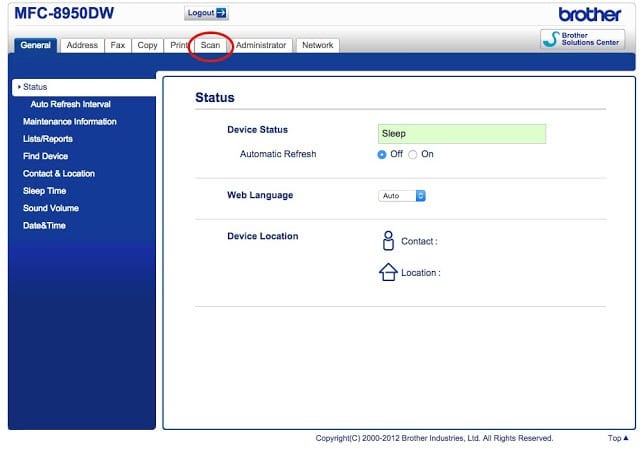 |
| Click on the “Scan” tab at the top |
Step 4: Click on “Scan to FTP/Network” in the left column.
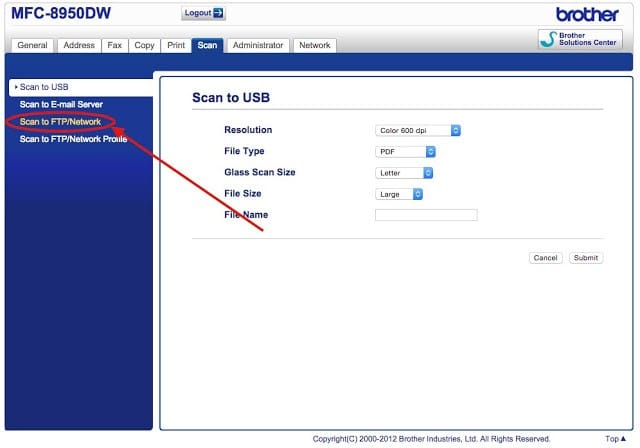 |
| Click on “Scan to FTP/Network” in the left column |
Step 5: Toggle one of the profile settings from FTP to Network.
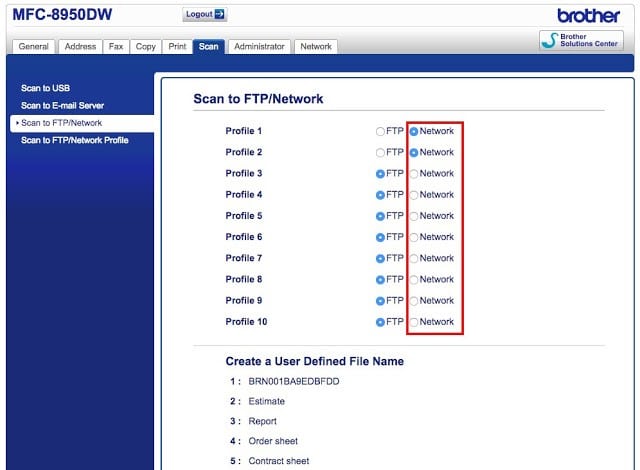 |
| Click on a radio button to the left of one of the “Network” Profiles |
Step 6: Click on “Scan to FTP/Network Profile” in the left column:
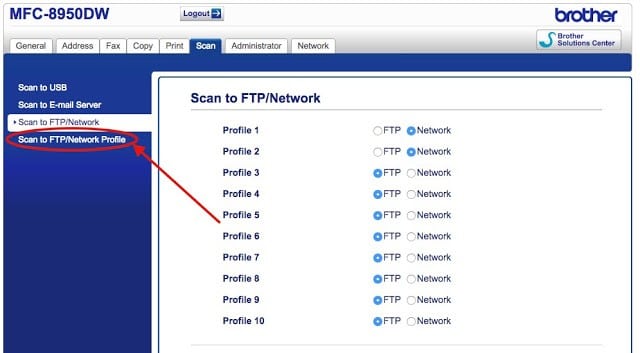 |
| Click on “Scan to Network Profile” in the let column |
Step 7: Click on the “Network” link next to the profile you want to set up:
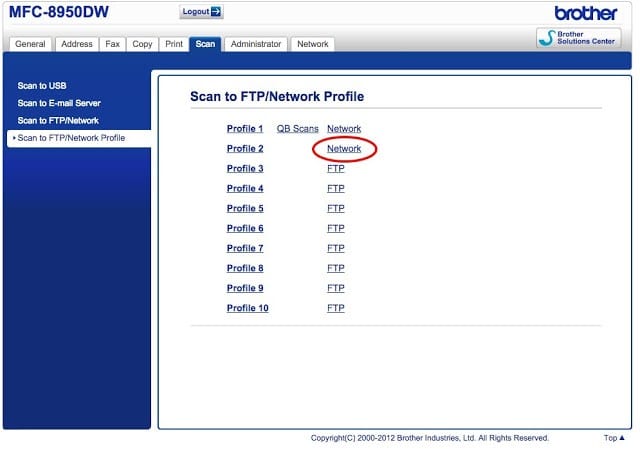 |
| Click on the “Network” link to the right of the profile you wish to setup |
Step 8: Enter the settings for the domain drive you wish to save to.
This is the tricky part I had to figure out. Here’s an explanation of all the settings:
Profile Name: enter anything you want, this is just what the printer calls this Profile
Host Address: the name of your domain, or the server name (do not enter any slashes)
Store Directory: This is the domain drive name and path on that drive. Enter it in domaindrivenamerootfoldersubfoldersubfolder form. If you only enter domaindrivename then it will save the files in the root of that domain drive.
File Name: I was unable to edit any of these choices. This is just the prefix of the file name it will create on this domain drive. Pick the one you like the most.
Quality: Pick whatever quality you want the printer to save the pdf as from the drop-down menu.
File Type: self-explanatory
Glass Scan Size: the size of paper you will be scanning on this profile, probably Letter.
File Size: You can leave it as is.
Use PIN for Authentication: this is whether the printer asks you for a PIN number in order to use this scanning to Network profile.
PIN Code: if you toggle the “Use PIN for Authentication” then this is the PIN people will need to enter to use the profile.
Auth. Method: leave as Auto
Username: it gives you options but for our Windows 2003 server the one that worked was “username@servername” where servername is exactly what you entered in the “Host Address” field above. This must be a user that your system administrator created on the Windows 2003 server that has access to save files to the network drive you specified in the “Store Directory” field above.
Password: this is the windows user password assigned to the username you entered above
Here I’ve filled out these fields with “example” data:
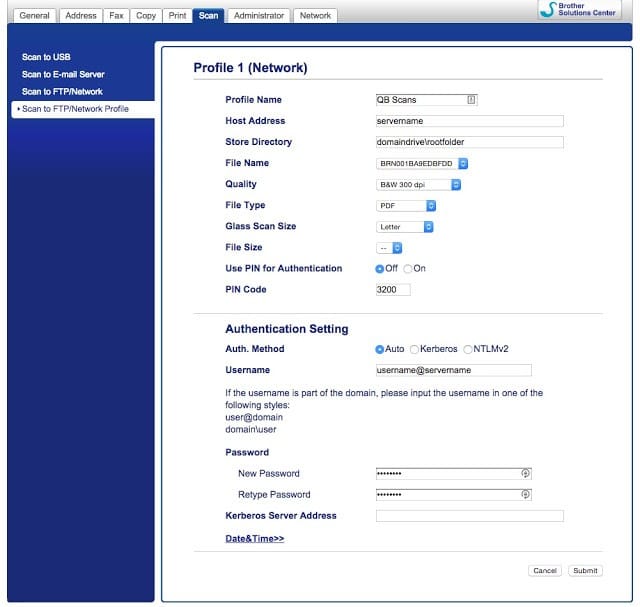 |
| Profile settings for saving to a Windows Domain network drive |
That’s all the settings you need to enter. Click the “Submit” button and you should see “Submit OK” in green at the top:
 |
| You will see “Submit OK” in green at the top if it saved the settings |
Step 9: Test out your settings at the Brother MFC-8950DWT printer/scanner.
Step 9a: At the main menu click on “Scan”:
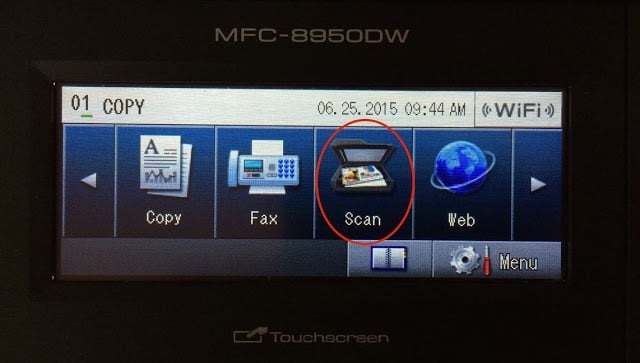 |
| Click on the “Scan” icon |
Step 9b: Click on the “Scan to Network” icon.
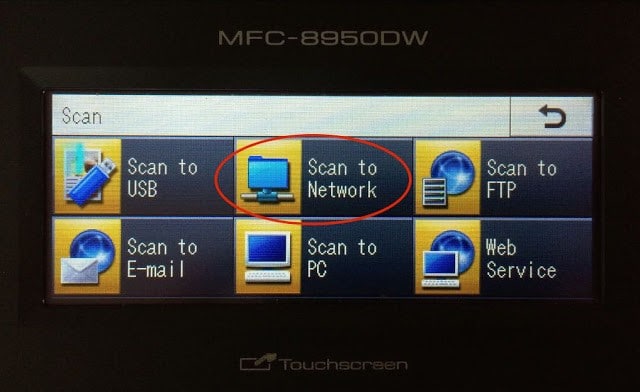 |
| Click on the “Scan to Network” icon |
Step 9c: Tap on the profile you created in the Scan to Network profile list.
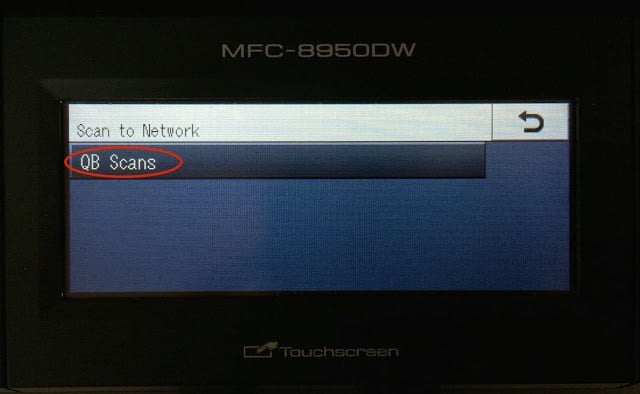 |
| Click on the profile you created |
Step 9d: You will now be able to change the scan preferences as normal.
You don’t need to change anything at this point:
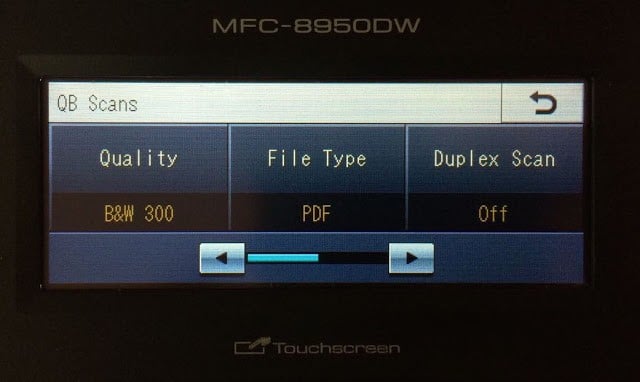 |
| You can switch to duplex or adjust the other scanner settings at this point |
Step 9e: Press the rubber start button on the scanner to scan to the network.
Once you press start you will see something like this as it attempts to first connect to the network using the profile you set up:
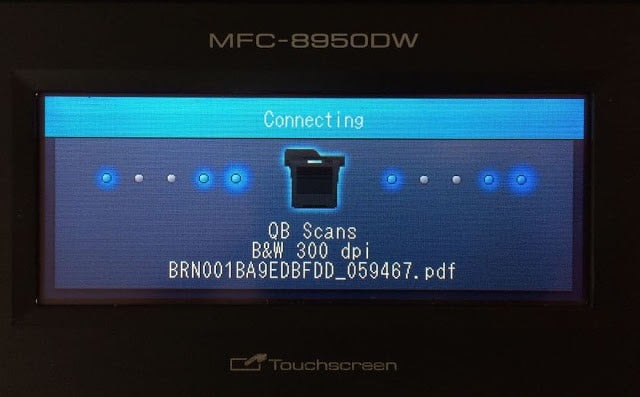 |
| Scanning to Domain Network drive in progress |
If it connects to the Windows drive correctly you will see something like below as it saves the file to the network drive. Success!
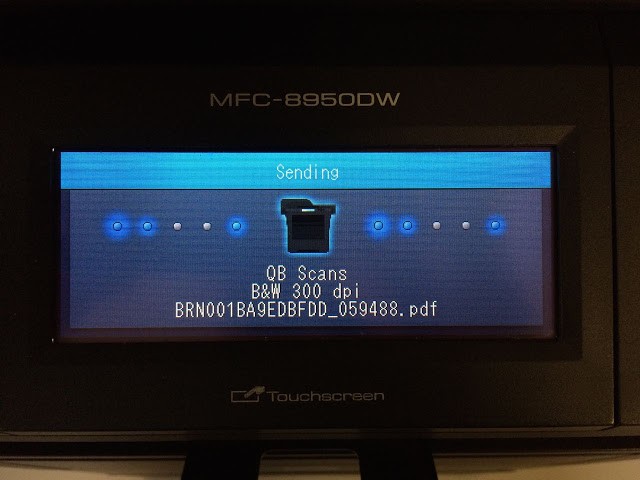 |
| You have correctly set it up if you see “Sending” |
Step 10: Errors you may get if you have things misconfigured.
If you’ve incorrectly entered the login or drive information you’ll get an error like this:
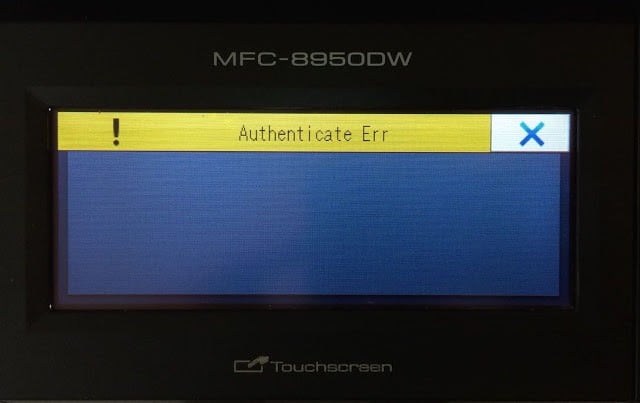 |
| Authentication Error–you must have a setting mistyped |
If you get the error above please go back to Step 8 and verify all the settings you entered. The username and password must be correct as well as the domain server name and network path on the drive.
Amazon Associate Disclosure: As an Amazon Associate I earn from qualifying purchases. This means if you click on an affiliate link and purchase the item, I will receive an affiliate commission. The price of the item is the same whether it is an affiliate link or not. Regardless, I only recommend products or services I believe will add value to Share Your Repair readers. By using the affiliate links, you are helping support Share Your Repair, and I genuinely appreciate your support.