Here are the steps to add a wireless sensor to a GE Simon 3 Alarm System. Your GE Simon 3 alarm system can have 23 different wireless sensors and one wired sensor. It is actually capable of 24 sensors but sensor number 24 is assigned to the wireless module that is required. If you are going to be setting up your alarm system for the first time I suggest using this form to plan out what groups and sensor names you want to use ahead of time (and physically number your sensors) and then it will be much easier for you when you are actually programming your system. Note: you can add one wired sensor that can be all your window switches wired in series (but you won’t be able to tell which window is open, just that a window is open).
How to Add a Sensor to a GE Simon 3 Alarm System
Hardware:
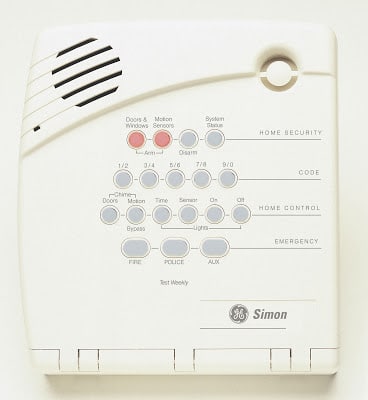
- GE Simon 3 Alarm panel, Part Number 60-875
- Wireless Motion Sensor, Part Numbers: GE ITI NX-481 60-807-95R PET PIR SAW
- Wireless Door/Window Sensor, Part Numbers:
NX-650
GE ITI 60-670-95R
NX450
319.5 - Wireless Water Sensor
60-744-95R NX-695 - Keychain Remote, Part Numbers:
GE ITI 60-707-95R - Dialog QS1500 Touchtalk Interactive Keypad (Remote Talking Touchpad)
Part No. 60-924-3-01

Step 1: Disarm the alarm (if it’s not already).
System disarmed, module ok.
Step 2: Open the panel cover.
This will both invoke the programmer’s mode and reveal the programming menu button names. Note: this is not opening the whole alarm up so you can see the circuit board, just the plastic cover that covers up the alternate button names, etc. After you open the panel cover, the panel will then say to you:
Use numbered keys to enter ID.
Step 3: Enter the programmer’s passcode.
Enter the programmer’s 4-digit passcode using the buttons with red numbers next to them. You’ll have to know what this is from the company you purchased it from.
 |
| Use these buttons with the red numbers to the lower right to enter the programmer’s passcode. |
The panel will then say to you:
Please select from START MENU.
Step 4: Press the “Add” button in the MAIN MENU section.
 |
| The “Add” button in the START MENU section is circled in Red |
The panel will then say to you:
Select from main menu. Select from main menu or press cancel to quit.
Step 5: Indicate that you want to add a sensor or remote.
Press the “Sensor/Remote” button once.

Step 6: Trigger the sensor you want to add.
After pressing the “Sensor/Remote” button as described in Step 5, the panel will then say to you:
Press button on sensor. Press button on sensor or cancel to quit.
For a Motion Sensor:
Take the back off the sensor by depressing the button on the top of the sensor and opening the back of the sensor. The back is hooked onto the bottom of the sensor body so you will just rock the top of the back cover away from the sensor like it is hinged at the bottom. You don’t need to take the back all the way off, just listen for the alarm panel to chirp, alerting you that it has detected the sensor.
 |
| Opening the motion sensor’s back cover this far should be enough to trigger the sensor. |
For a Door Sensor:
First, take the cover off the sensor (the larger part of the two pieces–the smaller one is just a magnet) by pressing the button on one end of the sensor and rotating the cover off the sensor.
 |
| Press the button on the end and lift the cover off. |
Once you have the cover open look for the plastic tab that says “PRESS TO PROGRAM” and press it to trigger the door/window sensor.
 |
| Press the tab circled in red to activate the door/window sensor. Note: this sensor is missing its batteries–they are definitely necessary for it to be added 🙂 |
For a Keychain Remote:
Press both the lock and unlock buttons simultaneously.
 |
| Press the lock and unlock simultaneously to add the keychain remote. |
For a Remote Talking Touchpad:
Press the “Lights Off” button on the keypad six times in rapid succession. On the sixth key press the keypad makes a long beep. The keypad announces “OK,” to indicate that it has been learned into the panel. Panel announces, “Keychain remote.”
 |
| Press “Lights Off” 6 Times in rapid succession. |
Step 6: Choose the name the panel will use to refer to the sensor.
Once you trigger the alarm sensor as shown in Step 5 the panel will say to you:
Keychain remote. Press sensor remote button again for next name or press done to select. Keychain remote. Press sensor remote button again for next name or press done to select or press cancel to quit.
- Touchpad remote
- Front Door
- Front Window
- Back door
- Back Window
- Garage Door
- Garage Window
- Master Bedroom
- Master Bedroom Window
- Bedroom
- Bedroom Window
- Guest Room
- Guest Room Window
- Child’s Room
- Child’s Room Window
- Utility Room
- Living Room
- Living Room Window
- Dining Room
- Dining Room Window
- Bathroom
- Bathroom Window
- Laundry Room
- Laundry Room Window
- Kitchen
- Kitchen Window
- Porch
- Porch Window
- Patio Door
- Office
- Office Window
- Den
- Den Window
- Garage
- Special Chime
- Basement
- Basement Window
- Upstairs
- Upstairs Window
- Downstairs
- Downstairs Window
- Hallway
- Medicine Cabinet
- Closet
- Attic
- System Panic
- Module
- Phone Communication Module
(at this point it will start back over with “Keychain Remote”)
Step 7: Enter the sensor group.
Use numbered keys to enter sensor group. Use numbered keys to enter sensor group or press cancel to quit.
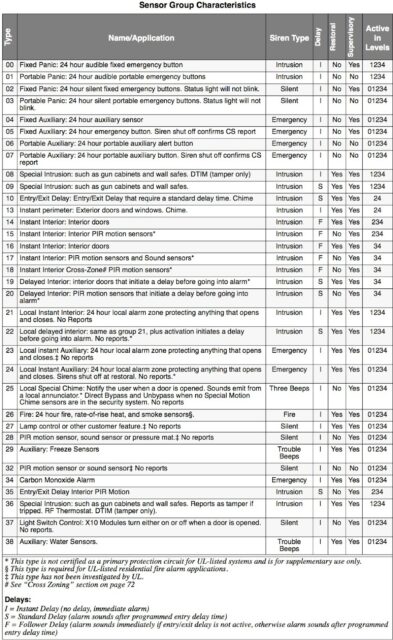
Group 10: Door/Window (perimeter) sensors for your front door. This group gives you a delay when it is triggered. For example: you most likely want your front door to give you some time once you open, it when the alarm is on, to go inside and disarm the alarm. Group 10 is most used for the front door. This group will be armed when the alarm is armed “stay” and when armed “away.”
Group 17: Interior Motion Sensors. This group will not signal an alarm if a sensor from Group 10 has been triggered first. For example: if you walk in your front door and walk by the group 10 motion sensor on the way to the alarm keypad. This group will not be armed when you have the alarm armed in “stay” mode (so you don’t trip it when you are walking around inside your house). If someone broke a window and crawled through the window without activating the window sensor and then walked passed a group 17 sensor it will trigger an alarm (because a group 10 sensor had not been tripped first).
Group 01: Talking Touchpad or Keychain Remote. This is classified as a “portable panic” group. You’ll use it for your keychain remote or the talking touchpad you mount on the wall by the entrance door.
Group 13: Window and Door (perimeter) Sensors. This group is armed in away and stay modes. When it is tripped while in both away and stay it signals an immediate alarm. When you are at home and arm the alarm in “stay” mode these sensors are your protective barrier and will trigger an immediate alarm if they are tripped.
Sensor group 33 sensor # <sensor name you just assigned> press done to accept. Or press cancel to quit.
Sensor # <sensor name you just assigned> <type of sensor you added, eg motion> group 15 programmed.
Step 8: Add another sensor by jumping back to Step 4 or close the panel door to finish.
Other Notes on Adding Sensors:
- The sensor number the alarm panel will assign to the sensor will be the next number available. The first sensor is going to be numbered 1, second 2, third 3… If you have 10 sensors programmed and then you delete number 5 and then add another one it will name it number 5.
- If you need to change the group number for a sensor you must delete the sensor (see my post here) and then re-add it.
All my GE Simon Alarm Posts:
- How to Delete a Sensor on a GE Simon XT Alarm
- How to Program a Simon 3 Alarm System to Call Your Cell Phone
- How to Set a Dialog QS1500 Touchtalk Interactive Keypad, Part No 60-924-3-01, in Chime Mode
- How to Power a Simon 3 or Simon XT Alarm System Permanently With a Battery
- How to Add a Sensor to a GE Simon 3 Alarm System (this post)
- How to Delete a Sensor from a GE Simon 3 Alarm System
Amazon Associate Disclosure: As an Amazon Associate I earn from qualifying purchases. This means if you click on an affiliate link and purchase the item, I will receive an affiliate commission. The price of the item is the same whether it is an affiliate link or not. Regardless, I only recommend products or services I believe will add value to Share Your Repair readers. By using the affiliate links, you are helping support Share Your Repair, and I genuinely appreciate your support.

PS I’m using 4321 and that allows me access.
Hi John…We have an old (20 year) Simon security system that was installed by ADT years ago. We no longer have an active account with ADT and have been using the system for just local alerts hopefully to thwart any burglary attempt by just the internal siren. Here’s a link to what looks to be our system. https://www.adt.com/content/dam/adt/downloads/manuals/manual_simon.pdf
Anyway we lost power last week and I am attempting to reprogram the system. We have 3 door sensors. I thought I had it programmed correctly (with a 30 second delay) but even though it seems to be working, even after it is disarmed, if a door is opened the alarm will go off after the 30 second delay.
I’ve tried a variety of sensor types like 13, 14, 19, 20 and 22 and suspect that I am inputting the incorrect sensor type. Do you happen to know what sensor type I should be using. (The sensor is the small rectangular magnetic type screwed to the door frame.) I’m not sure I tried #10 yet. I thought I used “Option 10” to program the delay.
I called ADT and they tried to help but apparently don’t support this old version.
Do you have any suggestions? Thanking you in advance.
Tom O.
Madison, WI
Tom, group 10 is the one you should use for a door. It is an Entry/Exit Delay that requires a standard delay time and if you have chime enabled, your panel will chime when it is activated.
Thanks again for your replies,
For whatever reason the emergency pendant device does not act the same. I’ve reached out to alarm.com before our communications and they were/are at a loss as well.
Thanks again
Well shoot, it looks like we have exhausted our options to get that medical pendant to do what you want it to. Check back in and let us know if you figure it out.
Again, Thanks for your response. My account is monitored by Alarm.com. It can and does send me text messages when my garage door is left open for instance or if a water sensor goes off. For some reason the pendant won’t trigger that way (full alarm sending messages to the CO0. If you are talking about group 25, modules entered in that group won’t send a text but the main panel beeps 3 times which unless your by the panel you won’t hear. Every other group, other than 29 (freeze sensor) or 38 (water sensor), seems to put the panel in alarm mode albeit in various alarm modes (Intrusion, Silent, Emergency Fire). Do you know what group for instance you have your mailbox set to? That is exactly what I am looking for (but the pendant does not give a open/close report like a door module – just a tripped). Again, the system is monitored by alarm.com and I have the ability to set up rules such as if the kids don’t get home by this time or others.
Thanks for you input
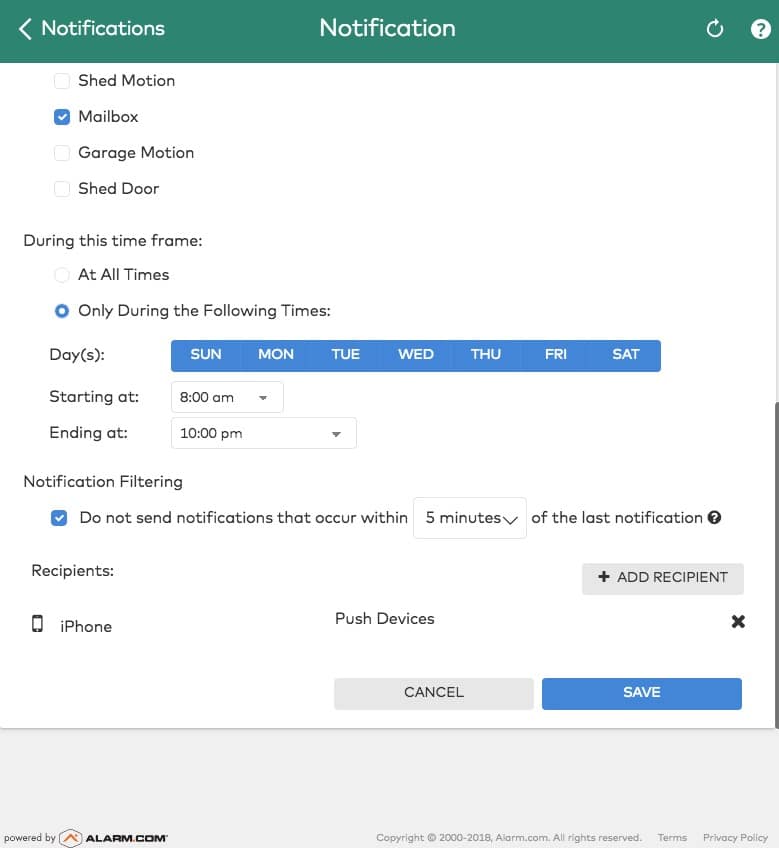
The sensor I’m using is a door/window sensor, which I added to group 25, and then set up the following notification with Alarm.com. I am using a push notification to my iPhone but you can have it send a text message as well.
Thanks for your reply. A lot of sites say you can have the Simon XT tell you if a drawer is opened, a medicine cabinet is opened, a fence gate opened, or keep children in check regarding something. I thought this would be the same concept but for even those things I guess the panel would have to go into alarm mode.
Thanks again
I understand what you are talking about now. You can add that functionality but it requires you to pay an alarm company to provide you the web-based back-end features for your system. For example, I have my Alarm.com system send me a text message if someone opens the mailbox. I have that sensor in a group that is active all the time and doesn’t trigger an alarm (I can’t remember the group number off the top of my head). Alarm.com’s website features allow me to set up notifications for that sensor and I get a text message. But you cannot do it with the Simon XT panel by itself. Also, I do not believe the text message feature is available on every Alarm.com account as they have different levels of functionality, which you must pay extra for. Let me know if this helps and I can provide you with the sensor group number you’d need to use if you want to know–let me know.
If you want to have a sensor notify you at all times when it is activated, when the alarm is armed or not (and not set off the alarm), then assign it to group 25. That is what I have my mailbox on, so I get notified whenever someone opens the door.
Hi, no one seems to be able to come up with a solution for this, not even alarm.com. Overview: Simon XT, Alarm.com as monitoring service, portable medical alert button/lanyard. Problem: I take care of my 91year old mother, she lives with me and sometimes I can’t hear her or I’m not in the house if she needs (non-emergency) assistance. I want the system to send me a notification or push alert on my cell phone without putting the system in alarm mode or having the central office call or send assistance. I’ve tried group 25 but all this does is make the panel give 3 short beeps which is useless unless you’re next to panel to hear them. Regardless of how I set up notification rules on alarm.com I never receive a notification the button is pressed. If I add the medical alert button as group 1, 3, 6, or 7 it does send the appropriate notifications to my cell but of course it puts the panel in alarm mode and the C/O calls. I don’t care if the panel beeps when the button is pressed or not. I just want the system to send notifications, not go into alarm mode, and have the central office disregard the sensor being triggered. Any help would be appreciated.
Hello, thanks for the question. Although I have a Simon XT now I am not aware of how you would accomplish what you want to do with an XT. It is not designed to be an emergency call system apart from calling the alarm company. This guide was written to help you set up your system to call yourself with a Simon 3 and a phone line. If you wanted to get a Simon 3 (they are super cheap now) you could add your mother’s keychain to that system and program it to call you and have two systems running in parallel, with the Simon 3 only as your emergency call system. That’s all I can think of and it’s a work-around.
On Step 5, it says “function not available”. Any idea how to unlock this function. ADT says only a technician can do this. They would not tell me how to unlock it.
You need the installer passcode in order to be able to do that and it sounds like ADT is not going to give it to you. You can attempt to reset the panel (but know you’ll need to completely re-program it afterwards). Here are some steps I found some time ago:
1. Open the panel cover
2. Unplug the transformer and disconnect the battery
3. Simultaneously press Cancel, Clock Set and Minutes buttons
4. Reconnect transformer with button depressed.
5. Panel say”Hello System XX OK.
Panel is now reset, installer code is 4321 master code is 1234