The batteries in APC Battery Backups don’t last forever. Luckily the batteries are easy to replace on your own.
Hardware:
- APC Smart-UPS 1500
- APC Smart-UPS 1000
is exactly the same process.
- Phillips Screwdriver (get a set here
)
- Vice-Grip
- 3/8″ box wrench (get a good Stanley wrench set here
)
How to Replace the Battery in an APC Smart-UPS 1500
Step 1: Unplug the UPS.
If you haven’t already.
Step 2: Remove the battery connector.
On the back of the UPS there is a plug that disconnects the battery from the UPS.
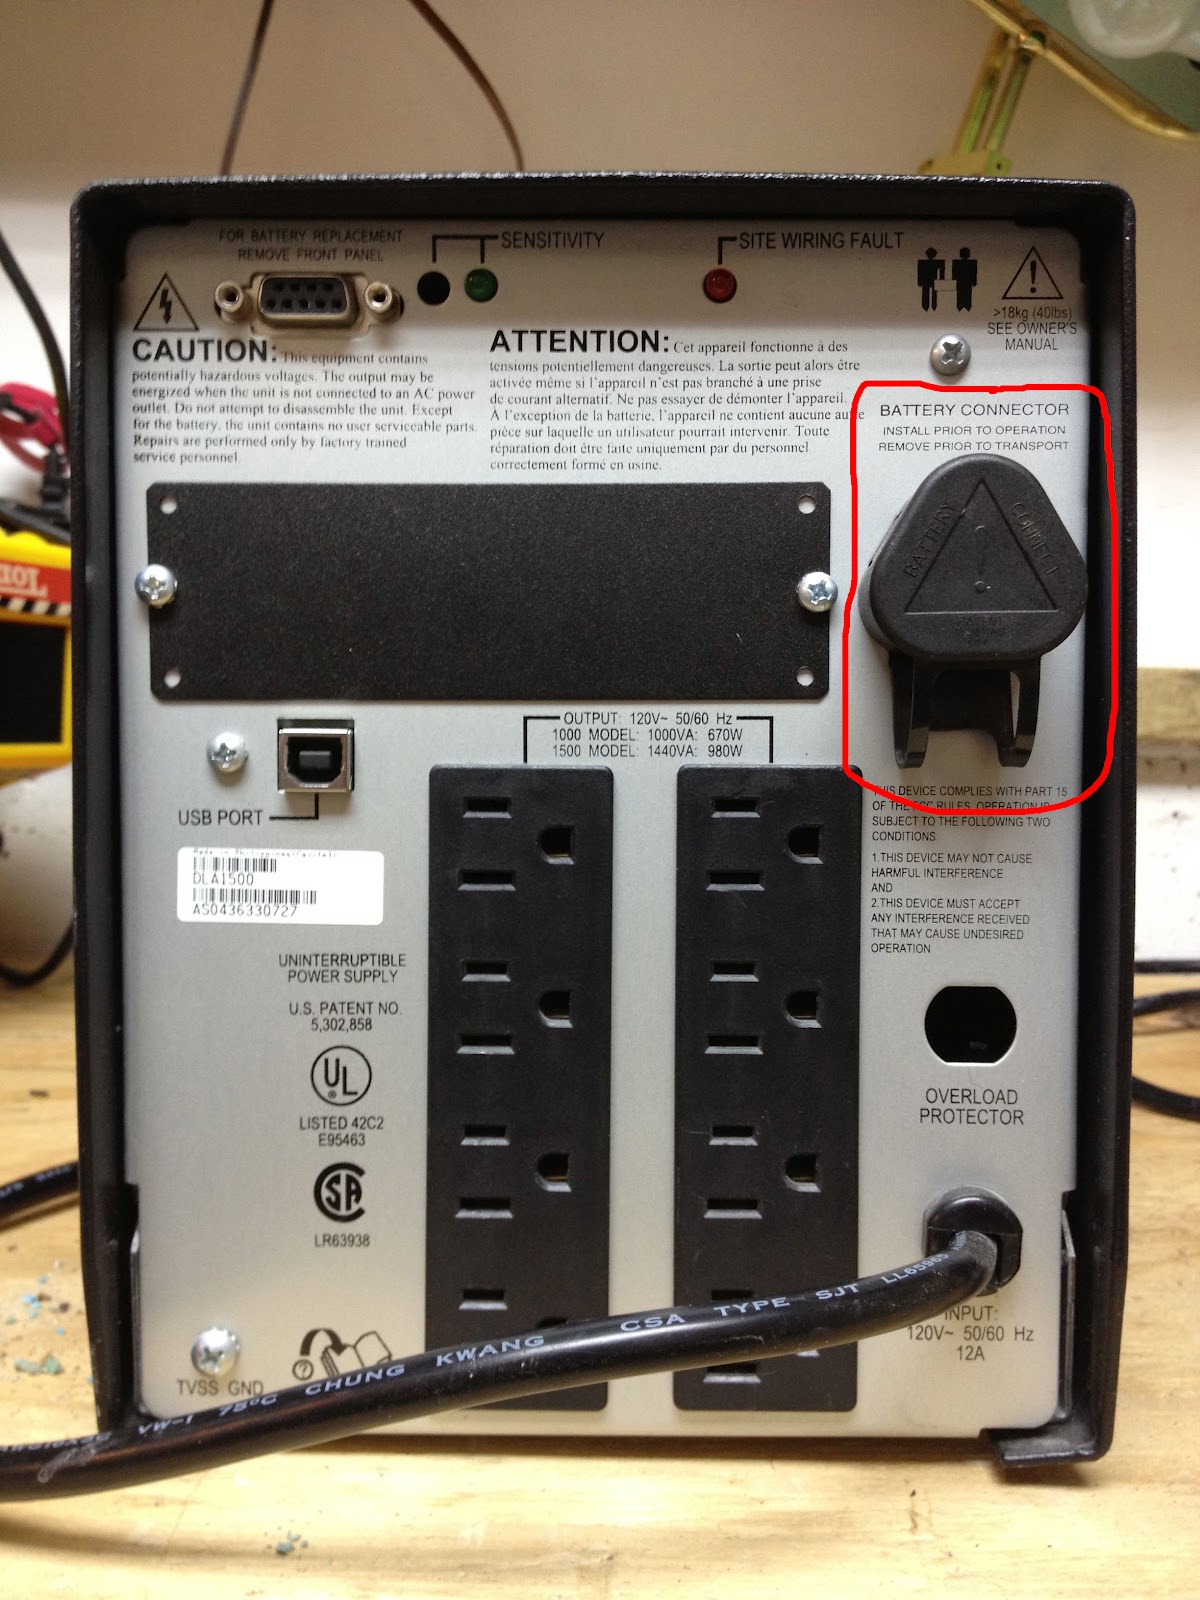 |
| Pull out the battery connector to disconnect the internal batteries from the UPS |
This is what it looks like when you’ve unplugged the battery connector:
 |
| UPS battery connector removed. |
Step 3: Snap off the face plate of the APC.
You should be able to do this without a tool, by grabbing it at it in the notches on both sides toward the top.
 |
| The cover has a notch on each side along the edge to help you get a hold of it. |
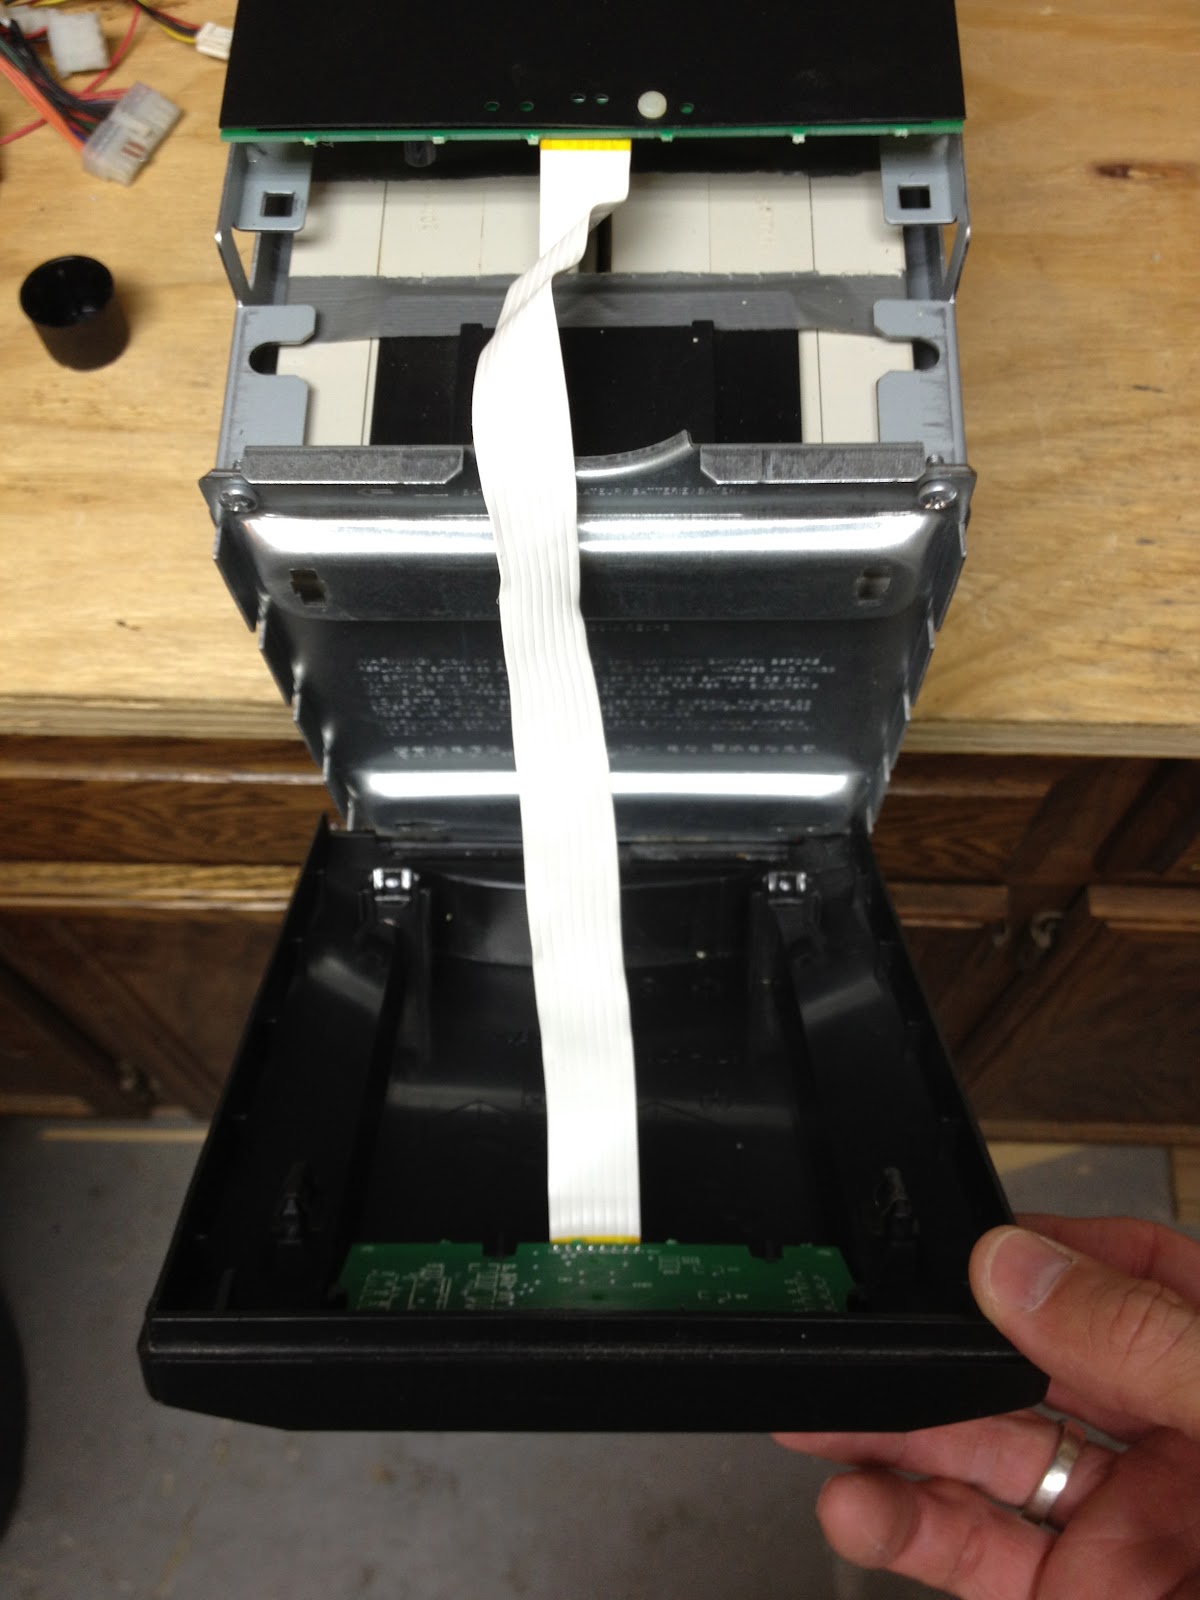
It was kind of tough to pop off and it will be retained at the bottom so you’ll need to treat it at first like it is hinged at the bottom. Also note: there is a ribbon connected to the top but it’s really long.
 |
| Watch ribbon that connects the circuitry that stays on the cover with the rest of the UPS. |
I needed to scoot the UPS over the edge of my bench to give it room to rotate out and then you can lift the cover up and out of the notch it sits down into on the bottom:
 |
| The front cover has a lip on the bottom that sits down into a slot. |
You can just place the front cover on top of the UPS once you get it off:
 |
| UPS with the face plate off. |
Step 4: Remove the battery case screws.
Remove the two screws at the top right and left of the metal plate on the front:

Pull the top of the plate out; the bottom of it sits into two notches. You will be able to lift it up and out once you have leaned it out a bit.

Step 5: Slide the batteries out.
They are connected together and are very heavy. I stuck a flat screwdriver up under them to help get them moving. There is a connector that you can disconnect to free the batteries from the UPS. Don’t pull by the wires, grab a hold of the plastic grey connector:
 |
| The connecter can be easily pulled apart. |
Step 6: Remove the plastic terminal covers.
This battery must have been replaced already by someone because they had taped on the plastic covers over the terminals on each battery. I don’t know how yours will be attached. Take off the covers:

Step 7: Disconnect the terminals.
This battery had been sitting for a while and was corroded, hopefully you don’t have to deal with that. There is a fuse between the negative and positive terminals on the left and then the connector for the UPS is attached to the terminals on the right. Pay attention to how they are laid out when you take yours apart. The batteries are in “series” meaning that the negative from one is connected to the positive of the other and the connector to the UPS is connected to the remaining positive and negative giving you 12+12=24 Volts. If your terminals are corroded like these you’ll want to definitely clean the connectors before putting everything back together. Baking soda in water works good to clean it off. I wouldn’t do that inside though because of the gas that is put off by the reaction of the baking soda and acid. This one had a phillips head bolt with a 3/8″ nut on it. The bolt was corroded so badly that I will have to replace it. It wouldn’t budge until I sprayed some WD-40 on it and even then I had to use a vice grip on one side and the 3/8″ wrench on the other and the threads completely smoothed out when it finally came off:
 |
| Use a 3/8 wrench and a phillips screwdriver to disconnect the terminal. I had to use a vicegrip because mine was corroded. |
Step 8 and onward:
Now that you have the battery out, reverse the steps, taking care to re-connect the terminals of the battery the same way (keep your reds connecting to red and blacks to blacks).
Goofs and glitches: I didn’t realize that the face plate came off so I took the outer case off and then realized I didn’t need to. I wish I would have read this tutorial first 🙂
All my APC Battery Backup Posts:
Amazon Associate Disclosure: As an Amazon Associate I earn from qualifying purchases. This means if you click on an affiliate link and purchase the item, I will receive an affiliate commission. The price of the item is the same whether it is an affiliate link or not. Regardless, I only recommend products or services I believe will add value to Share Your Repair readers. By using the affiliate links, you are helping support Share Your Repair, and I genuinely appreciate your support.

Hi! Thanks for the thing.
I’m wondering if the word here should be inside instead of outside?
“ I wouldn’t do that outside though because of the gas that is put off by the reaction of the baking soda and acid.”
Fixed! Thanks for the feedback Omid, you were right, I had a typo and on a critical word too–it has been corrected.
No need to turn the power off (so long as you don’t take the main case off!), you can hot swap these batteries, which means the connected equipment stays on. https://www.apc.com/uk/en/faqs/FA303216/
Nice article for refreshing my memory, thanks.
Thanks for the tip and reminder, that makes sense!
Hey great writeup! FYI that is a Bussmann FLB-100 bolt-on fusible link, available at any auto parts store.
Thanks a bunch for making this guide! Very well written.
Much better, more informative tutorial than the Youtube video someone else made that was only a minute and a half long. No help at all with the video but your pictures and in depth descriptions/directions are the best! Now if I can find a way to save this page/content for future reference in about 2 – 3 years!! I learned NOT to bookmark stuff like this because after a few years, things get moved around, server changes, etc and I get the “not found” error.
Also, I did some major price comparisons with Amazon, Ebay and Walmart.com. Walmart was the cheapest at $41.99 for a pair of new, (not refirb) RBC7 batteries, no cables/connector or fuse. The batteries appear to be fresh, not old stock. The seller is a third party seller, not affiliated with Walmart. It really pays to shop around!! Amazon was $99 for the pair and Ebay was $87.50 for the two.
Thank you John, for a very helpful and useful description of replacing a RBC7 battery! I get really tired of the videos that people create for tasks such as this. I think folks must make videos because it’s easier than doing a good set of text (with photos) instructions. I also couldn’t pull off the faceplate, but putting a flathead screwdriver lengthwise into the space at the top (between the faceplate and the body) and prying it open there worked well.
think I fried fuse
where can u get a new fuse
100 amp for 1500 apc
dave
I would contact APC, the fuse comes with the battery and I was unable to determine the part number or find it sold anywhere individually.
Thank you very much I was able to replace my APC Smart UPS Battery with the help of your tutorial.
Really appreciate the pictures and the clear concise write up on what to do and expect.
Thanks again
Any pointers on how to get that faceplate off? I tug on these little notches and it is not moving.
You can try prying at those notches with a flat-head screwdriver. That’s what I’d do if I were you.
Upon further review, it turns out that the batteries I bought were specific to the Rack Mounted UPS 1500. I was going to return them, but I found a use for them in another location. I definitely need the RCB7 style battery for my Smart Ups 1500.
Ironically, since disconnecting the original battery, reconnecting it, and moving some of the plugs to another UPS, the “Replace Battery” light is no longer illuminated and it shows a full charge.
Thanks for the update Greg. If that light went out I’ll bet you it will come back on before you know it 😉 as batteries do wear out.
Is there a conversion for 4 smaller batteries instead of the 2 large? I ordered a replacement set of 4, not realizing that I needed the two larger batteries (both were listed as being Smart Ups 1500 batteries)? Perhaps a cradle or wiring harness that connects them all and then uses the Grey Connector?
I don’t know of anything like that and a google search didn’t show up anything either. It is electrically possible to use 4 batteries, if 4 batteries would physically fit inside the UPS. 4 batteries probably take up more space than 2 though. To use 4, you’d need to put each of the two sets of them in parallel and then put the two parallel sets in series, to give you 24 volts, but if those terms don’t mean anything to you, I would not attempt it. You’d need to also make sure you have high enough gauge connectors so you don’t fry the wires (over amp them) you use to connect the batteries (or worst, create a fire). I link the correct batteries for a Smart UPS 1500 in this article.
If the ribbon tears, how do you fix?
Kathy, I’m sorry to hear that. How you repair that ribbon probably depends on exactly how it tore (partially or all the way through), what materials you have on hand, the tools at your disposal, and your comfortability in electronics. If the ribbon was cut all the way through you could mark one side of the ribbon (on both sides of the cut) so you make sure to connect the wires correctly and cut the cable straight on both ends and strip each wire a couple millimeters and solder each wire back together side by side, and then put some electrical tape over the ribbon. Alternatively, if only a couple wires of the ribbon are cut you could simply “jump” the wires individually with some strands of wire by exposing some wire before the cut and after the cut and use a jumper wire to bridge the cut (for example by using the wires from a CAT-5 cable). I don’t think any high frequency data is transferring over those lines where a splice will matter. Give me some more information about your exact situation and I can give more feedback.