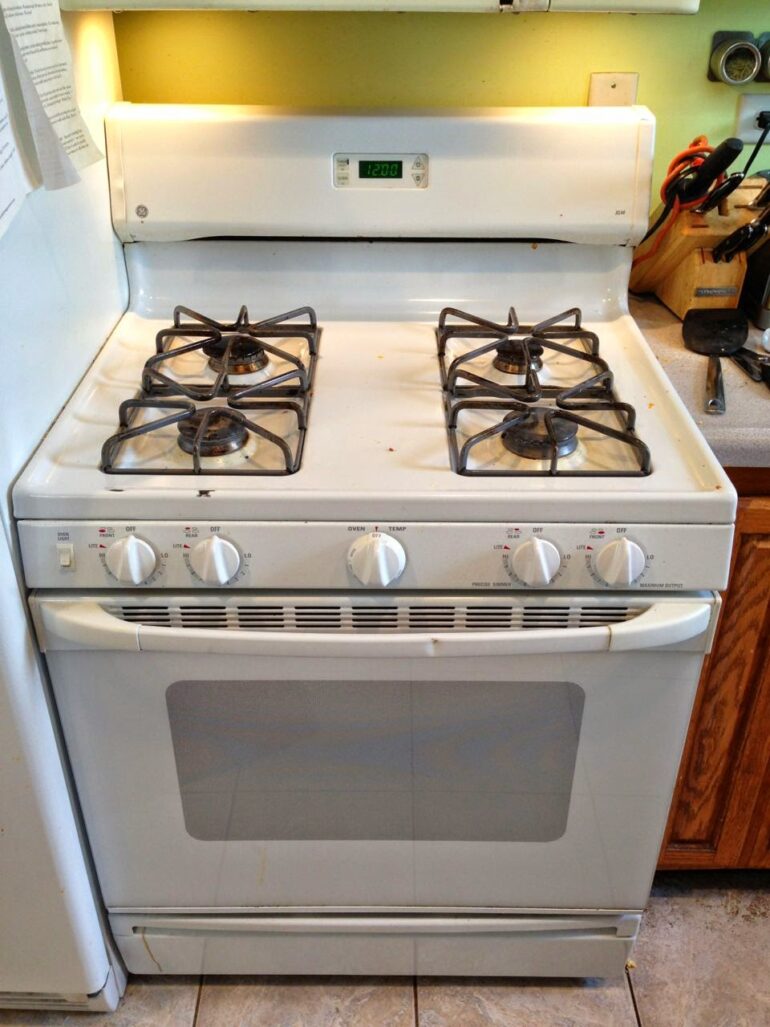
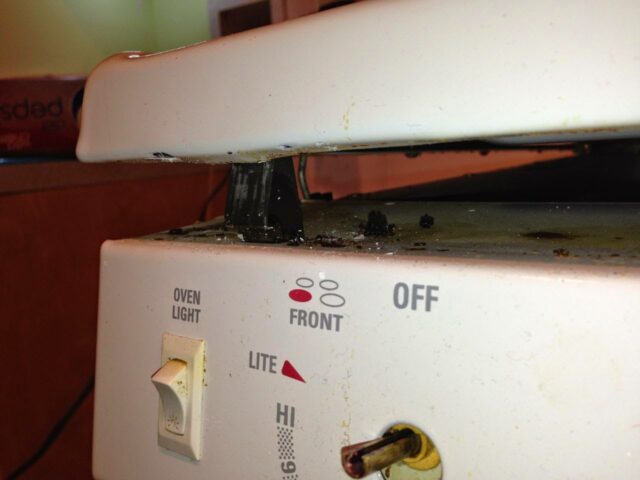
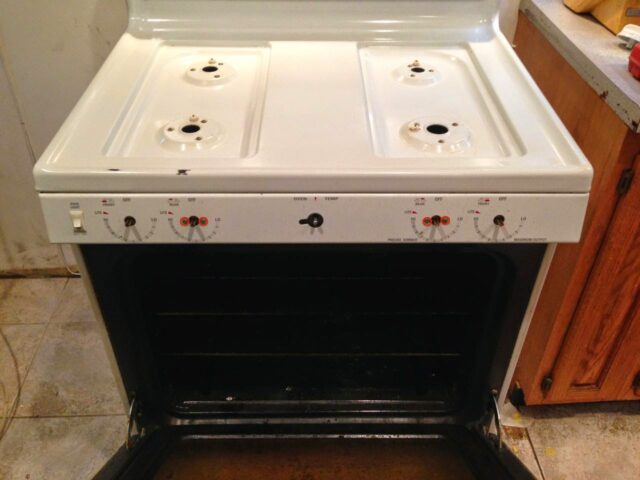
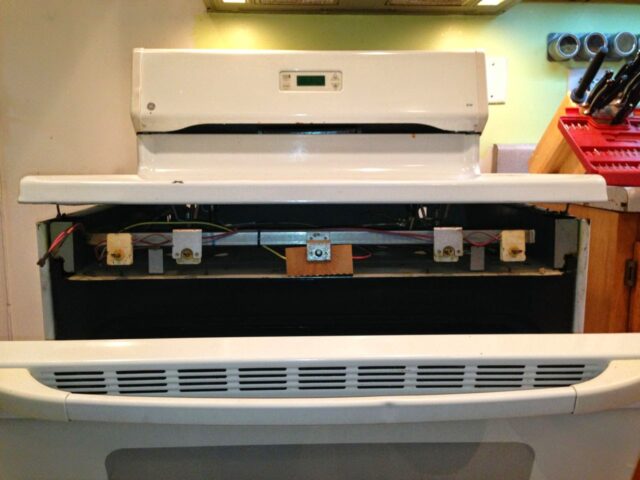
The other day I noticed that the oven was very hot even after my wife had finished baking for a while. I looked and the knob was set to “OFF” though:
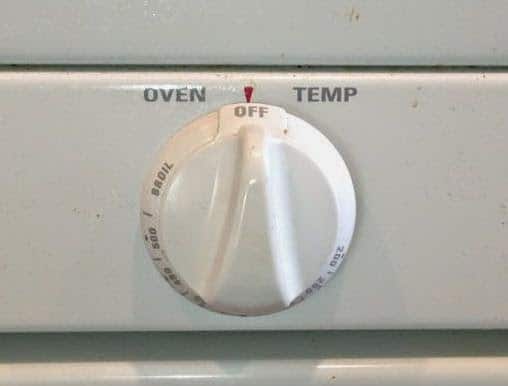 |
| Oven thermostat knob |
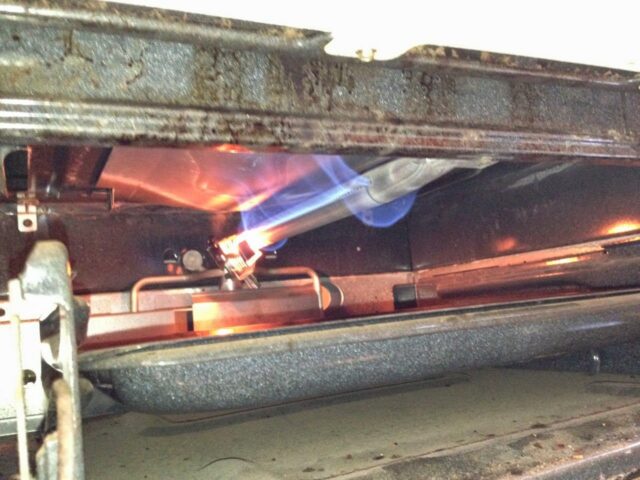 |
| You can peek down below by lowering the door of the lower drawer to verify that the burner is on (and you can see the igniter at the far back glowing) |
Q: Is This A Safety/Warranty/Recall Issue?
After I ordered the part from Amazon.com (see step 2 below) I began thinking that this is a serious safety issue–that a part would fail in a way that caused the oven to run indefinitely. If we would have left our home for the weekend our oven could have run for days without us knowing. I called GE service to see if this is something they would cover under some kind of extended warranty or recall– 800-432-2737. They said that this may be considered “a safety issue” and that I needed to call GE Customer Relations at 800-386-1215. I called them and they told me that they would sent out a tech free of charge to evaluate the situation. I pressed them on the issue asking what they would do if it was deemed a safety issue (which I was sure it was) and they said they would repair it free of charge. The Tech came out a day later and confirmed it was the oven thermostat but that they would not replace it for free because they did not consider it a safety issue since you can unplug the oven. That was disappointing. The tech was really nice though and I knew he was just doing his job and he was very nice to give me some tips about replacing the part and experience-backed tips are always really handy. The one thing he said was to be very careful not to strip out the torx screws that hold the stove-top burners because it is very easy to break them or strip them out. I appreciated the tip and plan on being careful.
A: According to GE, no 🙁
How to Replace the Oven Thermostat Assembly on a GE XL44 Range
Hardware
- GE XL44 Range Model: JGBS23WEA2WW
Parts Needed:
- WB20K8 Oven Thermostat
replaces WB20K10023, WB20K10008, 164D2793P001, 183D5463P001, 223C3823P001, 251863, AH235170, EA235170, PS235170, WB20K0006, WB20K0008, WB20K6, WB24X20656 (just make sure you get the model that has the terminals on either side like in the pictures below)
- GE Lighting Appliance Bulbs, 40 Watts, Pack Of 2
(if your oven bulb is out)
Tools Needed:
- Flat head and phillips head screwdrivers
- 1/4″ driver–get this and more with this Highly rated 170-Piece Tool Set
- Torx Bit Set
Time to complete repair: 2 hours 20 minutes (but I did some serious cleaning of the oven and behind the oven as I did the work).
Step 1: Unplug your range from the wall so your oven won’t run continually.
 |
| Extension cord running to the outlet and the plug for the oven so we can easily unplug the oven when we are done |
I wanted to disable the oven so that my wife could use the range top without heating up the house while we were waiting for the part to come in so I actually disconnected the oven igniter. You can read how to disconnect the igniter via my other GE XL44 post here: How to Replace the Igniter on a GE XL44 Oven. I left the igniter in place but just disconnected it–this keeps the oven gas from flowing.
Step 2: Order the part.
If your oven is the same as mine click here to order it cheap from amazon.com. To look up the part, first you need to know the model number of your oven. If you open the lower drawer of the oven and look at the top left corner of the opening you’ll see the plate with the model and serial number:
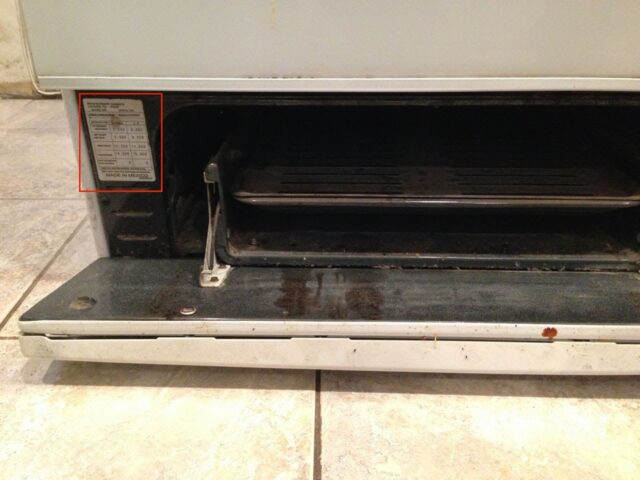 |
| If you lay down the lower drawer face you can see the sticker with the model and serial number on the left |
You may have found this blog by searching for XL44 but that’s not the model, here’s where to find the model number: JGBS23WEA2WW
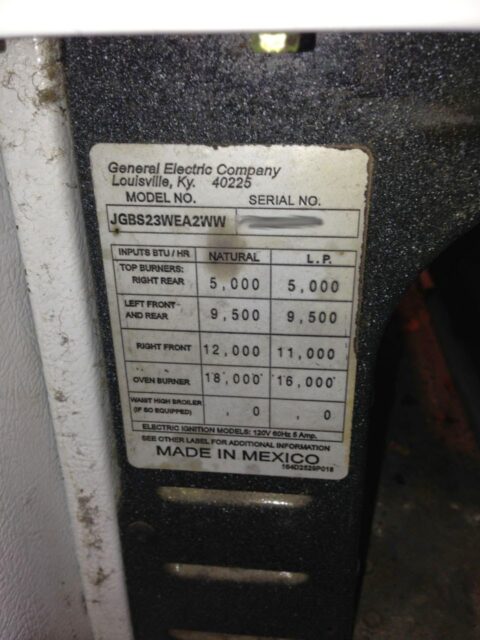 |
| Model number and Serial number sticker on GE XL44 |
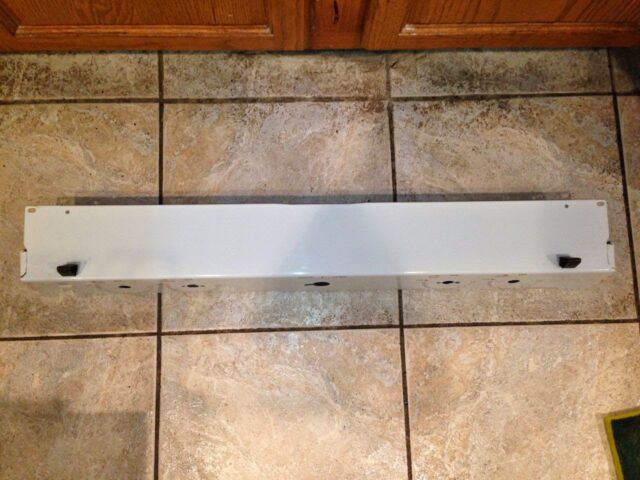
I had a hard time figuring out what they call the part. I kept searching for terms like “oven control valve.” I used the parts diagrams at www.appliancepartspros.com to try to track it down. The first part I thought it might be called is the Oven Safety Valve but when I watched the repair video they have on their site I discovered that the oven safety valve is on the back side of the oven so that’s definitely not correct. With the help of their live chat was able to figure it out. The part’s name is actually the “Oven Thermostat Assembly” and the Manufacturer Part Number is WB20K8. It’s part number 17 in the diagram below:
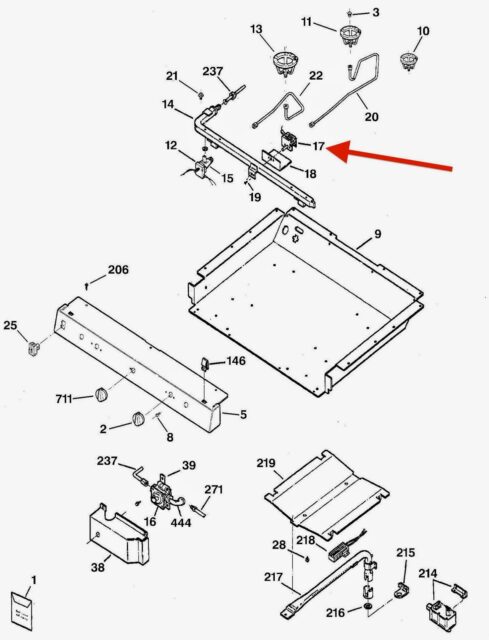 |
| GE XL44 Thermostat Assembly Parts Diagram |
What’s weird is the GE has left off 3 of the control knobs in the diagram above for simplicity but it doesn’t help in recognizing what goes where to a layman like myself. Here’s a link to the part at amazon.com where it is cheapest (currently $37.55). I listed all the other part numbers it might be called by up in the hardware list at the top. Now you must wait. 2-Day delivery was the fastest I could get for this part. Here’s what the box looked like that the part came in:
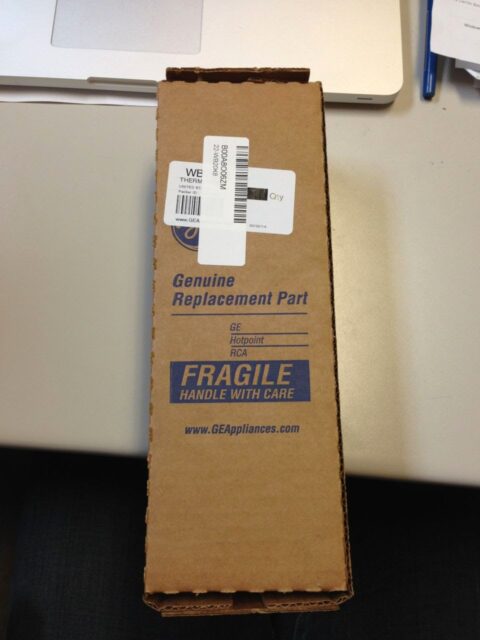 |
| GE XL44 Oven Thermostat Part Number WB20K8 Box |
The front side of the part:
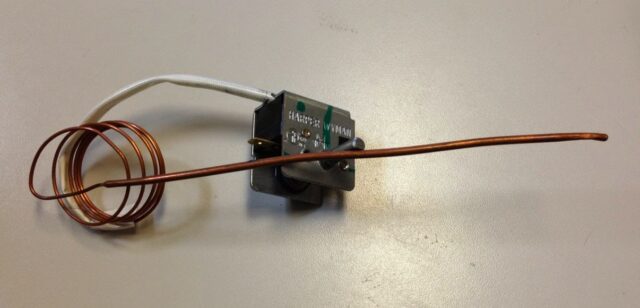 |
| GE XL44 Oven Thermostat Part Number WB20K8 |
Back side of the part:
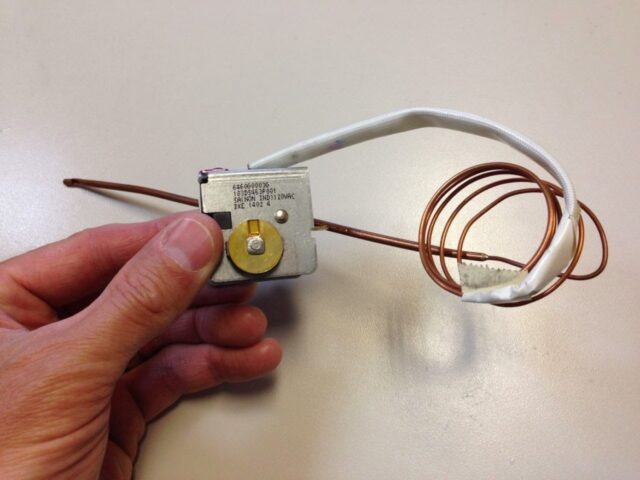 |
| GE XL44 Oven Thermostat Part Number WB20K8 |
It turns out that the part is purely electrical. I thought for sure it was partially a valve but it is a thermal couple with some kind of adjustable switch.
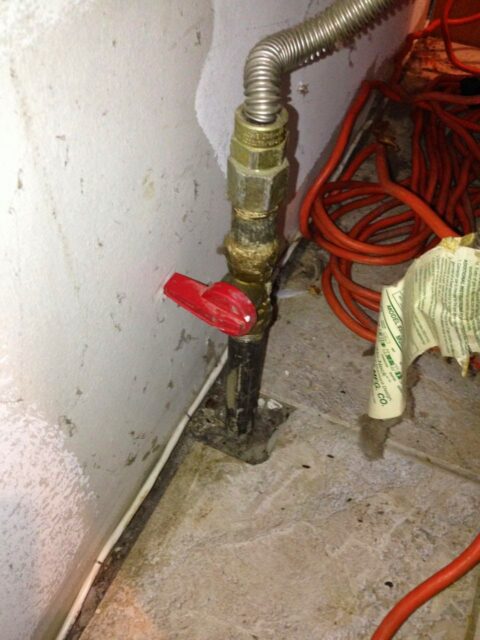
Step 3: Turn off the gas to the oven.
You don’t need to actually disconnect the gas line–you can do this repair with the gas line connected because you aren’t going to be disconnecting any gas lines in the oven. The valve typically will only turn 1/4 turn and it is off when the valve lever is perpendicular with the piping as seen below:
Step 4: Unplug the oven.
I forgot to do this and blew the circuit breaker when I was disconnecting the thermostat. I’m lucky I didn’t shock myself.
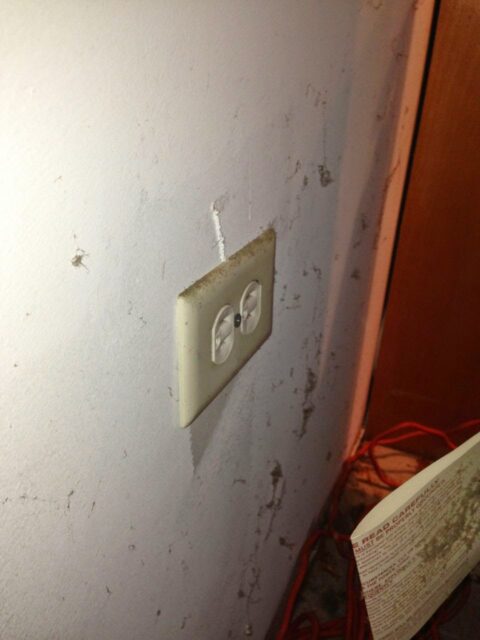 |
| Don’t forget to unplug your oven before replacing the oven thermostat assembly–it is directly connected to AC power |
Step 5a: Unscrew the three 15mm torx screws from each burner location??
NOTE: Read on before you do this step. If you need a torx set get one here on amazon.com. When the GE tech came to trouble-shoot the oven (and tell me they weren’t going to cover the repair) I asked him to give me a quick overview of how to do the repair and he specifically said I was supposed to remove the screws from each burner. He also said to be very careful not to cross-thread them or break them off because he said that happens sometimes. I removed the three screws from each burner but the spark igniter for each burner stays attached and holds the burner to the top so removing the screws didn’t do any good.
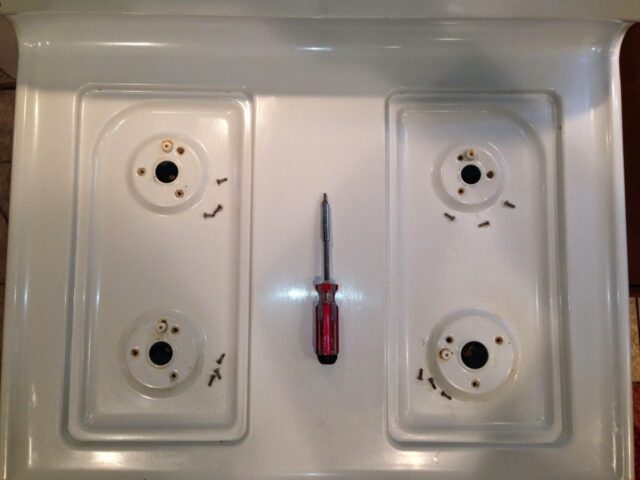 |
| Optional step? It didn’t do any good to remove these screws because the igniter retained the burners anyway |
Step 5: Lift up the stove top.
When I did this repair I actually did step 6 first but I would suggest doing this step first. I honestly didn’t have a clue the way a repair man would get the stove top released from the spring latches that are on either side but I used a screw driver and tried to carefully pry up. I now would suggest taking a butter knife and inserting it in the crack between the oven top and the control panel and compress the spring clips straight in as you pry up the top. I think this would have made it easier for me. Be Careful: You don’t want to lift the stove top too high because all the piping for the burners is connected to the top of the stove. Release each side and just let it be for now.
 |
| Left spring latch for the stove’s top |
 |
| Right spring latch for the stove’s top |
Step 6: Lift up the top until the wire guides come all the way out.
On either side of the stove top there are curved wire guides that poke down into the frame of the oven:
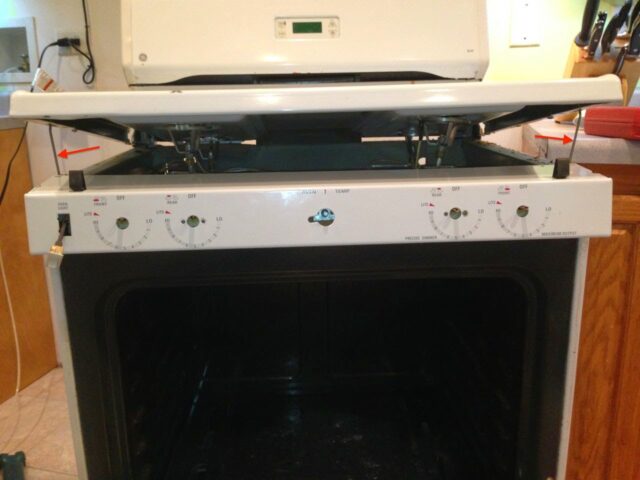 |
| These two wires can be used to hold the stove top up |
Lift the stove top up until the curved wire guides (see red arrows on each side in the image above) come all they way out and then place them out of the hole somewhere so that the stove top stays up.
Step 7: Remove the 5 control knobs.
You can pull them straight off with your fingers.
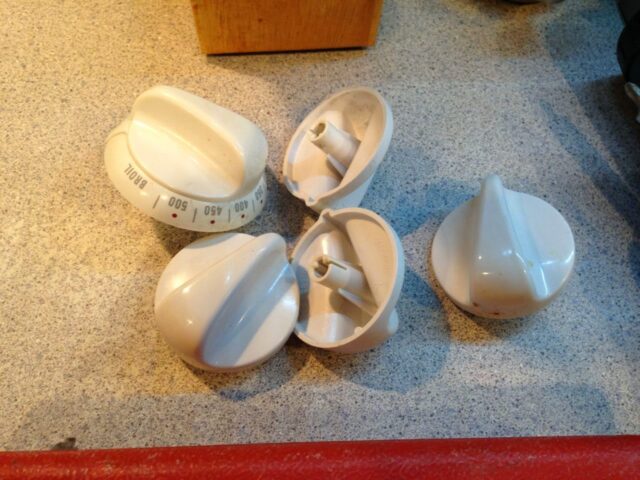 |
| Control knobs removed |
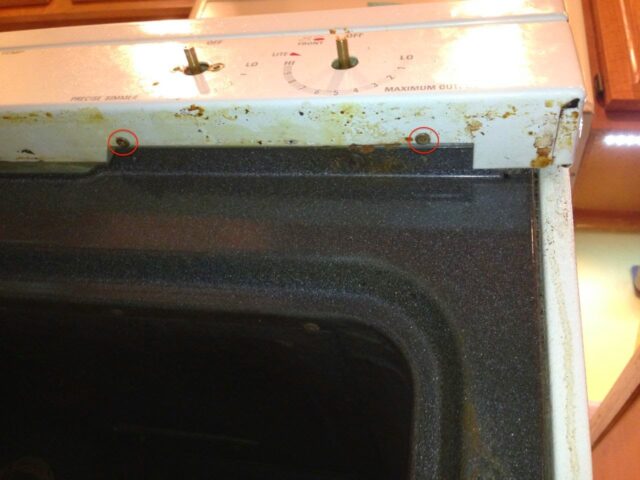
Step 8: Remove the control panel cover screws.
As you can see from the image below I removed these before step 6 but I suggest doing them last because it is easier to pry the top up when the cover is on there tight than the way I did it. There are 4 phillips-head screws on the front side, circled in red in the picture below. If you need a good screwdriver set get one here.
 |
| The 4 screw locations on the front of the control panel cover (they are located behind the two inside burner knobs |
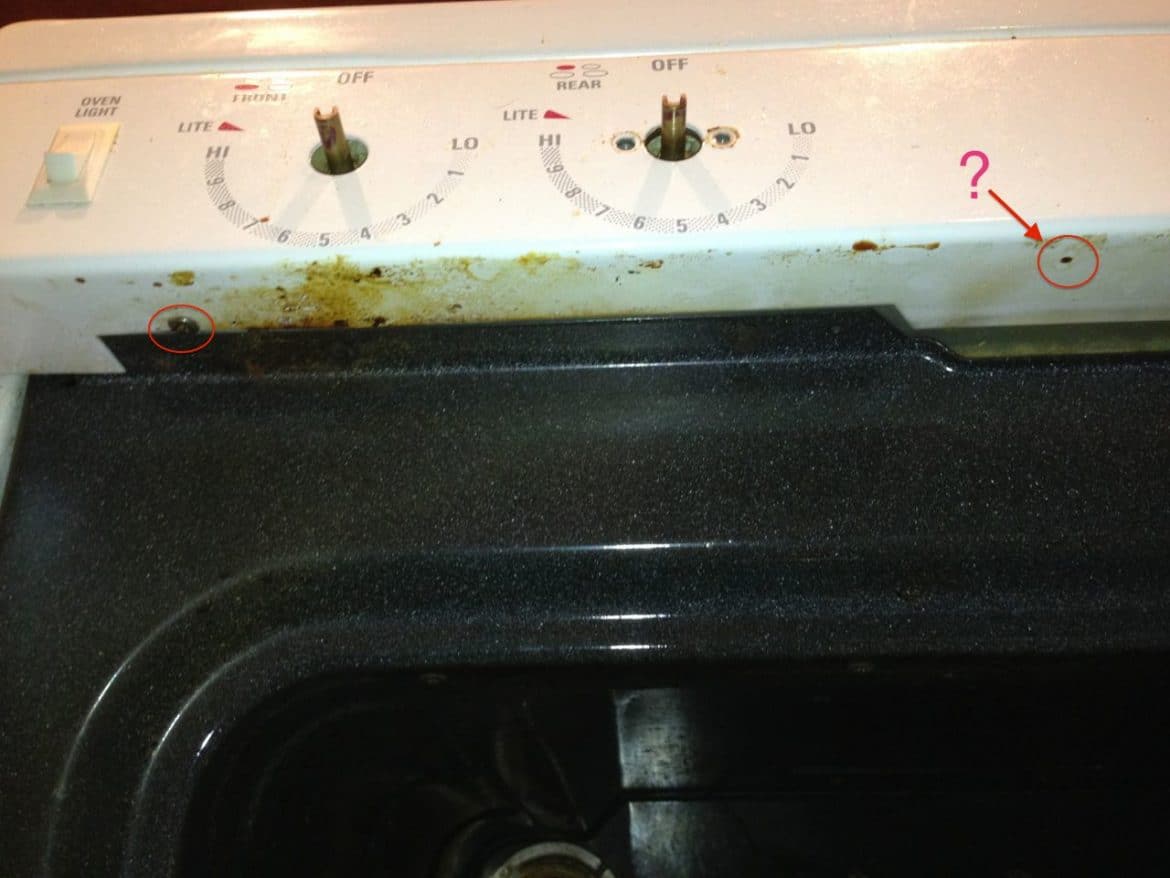
There are at least 3 screws under the front face of the control panel cover (and it looks like there was possibly one missing on my oven):
 |
| Right two screw locations |
 |
| Disconnect the two wires running to the oven light switch–the wire connectors pull straight off |
Step 9: Remove the control panel cover.
The oven light switch has two wires that you’ll need to disconnect. The connectors slide straight off:
Once you have the panel removed this is what you’ll see:
 |
| Here the front control panel cover is removed |
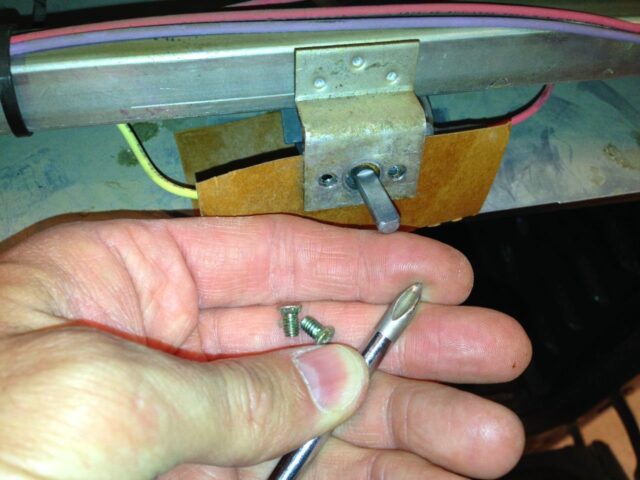
Step 10: Remove the 2 screws from the oven thermostat assembly.
There is one on either side of the shaft that the knob went on:
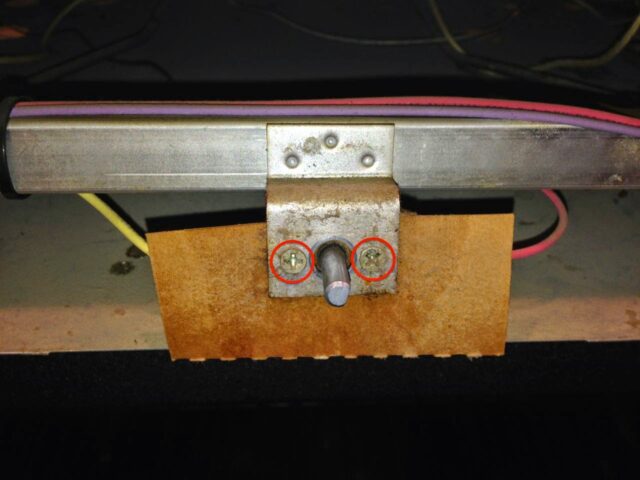 |
| Location of screws that hold the oven thermostat assembly in place |
Keep the protective cardboard that covers the assembly because you’ll want to re-use it.
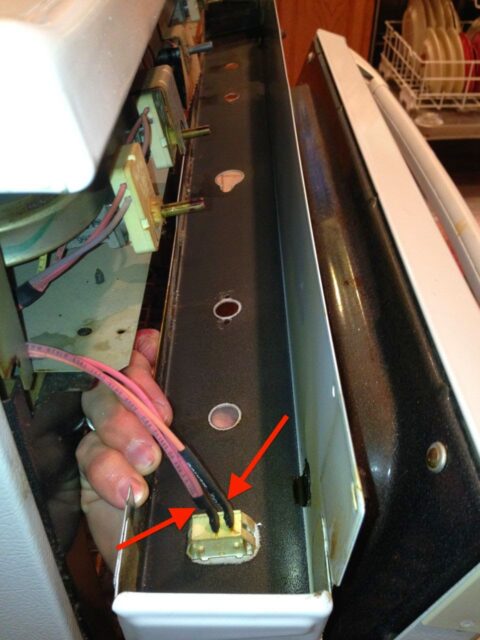
Step 11: Remove the two wires connected to each side of the thermostat assembly.
This is where I made sparks fly because I had not unplugged my oven. Don’t make the same mistake. The wiring connector welded itself to the body of the old thermostat when I shorted it out! There is a wire with the same type of connector as the oven light switch on each side:
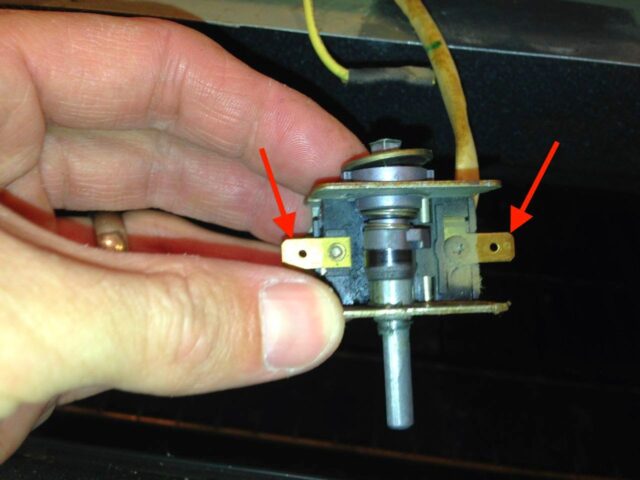 |
| I forgot to take a picture before I removed the two wires that are connected on either side as shown by the red arrows |
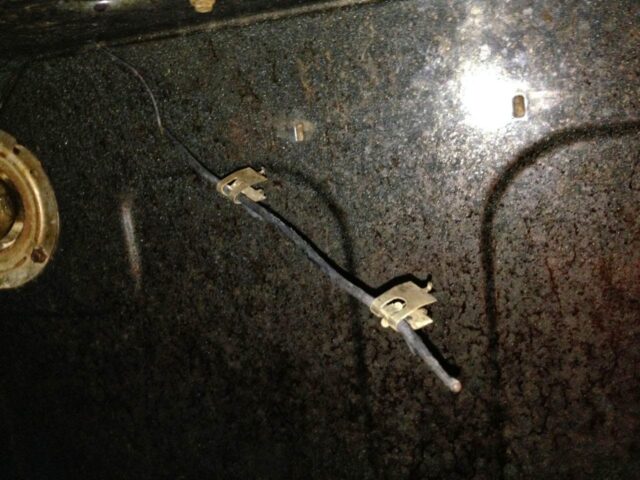
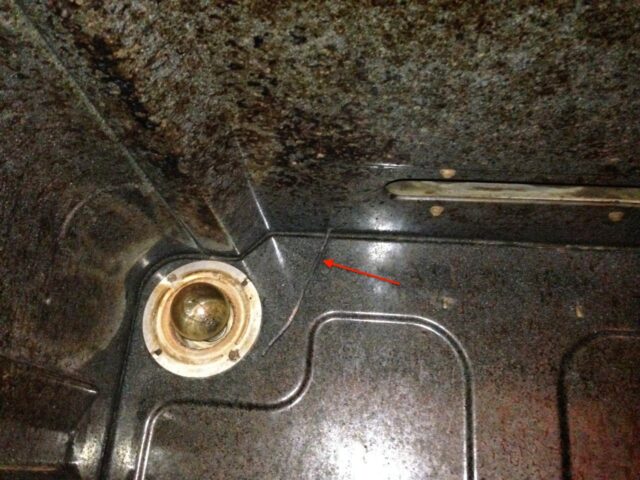
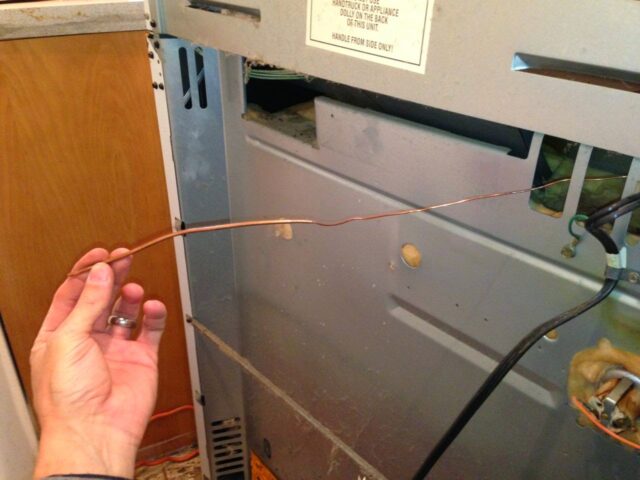
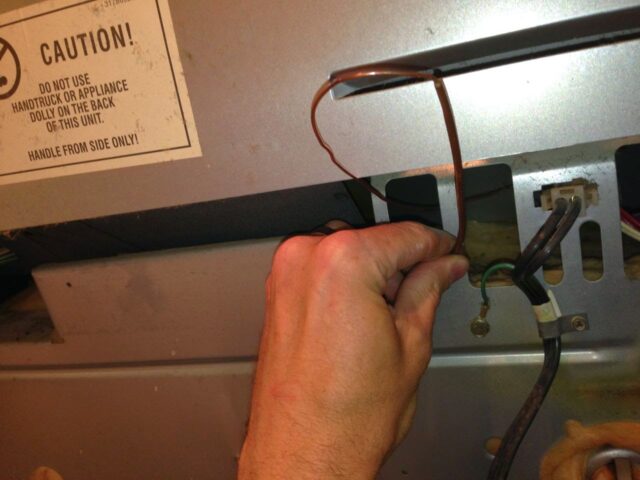
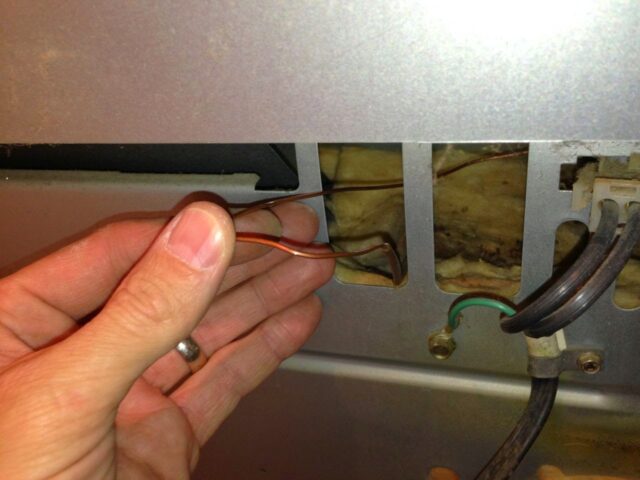
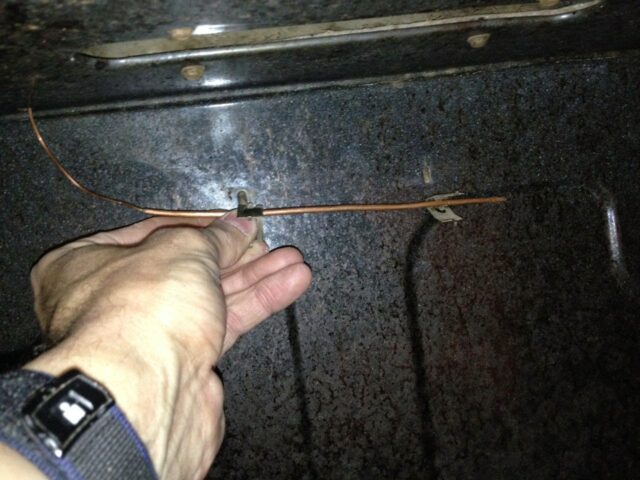
Step 12: Trace the path of the old thermostat’s wire.
You’ll need to remove it and run the new one along the same path. It is a copper colored wire (without any insulation on it). This is where it would have been really nice to be able to remove the top but I opted to just install it without removing the top because the igniters retained the burner assemblies to the stove top.
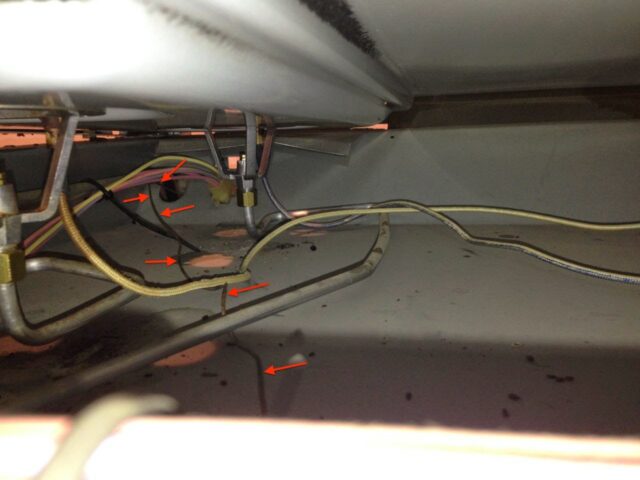 |
| Here I’ve indicated the path of the thermostat wire as indicated by the arrows |
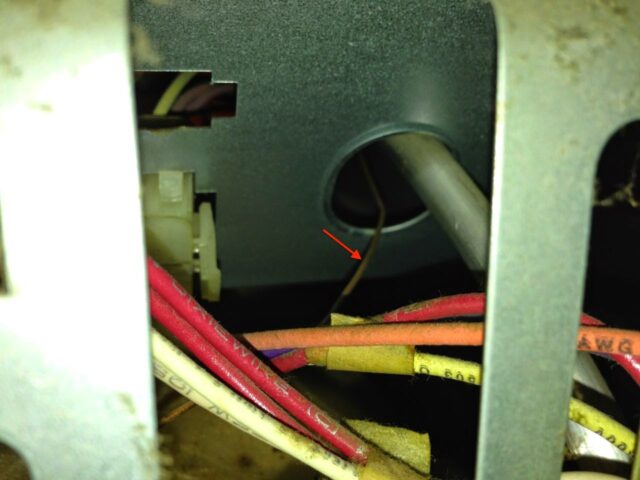 |
| Thermostat wire comes out the back of the oven |
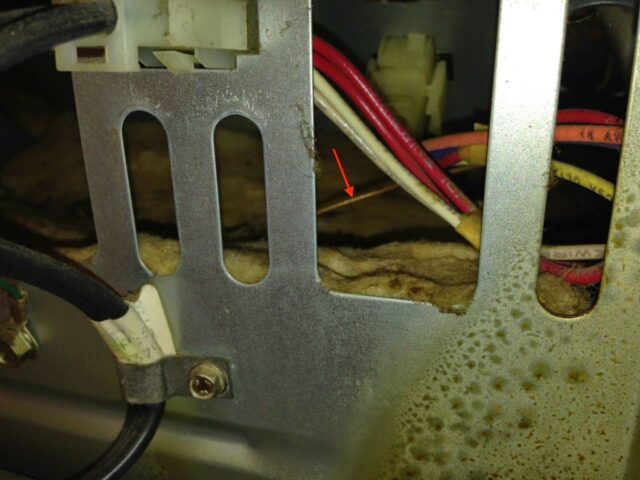 |
| It runs towards the center of the oven along the insulation |
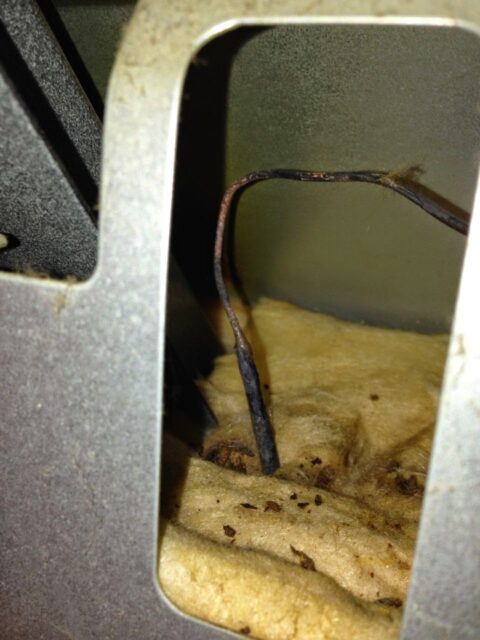
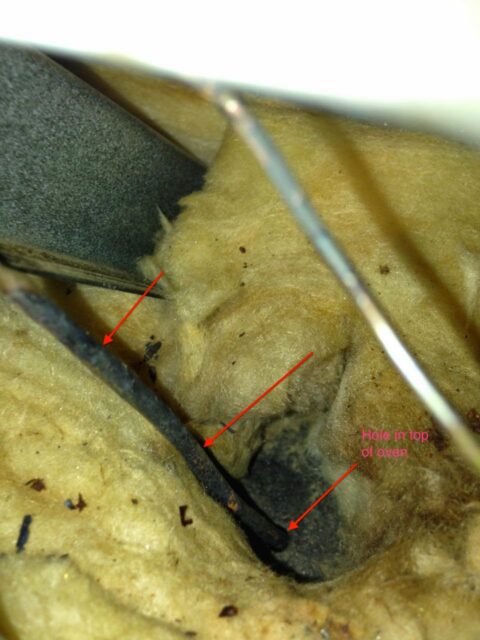
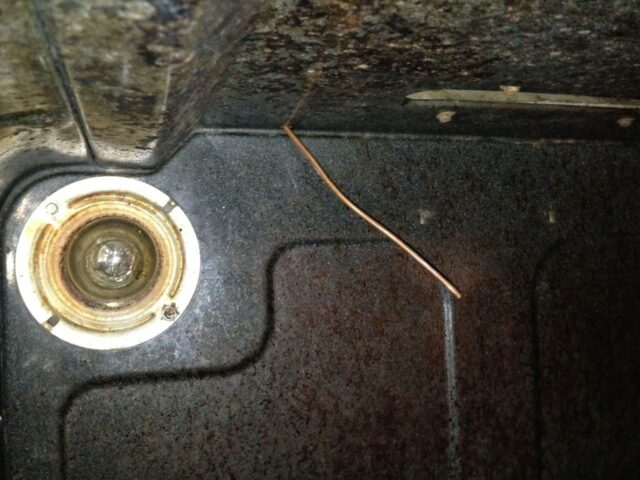
And in the back it feeds down through the insulation and through a hole in the far back of the top of the oven:
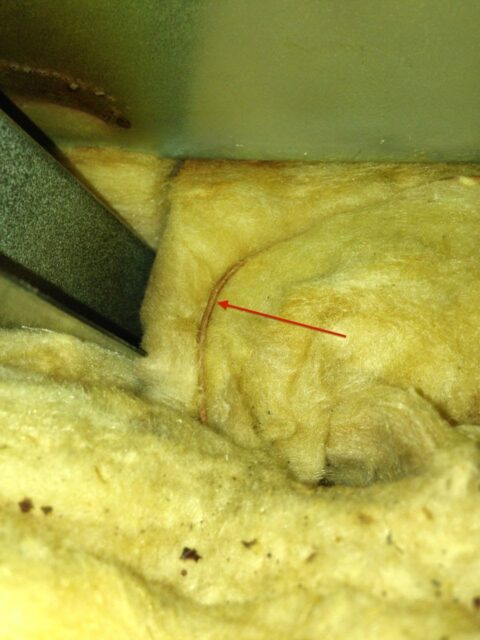
When I got to the point where I took the picture above I took my finger and spread out the insulation so I could better get at the hole in the top of the oven for when I remove the wire and replace it with the new one.
And here it is at the top back of the inside of the oven:
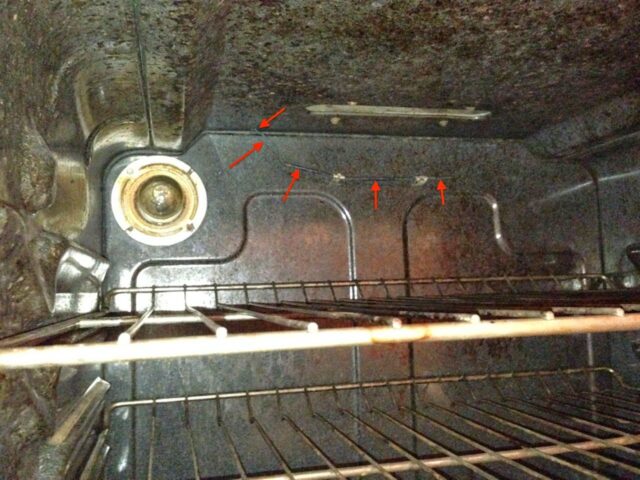 |
| Thermostat wire and the thermal couple on the end inside the oven |
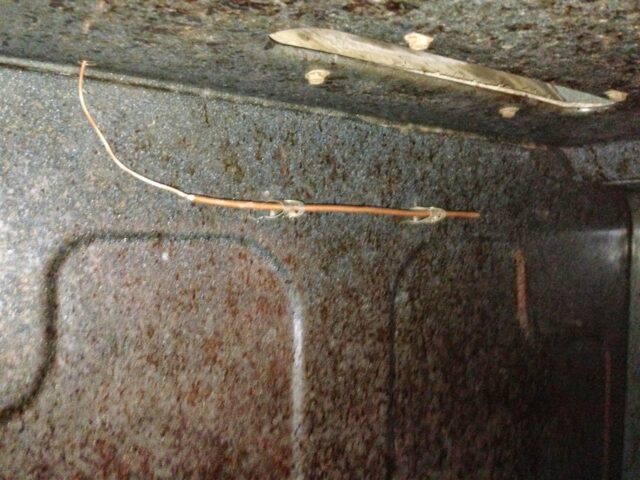
Step 13: Disconnect the clips holding the thermostat’s end on the back of the oven.
If you squeeze the clips they will press together and release from the holes they are in on the back of the oven.
 |
| Thermostat clips disconnected from the back of the oven |
Step 14: Gently bend open the clips open to release the thermostat probe from the clip.
You’ll need to re-use these clips for the new thermostat so be careful not to bend them more than necessary so they don’t break.
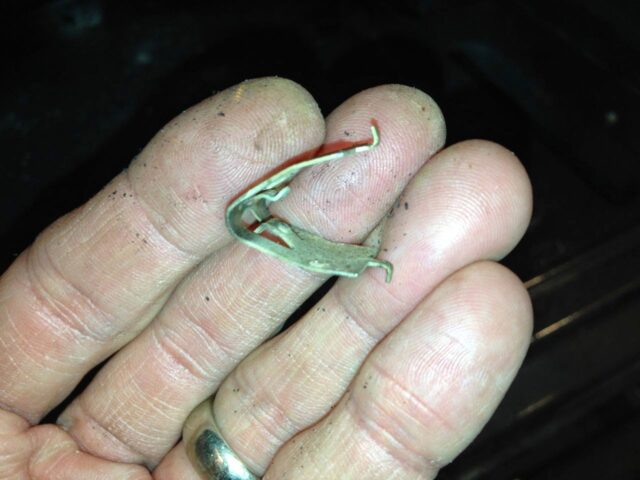 |
| An up-close look at the clips that hold the thermostat’s thermal couple in place at the back of the oven |
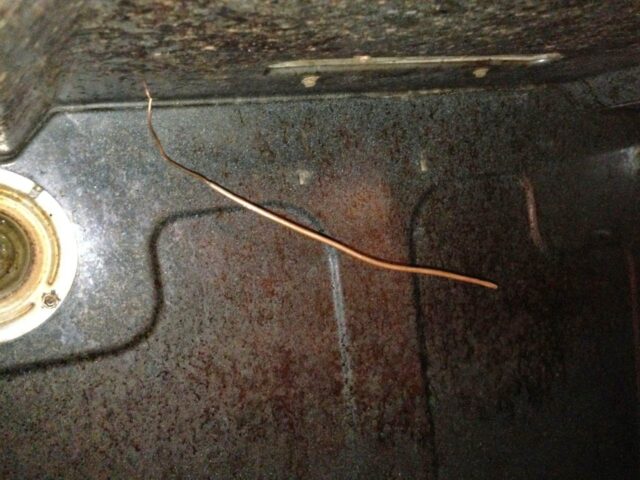
Step 15: Remove the old thermostat wire.
You’ll need to feed the old thermostat up through the hole and then feed it out the path it runs back to the thermostat assembly.
 |
| The thermostat wire being pushed up and out the hole at the top of the oven |
Here’s what it looks like as I pushed the thermostat up and out of the oven.
 |
| Coming up through the insulation in the back |
At this point I used my finger to spread out the insulation so I could find the hole easier when I ran the new thermostat wire:
Step 16: Unroll the new thermostat wire.
Do not simply stretch out the new thermostat wire because you will twist it and it will not straighten out. Gently unroll it and straighten the wire. Be careful not to kink the wire or make any sharp bends in it.
 |
| Unrolling the new thermostat wire |
 |
| Gradually unrolling the thermostat wire |
Step 17: Feed the new thermostat along the same path as the original one and through the hole in the back of the oven.
This was a little tricky since I wasn’t able to take off the top of the range but it still can be done. You don’t want to bend the thermal couple on the end of the thermostat wire too much. I ran the wire out the back of the oven through the rectangular slot that is closest to the hole in the top of the oven and then down through that hole as follows:
 |
| I ran the thermostat wire out the back as seen above and then gently bent the wire and reinserted the end into the hole |
 |
| Gently fishing the end into the hole in the oven |
 |
| Be careful not to kink the wire as you do this |
 |
| The new thermostat wire being fed into the oven |
Step 18: Mount the thermostat’s thermal couple on the back of of the oven.
You’ll need to install the mounting clips, properly spaced on the wire and then squeeze them to install on the two slots cut into the back of the oven.
 |
| The thermostat wire fully inserted into the oven |
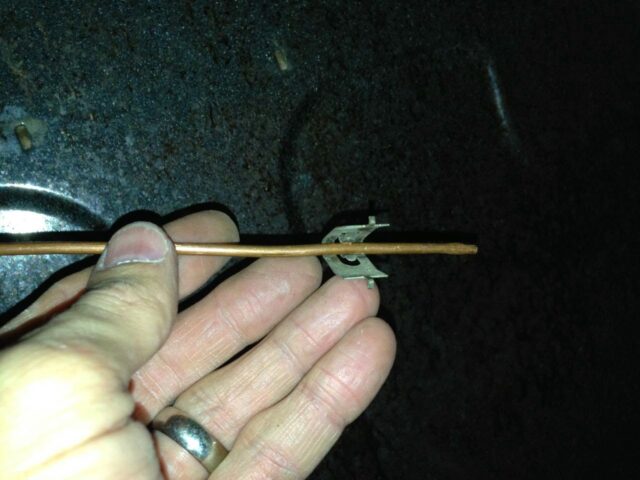 |
| Installing the first mounting clip on the far end |
 |
| I held up the probe to the two mounting holes to determine the placement of the 2nd clip |
 |
| The newly mounted replacement thermostat |
Step 19: Install the thermostat assembly.
I did this step after I mounted the thermal couple end of the thermostat assembly to give me more flexibility in running the wire. Reconnect the wire on either side of the thermostat (yellow on left, red on right), slip the protective cardboard back on the new thermostat and secure it in place with the two phillips-headed screws.
 |
| Securing the thermostat with the two screws |
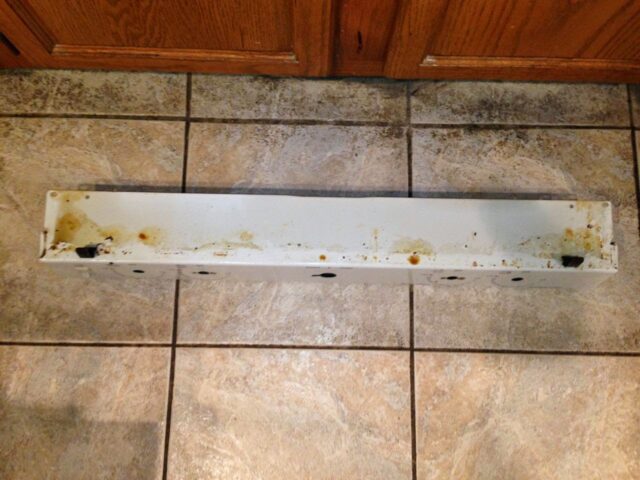
Step 20: Clean the control panel cover.
Since it’s time to start putting the oven back together I would suggest cleaning everything as you go. While you have it off you might as well clean it and given ours was something like 10 years old it needed it:
 |
| Dirty control panel cover |
It cleaned up nicely though:
 |
| The cleaned up control panel cover |
Step 21: Reinstall the front control panel cover.
There is a screw on each side of two of the range control knob shafts and 3 screws on the lower edge.
 |
| Reinstalling the control panel cover– 4 screws on the front side and 3 (or 4) on the lower edge |
The oven light switch popped out when I was putting things back together. One thing to note when reinstalling the switch is that there are two notches on one side of the opening that match the little posts that stick out of the left side of the switch as seen here:
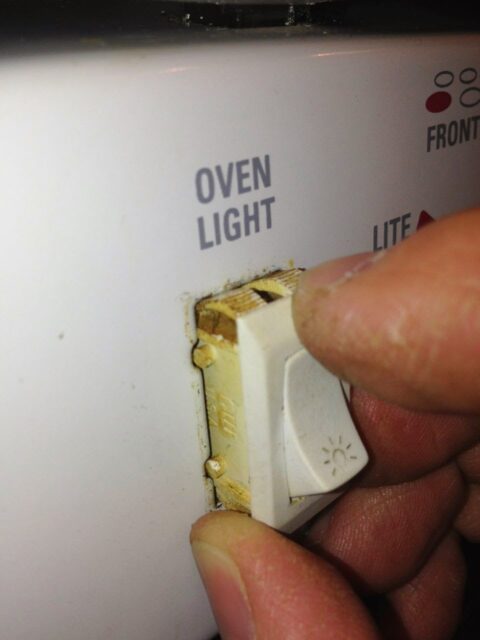 |
| Note the two “posts” that stick out of the left side of the oven light switch that match the notches in the panel |
Step 22: Reinstall the cook top burner torx screws (if you took them out).
Although it didn’t help me at all I had removed the three torx screws from each burner (out of suggestion from the GE tech who came to my house). Now is the time to reinstall them so you can reach underneath the range top to line up the screws with the holes. The GE tech I talked to warned me that it was easy to cross-thread them. He also said that you could get by with only 2 screws on a burner if you messed one up. I didn’t have a problem getting them all back in fine.
Step 23: Latch the range top down, locking the clips on each front corner.
I think I know why the range top locks down using these spring clips–because when you lift it up, it bends the burner piping slightly and it wants to spring up and the clips hold it down. From the way the piping zig-zags (giving it room to flex) it looks like it was designed to do this. I’m sure once we’ve used the burners some they will relax and not push up on the range top anymore.
Step 24: Plug in the oven’s electrical cord and turn the gas back on.
Remember that the gas valve will be on when the valve’s handle is pointing in the direction of the gas piping, like this:
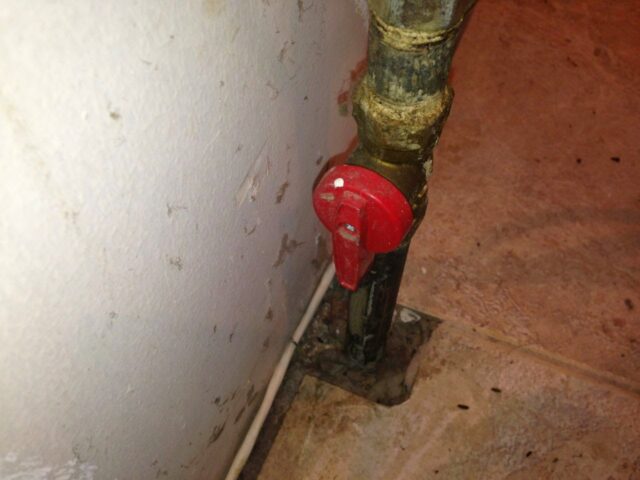 |
| Gas valve in the “on” position |
Thankfully everything worked great when I got it all put back together and hopefully it does for you as well. Let me know if you have anything to add to this tutorial in the comments section below. Also, if you have any questions please post them as well and I’d be glad to respond.
Other notes:
- If you did accidentally leave your oven on for a weekend (and your house didn’t burn down) you very likely will need to replace the igniter, because it is not meant to be left on for that long. See my post, How to Replace the Igniter on a GE XL44 Oven to see how to do that–it’s easy (a lot easier than this repair).
All my GE XL44 Oven Repair Posts:
Amazon Associate Disclosure: As an Amazon Associate I earn from qualifying purchases. This means if you click on an affiliate link and purchase the item, I will receive an affiliate commission. The price of the item is the same whether it is an affiliate link or not. Regardless, I only recommend products or services I believe will add value to Share Your Repair readers. By using the affiliate links, you are helping support Share Your Repair, and I genuinely appreciate your support.

Just to add some clarification on the loose screws. I too was able to solve the problem by tightening two screws. On this model of oven there are several different types of thermostats. Mine was the WB20K10023 (also the WB20K10008). On this thermostat there are two screws that hold the knob post to thermostat. I still had to get the thermostat out using the instructions, but simply tightening the post solved the issue.
Thanks for the post and everyone’s comments.
Thanks for your very clear instructions. After reading Wyatt Brule’s comment, I decided to check for that before ordering the part. Sure enough, the problem was simply a couple of screws on the thermostat were loose. They attach the metal knob turner to the body of the thermostat.
Here’s a link to a picture of it.
https://share.icloud.com/photos/0Fr72dAJpcl62vvk5UTBB18RQ
Thanks for this! I thought I was going to have to get a whole new oven when the repairman said he couldn’t find the part number, but I was able to do it myself and save some money. The pics and step-by-step are perfect–I’ll be following.
Thanks for the feedback Audra and great work on fixing your own oven! Next time do a google.com search first and you can save the repairman cost!
I did this today and the only problem was that I stripped one of the 3 screws that holds the electrode. Also I did not have to take the cover for the thermostat knob because one of the phillips screws underneath that holds the front cover was stripped. So I took off the thermostat anyway using a mirror since you can’t see anything of what you are doing with the cover on, if that makes sense. Just so you know that if removing the cover becomes a hassle then you can still remove the thermostat without removing the front cover. Thanks for this post, I probably would not have been able to do it without.
Thanks for the feedback Adam and good work on your repair!
Just found this problem on my xl44 to. The thermostat is noticeably bad as the knob shaft has come loose. We discovered the problem when it wouldn’t turn off. Just ordered mine off amazon.
Thanks for checking in. Make sure to unplug your oven when you are replacing the thermostat! Drop back in and let us know how the repair went.
I broke off the metal piece that sticks out where the knob slides onto. I also broke the knob. 😬 The oven works just fine I just cant tell what the temperature is, I also cannot turn the oven off! So I’ve turned the gas off.
My question is do I need to rerun the wires or could I just connect the existing wires to the new part? Thank you!
Gregori, There is no need to re-run any wiring. You can just pull the wiring connectors off the old part and slip them onto the new part. Sorry about the broken mounting bracket. It may be possible to get some sheet metal and make another one, then with self-tapping screws, screw it in place. You’ll have to feel your way through that process.
Thanks for your instructions! However, after ordering the replacement part, we discovered that the original thermostat just had a couple screws loose that needed tightening and problem solved! Didn’t need replacing!
Thanks for leaving a note. I’m glad you were able to solve your problem without the part–sometimes just knowing how an appliance comes apart can help a lot. Was your range different? I don’t remember there being electrical connections held together by screws, only slip-on electrical connections. Thanks again for taking the time to share your (successful) repair 🙂
John,
I received the replacement OEM part this week. It was a different configuration than my original part, which was also different than the one you have pictured above. I was thinking along some of the above comments, I was going to have to send it back, because it wouldn’t clear the top gas rail. I was frustrated, but I persevered. I flipped it upside down, and that position smooshed the temperature gauge wire, was up against the rail. I thought I could rig up an alternative, even drilled a hole to position it at 90 degrees to what I thought the original was. What I found is, that it can be installed, at 90 degrees, and that my part was redesigned to ONLY be installed a certain way. I noticed the clearances for the wires were better. The electric wire leads were to the right, and the temp cut off wire was to the left, the whole parts bulk was to the right this way, instead of vertical. I should have taken a picture.
So for anyone else, don’t send it back, try different positions. My oven is working and thanks for your online tutorial, it really helped as a reference!
Thank you for sharing John Paul. I would recommend to everyone to carefully verify (if possible) the pictures of the parts for sale and the part you are replacing the best you can. I really appreciate making things work–good job on figuring out how to make the part you received work on your oven.
Excellent post!!!
I’ve done a fair amount of varied repairs, and I think you did a great job writing up the process, along with the pictures.
It’s also nice to see a thread without a single troll : )
Thank you for your efforts.
Well thank you! I run spam blocking plug-ins and manually/personally approve all comments because the software doesn’t catch everything. Who wants all those mass spam posts on their website?? Thanks for taking the time to share.
Thank you so much for your step-by-step photos! I have some fear around fixing appliances or doing anything like this, but your steps made it really easy! Yay we get to have yummy baked goods for Thanksgiving! Happy Holidays!
That is great to hear! I’m glad you were able to fix it in time for Thanksgiving.
That's good to hear! I too had bought the wrong thermostat but I sent mine back. I could not get it to clear the square rail that goes right above it. I believe gas flows through that rail so I did not want to to bend it or move it out-of-the-way. How did you get yours to fit?
Thanks so much. I got it to work on the first try! I attached what logically seemed right – the red wire to the bottom fitting, etc. and viola! so happy! Cooking again!
It is fun to see the "community" here helping each other. It's my bet that it will work either way because those two wires are simply 120V AC (straight out of the wall) and there is no polarity to hooking it up. It will likely work either way. I'm so glad to hear you're back to baking Michelle–thanks for sharing!
The only thing I can say is try it- it may not matter which goes where. If it doesn't work then reverse them. I'm thinking the worst that can happen it turning up the temp may Ctually turn it down but I could be wrong.
Oops, forgot to mention that yes, I have the part where they are both on the same side.
Can anyone please help with whether or not they know which wire should go to which fitting? I can get this thermo to fit in the location, but am very confused as to which wire goes where. Help! I'm so lost without my oven. Thank you!
I unknowingly got the wrong part today. I have the whole oven torn apart. It seems to "fit" in the area okay, and I honestly think it will work, but I'm so confused as to which wire should go to which fitting because, yes, they are both on the same side. My husband and I cook so much and being without our oven all week has killed us. Please help, anyone who knows if I can make this part work tonight. Thank you!
I have done some extensive searching and I don't believe any of the ones sold on Amazon will work with our oven. We need the thermostat that has the two ears for the wiring on each side… the ones that are sold are redesigned and have the ears on the same side- this makes the profile of the thermostat too tall to screw into the front of the oven. I'm finding some decent buys on eBay but prices are about $62 or so shipped, and not under $40 which is what you and some others who bought earlier versions got- and they were the ones that worked!!
Fantastic write-up and just what I needed!! I replaced the ignitor on our XL44 last year but other things are going south as well, including the thermostat which does turn off but it is over 100 degrees too high. The only way to make it work it appears is to replace it like you did. Your link to the part is fairly old with it, the part is not on sale anymore, but thanks to your cross reference numbers, I found another one- so for $37.63 and fast free shipping (although not prime), I will get it in about 3 days. Here is the new link to the part on Amazon http://www.amazon.com/WB20K10023-WB20K10008-Kenmore-Replacement-Thermostat/dp/B00HG06196/ref=sr_1_cc_1?s=aps&ie=UTF8&qid=1422810154&sr=1-1-catcorr&keywords=WB20K10008
Once again, thanks so much for your effort in documenting this and helping another XL44 user!! Btw, my range-oven part number was different than yours but it referenced back to the same part, at least here!
David, thank you for the comment and for notifying me about the bad link. I have corrected the link and actually found the same part for a better price, see my links above. I'm glad both tutorials were able to help you out. Thanks for sharing!
Actually, my part came today- it would have worked but the gas rail at the top of the thermostat switch is too fat for the replacement part. So, I have to send this one back- It would not fit. I think it it would have fit, it would have worked… the connections are on the same side with this one too- some confusion as to which wire would go where.
There wasn't a gas connection on the thermostat on my oven–it was purely electrical. Sorry that you got the wrong one.
There wasn't a gas connection to the switch….the problem was that the redesigned part is too fat at the top that the square looking rail that runs across the front of the stove gets in the way of the new thermostat switch bolting in. There are two designs- the older type that have the ears for the wires on each side of the switch and the newer type that have the ears for the connecting wires on the same side. If you have an XL44 then you need the older type of switch…the newer type with the connecting ears on the same side won't fit because it's too fat to clear to bolt on. Even though you ordered the same part number it was long enough ago that yours has ears on the opposite side of the switch like in this picture http://3.bp.blogspot.com/-EVoKOhOeGZ4/U2D51_oszHI/AAAAAAAAI8k/We0aR9mulx8/s1600/Unrolling+the+New+Thermostat+Wire.jpg The newer switch (same part number that you link to has ears on the same side and won't work like in this picture http://ecx.images-amazon.com/images/I/819s9hSFmlL._SL1500_.jpg Just be aware and order the right one that has the connecting ears on opposite sides of the switch!! I finally found on on eBay for about $60 shipped.
Yes David, I see the difference. I am working on a relationship with another online parts website so I can have a link to the correct part since Amazon doesn't stock it anymore and will update the link as soon as I can. Thanks for all your help on clarifying this. I'm glad you were able to get the correct part finally. When the part arrives and you go to install it let me know if you run into any issues and I'll do all I can to help. Thanks, John
The part arrived today and it took me about 30 minutes to install it. Thanks again for your wonderful ride up – it was extremely helpful!!
Great to hear David, thanks for the feedback and for letting me know how your repair was successful.
Thanks for posting this. Opposite to yours, my oven will turn on. I need part WB20K8 for model JGBS23WEH1. I noticed the thermostat knob hard to turn / push in for a while now and now the oven will not warm. I think it's the thermostat, but possibly the igniter? Did you or repair person have experience or mention similar?
I have written a tutorial on how to troubleshoot your range if the oven igniter is bad and you can see that tutorial here: http://johnfixesstuff.blogspot.com/2012/11/how-to-replace-igniter-on-ge-xl44-oven.html
Let me know if that helps.
Fantastic! Thanks very much.
Thanks John! I did the voltage test and found indeed, the igniter was bad. Replaced it, it was easy. I also lubricated the Oven Thermostat knob after removing it, and it turns reasonably well once again. Thanks again!
Glad to hear you were able to fix it–that's great. Thanks for letting me know. If that thermostat knob goes out you can come back here for how to replace that!
I'm having the same problem with you oven. After you changed the switch did it ever happen again? I'm worried that it could happen again, because it seems like a problem with the switch. I feel this is a safety issue and don't understand why GE hasn't done a recall.
Thank you for your question– Our oven was about 10 years old when the thermostat went out and I replaced it a little over 4 months ago and it has worked great since. It is a little disturbing that it fails in the way it does but, I guess, not enough for me to replace the entire range.