Software:
- Mac OS 10.8+
- Automator
Step 1: Run Automator and Select “Folder Action.” Click on the magnifying glass in the top right corner of your screen and begin to type “Automator” and then when it shows up as the top hit you can just hit the Return key. Click once on “Folder Action” and then click on the “Choose” button (or just double-click on “Folder Action”).
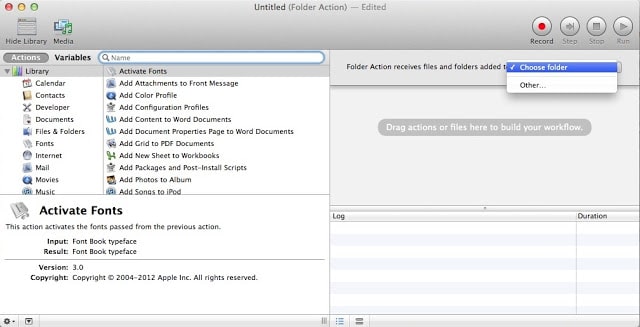
Step 2: Select the folder you wish to have the Workflow applied to. There is a drop-down window at the top of the right column that says “Choose Folder.”

Click on this drop-down menu and then click on “Other…” and it will bring up a “Choose” finder window to select the folder. Choose the folder you want the folder workflow assigned to or you can create one by browsing to the folder where you want the new folder, clicking the “New Folder” button at the bottom left corner of the window (or using the keyboard shortcut for creating a new folder: command-shift-n), naming it, then selecting it, and finally clicking the “Choose” button. My folder is called “Test Resize to 2048.” 2048 pixels is the maximum dimension Google allows if you don’t want to cut into your file size quota. You can upload unlimited files to Google+ if they are at or below this maximum dimension resolution.
Step 3: Add the “Get Selected Finder Items” Action to your workflow. In the search box at the top of the left column start to type “Get Selected Finder Items” until it shows up in the list. Note: you must have “Library” or “Files & Folders” selected in the left column for it to find it. Then click and drag it to the right Workflow window.

Step 4: Add the “Scale Images” Action to your workflow. Type “scale images” in the search box. You must have “Library” or “Photos” selected in the left column to find it. Click and drag “Scale Images” and drop it below the “Get Selected Finder Items” in the workflow window on the right.
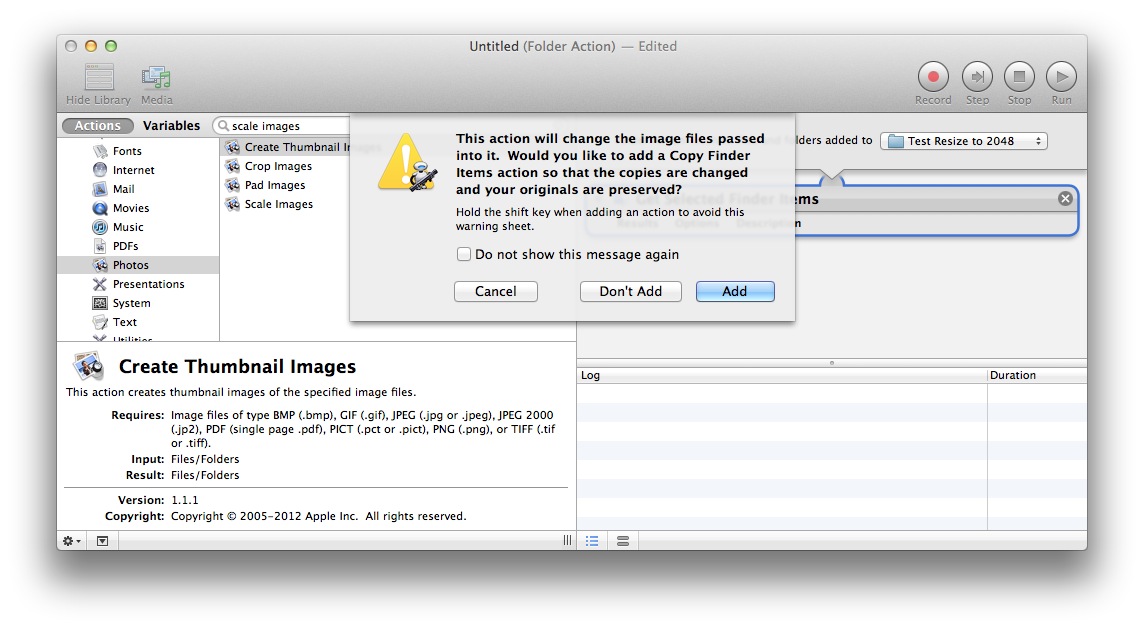
When you drop the action in the workflow window a warning will pop up reminding you that “This action will change the image files passed into it.” It goes on to say “Would you like to add a Copy Finder Items action so that the copies are changed and your originals are preserved?” I always click the “Don’t Add” button because I want it to change the files I’m dropping in the folder and I don’t want an extra copy. So click Add or Don’t Add but either way the steps will be the same. In my case I’m clicking “Don’t Add” so you won’t see the extra “Copy Finder Items” action in the workflow list like if you clicked “Add.”
Step 5: Set up the “Scale Images” action settings. The controls you are given are to either scale the image by a percentage or a set pixel size. In my case all my pictures are going to be large (from my iPhone 4S so they’ll be 3264×2448) and I want them to be set to a max dimension of 2048 pixels. So select “To Size (pixels)” from the drop-down menu and type the number of pixels in the text box to the right of the drop-down menu.

Step 6: Save and name the folder action. To save the folder action you can either select Save from the File menu at the top of the screen or simply use the keyboard shortcut: Command-s. Name the folder action something that makes sense to you and so you can remember what it does later. Click the “Save” button and you are all set.

You can now drag pictures into the folder you assigned the folder action to and they will automatically be resized. In OS 10.7 you could look for the gear in the OS X menu bar to see that the folder action is running but now in 10.8 I don’t see it. I kind of liked the feedback.
My other Apple Automator blog posts:
- How to Use Automator and Applescript to Automate Connecting to a Specific SMB Drive
- How to Create a Custom Print Workflow to Save Printed PDFs to a Folder Automatically with Automator
- How to Create a Folder Action to Resize Your Photos Using Mac OS X Automator (this post)
- How to Open Websites on Your Mac From Your iPhone Using Dropbox, a Sendtodropbox.com Account, and Folder Actions
- How to Create a Mac Application to Merge Pdf’s in Automator
- Excel Toolbars Disappear-How to Automate Fixing Them With Automator in Excel 2008 For Mac
Amazon Associate Disclosure: As an Amazon Associate I earn from qualifying purchases. This means if you click on an affiliate link and purchase the item, I will receive an affiliate commission. The price of the item is the same whether it is an affiliate link or not. Regardless, I only recommend products or services I believe will add value to Share Your Repair readers. By using the affiliate links, you are helping support Share Your Repair, and I genuinely appreciate your support.